
Adk Mcp Rag
БесплатноНе проверенA Retrieval-Augmented Generation (RAG) system that leverages Google's Agent Development Kit (ADK) and Qdrant vector database via MCP server.

Описание
A Retrieval-Augmented Generation (RAG) system that leverages Google's Agent Development Kit (ADK) and Qdrant vector database via MCP server.
README
MseeP.ai Security Assessment Badge
RAG Agent with Google ADK and Qdrant MCP server
A Retrieval-Augmented Generation (RAG) system that leverages Google's Agent Development Kit (ADK) and Qdrant vector database via MCP server.
Table of Contents
Overview
This project implements a Retrieval-Augmented Generation (RAG) system that combines the power of Google's Agent Development Kit (ADK) with Qdrant vector database (via MCP server) for efficient knowledge retrieval. The system enhances Large Language Model (LLM) responses by retrieving relevant context from a vector database before generating answers.
Architecture
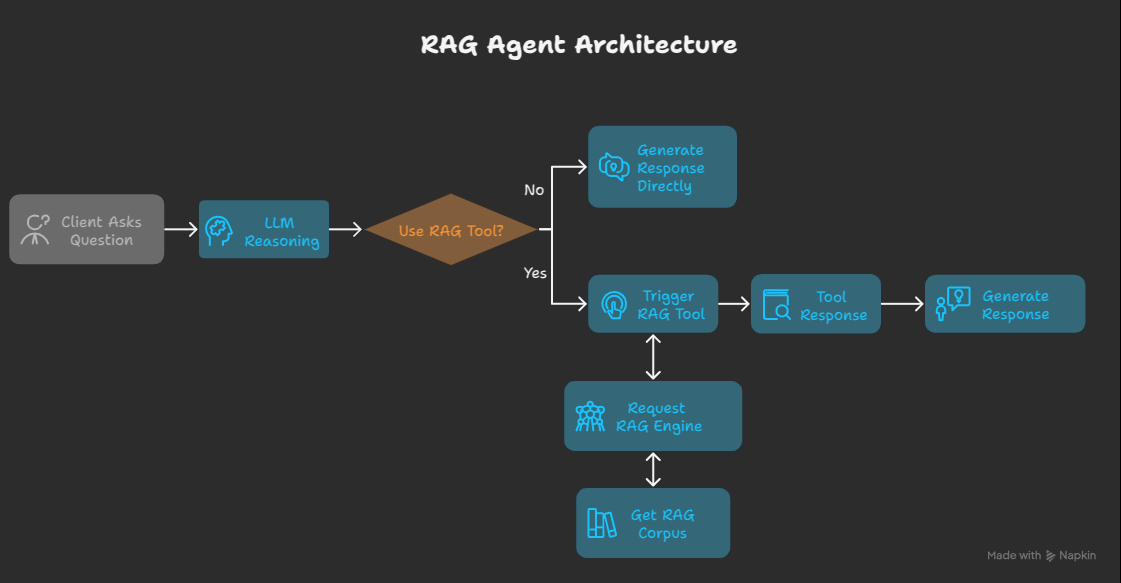
Features
- Advanced Retrieval: Semantic search powered by Qdrant vector database
- Google ADK Integration: Leverages Google's Agent Development Kit for LLM capabilities
- MCP Server: Model Context Protocol server for Qdrant vector database
- Context Augmentation: Enhances LLM responses with relevant retrieved information
- Monitoring & Logging: Comprehensive tracking of system performance
Installation
Remember to install the uv first
# Clone the repository
git clone https://github.com/khoi03/adk-mcp-rag.git
cd adk-mcp-rag

# Create a virtual environment and install dependencies
uv sync

# Activate the virtual environment
# For macOS/Linux
source .venv/bin/activate
# For Windows
.venv\Scripts\activate

# Add required dependencies via requirement file (In case there are new libs)
uv add -r requirements.txt
Configuration
Environment Variables
Create a .env file in docker directory:
# Change directory into docker
cd docker

# Set up environment variables
cp .env.example .env
# Edit .env with your API keys and configuration
Example .env file:
# -------------------
# Google API keys
# -------------------
GOOGLE_API_KEY=YOUR_VALUE_HERE

# -------------------
# OPENAI API keys
# -------------------
OPENAI_API_KEY=YOUR_VALUE_HERE

# -------------------
# ANTHROPIC API keys
# -------------------
ANTHROPIC_API_KEY=YOUR_VALUE_HERE

# -------------------
# Network names
# -------------------
NETWORK_NAME=mcp-servers

# ----------------------------------
# Parameters for Qdrant MCP Server
# ----------------------------------
QDRANT_CONTAINER_NAME=qdrant-mcp
QDRANT_URL=http://qdrant:6333
QRANT_MCP_SSE=http://localhost:8888/sse
# QDRANT_LOCAL_PATH=/qdrant/db
COLLECTION_NAME=default_collection
QDRANT_EMBEDDING_MODEL=sentence-transformers/all-MiniLM-L6-v2
QDRANT_SEARCH_LIMIT=3
FASTMCP_HOST=0.0.0.0
FASTMCP_PORT=8888
Build Qdrant and Qdrant MCP
Build Qdrant and Qdrant MCP server using Docker Compose after completing the configuration steps:
# Build and start services
docker compose -p qdrant-mcp up --build -d

# Check running services
docker compose ps

# View logs
docker compose logs -f

# Stop and remove services
docker compose -p qdrant-mcp down
You can also access qdrant web UI at http://localhost:6333/dashboard
Usage
Document Ingestion
Push all your needed files into the data directory and run:
python local_vector_store/prepare_corpus_and_data_locally.py
Note: Currently only processes .md and .pdf files. The system will:
- Extract text from the documents
- Split the text into manageable chunks
- Generate embeddings for each chunk
- Store the embeddings in the Qdrant vector database
Basic Usage
To test and run the system with default settings:
python main.py
Built-in ADK-UI
For tracing, testing, and debugging with a UI, run the built-in web interface provided by ADK:
adk web
Project Structure
adk-mcp-rag/
├── assets/                  # Images and static files
├── data/                    # Documents for ingestion
├── docker/                  # Docker configurations
│   ├── .env.example         # Example environment variables
│   ├── Dockerfile.qdrant    # Docker file for qdrant mcp
│   └── docker-compose.yml   # Docker Compose configuration
├── agents/                  # Main code
│   ├── config/prompts.yml   # Store prompts
│   ├── tools/               # Embedding generation
│       ├── mcp_tools.py     # Manage MCP Tools
│       └── prompts.py       # Manage Prompts
│   └── agent/               # Manage agents
├── .gitignore               # Git ignore file
├── main.py                  # Main entry point
├── README.md                # This file
└── requirements.txt         # Python dependencies
Установка Adk Mcp Rag
У этого сервера нет опубликованного пакета — он собирается из исходников. Открой репозиторий и следуй инструкции в README.
▸ github.com/khoi03/adk-mcp-ragFAQ
Adk Mcp Rag MCP бесплатный?
Да, Adk Mcp Rag MCP бесплатный — установка в пару кликов через Unyly без оплаты.
Нужен ли API-ключ для Adk Mcp Rag?
Нет, Adk Mcp Rag работает без API-ключей и переменных окружения.
Adk Mcp Rag — hosted или self-hosted?
Self-hosted: сервер запускается локально на твоей машине командой из раздела установки.
Как установить Adk Mcp Rag в Claude Desktop, Claude Code или Cursor?
Открой Adk Mcp Rag на unyly.org, выбери вкладку своего клиента (Claude Desktop, Claude Code, Cursor) и нажми Install — конфиг сгенерируется автоматически, без правки JSON.
Похожие MCP
wenb1n-dev/SmartDB_MCP
A universal database MCP server supporting simultaneous connections to multiple databases. It provides tools for database operations, health analysis, SQL optim
 автор: wenb1n-dev
Postgres Server
This server enables interaction with PostgreSQL databases through the Model Context Protocol, optimized for the AWS Bedrock AgentCore Runtime. It provides tools
 автор: madhurprash
Postgres
Query your database in natural language
 автор: Anthropic
PostgreSQL
Read-only database access with schema inspection.
автор: modelcontextprotocolCompare Adk Mcp Rag with
Не уверен что выбрать?
Найди свой стек за 60 секунд
Автор?
Embed-бейдж для README
Похожее
Все в категории data