
GoLogin MCP server
БесплатноНе проверенManage your GoLogin browser profiles and automation directly through AI conversations!

Описание
Manage your GoLogin browser profiles and automation directly through AI conversations!
README
Manage your GoLogin browser profiles and automation directly through AI conversations. This MCP server connects to the GoLogin API, letting you create, configure, and control browser profiles using natural language.
What You Can Do
With GoLogin MCP Server, you can:
- Manage browser profiles - Create, update, delete, and list your browser profiles
- Configure proxies - Set up and modify proxy settings for your profiles
- Handle fingerprints - Customize browser fingerprints and user agents
- Manage folders - Organize your profiles into folders
- Account information - Check your subscription status and usage
Example Use Cases
- "Create a new browser profile with a US proxy"
- "Show me all my browser profiles"
- "Update the proxy settings for my profile"
- "Delete old profiles I no longer need"
- "Check my GoLogin account status"
- "Create a folder to organize my profiles"
Setup for MCP Clients
Claude Desktop
How to connect Gologin MCP with Claude Desktop:
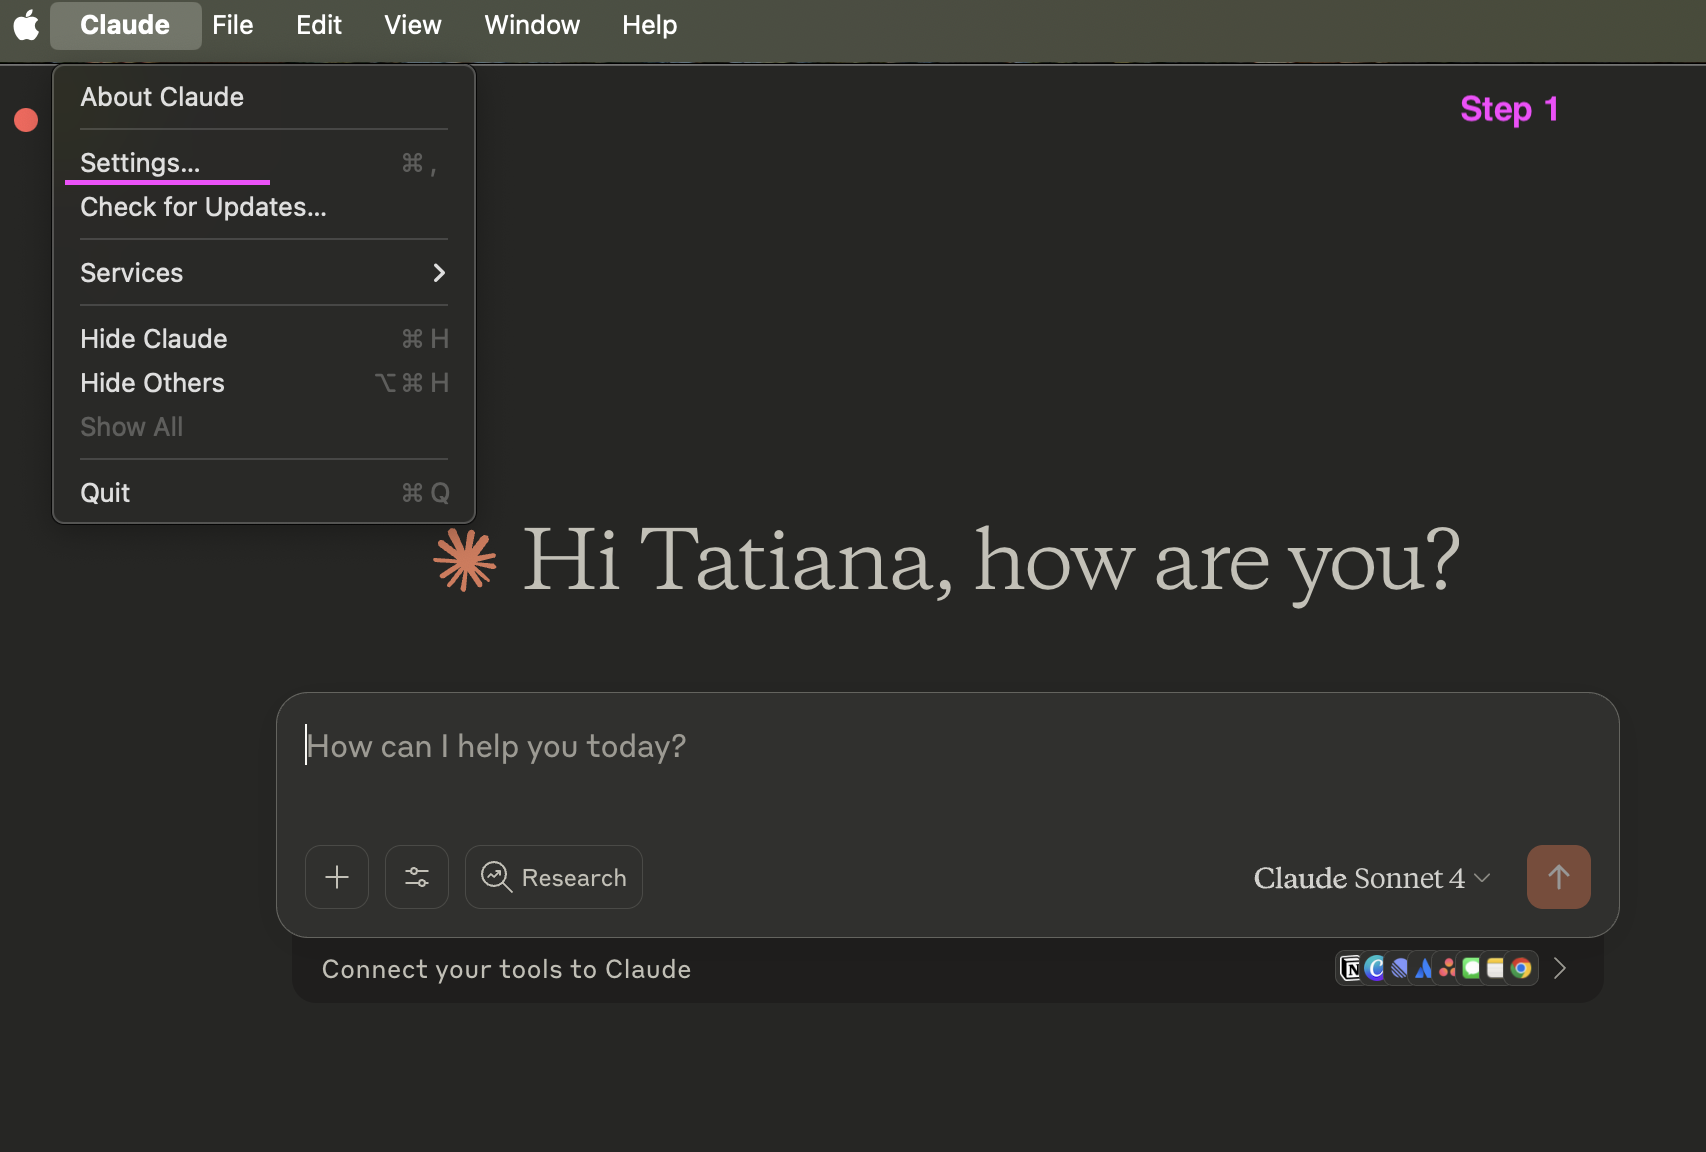
Step 1: Access Claude Desktop settings
Open your Claude Desktop application. In the top menu bar, click on 'Claude' and then select 'Settings...'.
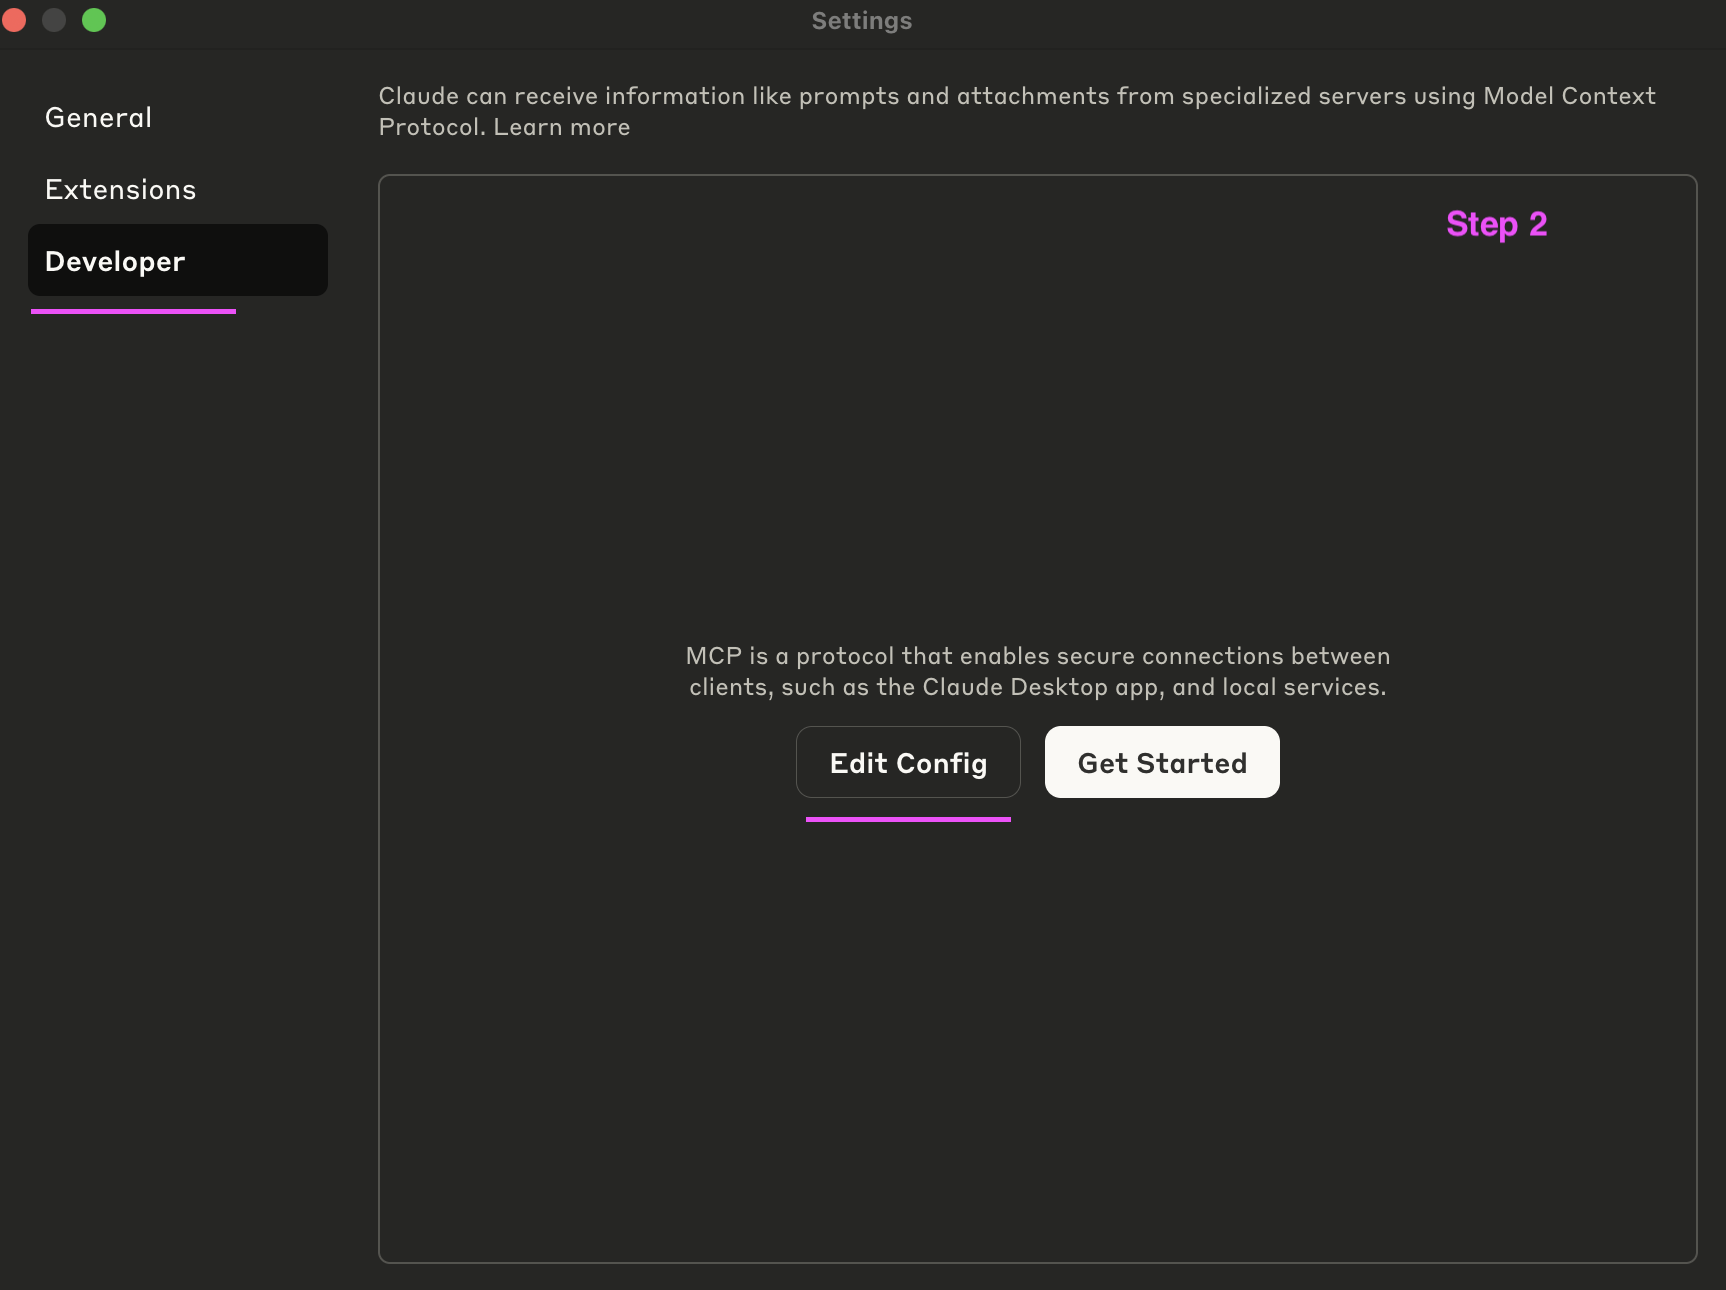
Step 2: Navigate to developer settings
In the Settings window, on the left sidebar, click on 'Developer'. This section manages connections via the Model Context Protocol. Click the 'Edit Config' button to open the configuration file.
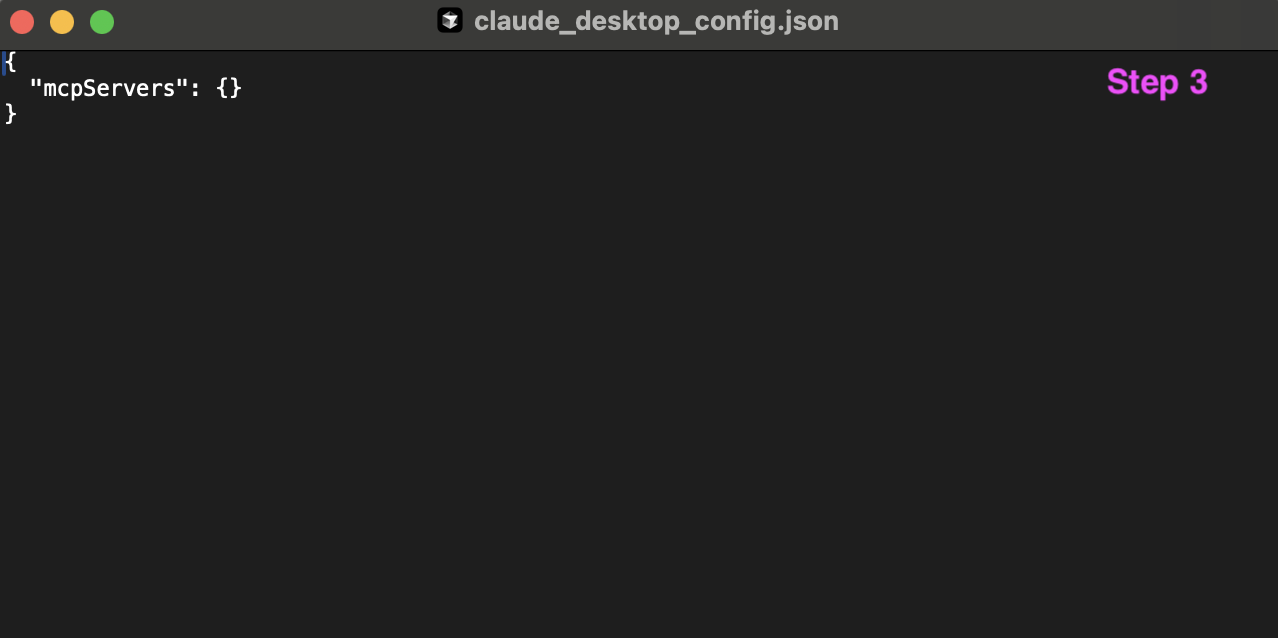
Step 3: Locate claude_desktop_config.json
This action will open the claude_desktop_config.json file in your default text editor. This file is where you configure your MCP servers.
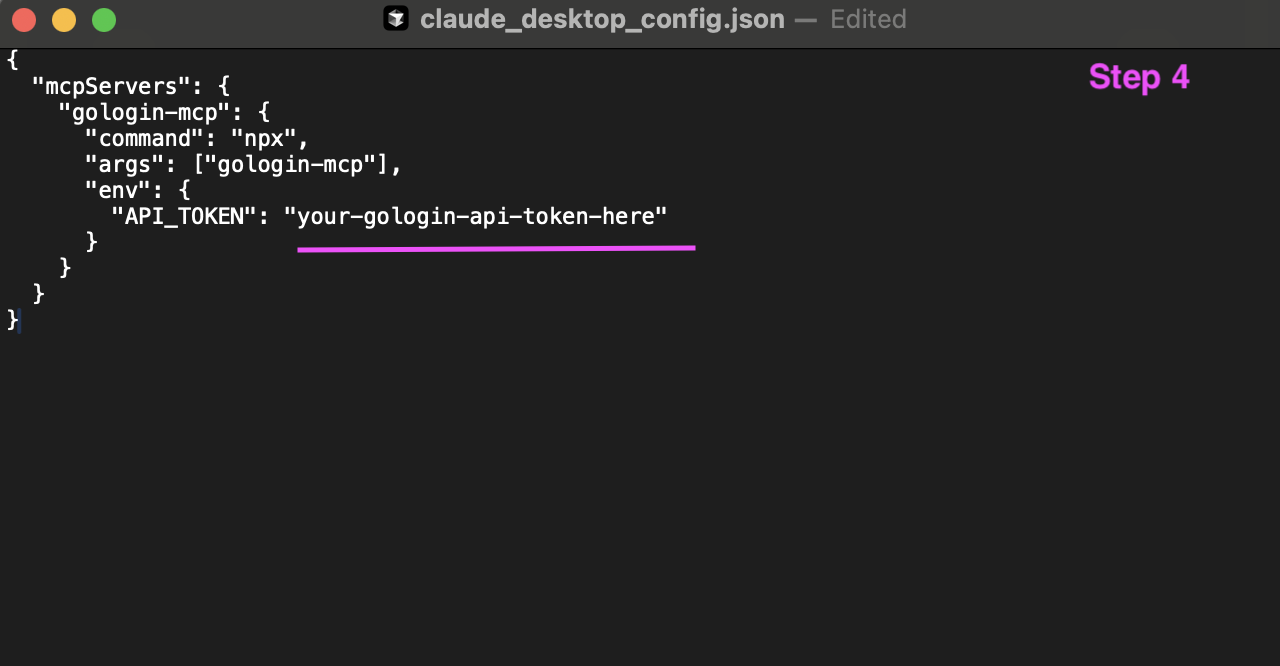
Step 4: Add Gologin MCP configuration
You need to add the GoLogin MCP server configuration details within the mcpservers object. Carefully paste the following JSON snippet into your claude_desktop_config.json file. Important: Replace 'your-gologin-api-token-here' with your actual GoLogin API token. Ensure the JSON structure remains correct after pasting.
{
  "mcpServers": {
    "gologin-mcp": {
      "command": "npx",
      "args": ["gologin-mcp"],
      "env": {
        "API_TOKEN": "your-gologin-api-token-here"
      }
    }
  }
}
Step 5: Verify connection in connectors
After saving the claude_desktop_config.json file, it is recommended to restart Claude Desktop to ensure the new configuration is loaded. Once Claude restarts, navigate back to its 'Settings'. Under the 'Connectors' section (which might be under 'General' or 'Extensions' depending on your Claude version), you should now see 'gologin-mcp LOCAL' listed as a connected service. This indicates a successful integration.
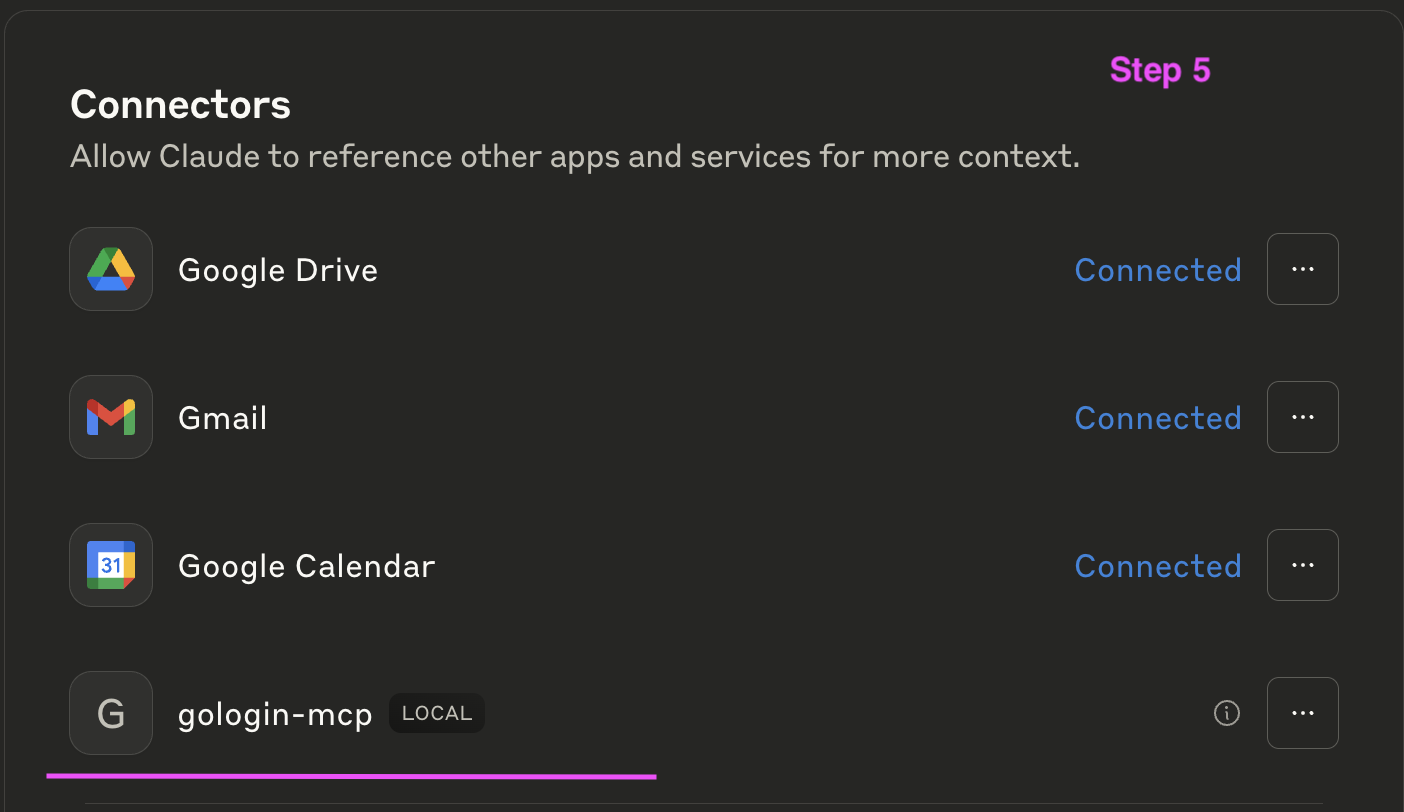
Congratulations! You have successfully connected GoLogin MCP with Claude Desktop. Your AI assistant can now leverage Gologin profiles for various tasks.
Cursor
Configure in Cursor:
Add to your Cursor MCP configuration:
{
  "mcpServers": {
    "gologin-mcp": {
      "command": "npx",
      "args": ["gologin-mcp"],
      "env": {
        "API_TOKEN": "your-gologin-api-token-here"
      }
    }
  }
}
Other MCP Clients
For other MCP-compatible clients, use the same configuration pattern with the appropriate config file location for your client.
Getting Your API Token
- Log in to your GoLogin account
- Go to API settings
- Generate or copy your API token
- Use this token in the configuration above
Example Workflow
Check your account: "What's my GoLogin account status?"
Create a profile: "Create a new browser profile with Chrome browser and a US proxy"
Manage profiles: "Show me all my profiles" "Update the proxy for profile ID 123 to use a UK proxy" "Delete the profile named 'test-profile'"
Organize profiles: "Create a folder called 'Social Media Accounts'" "Move profile XYZ to the Social Media Accounts folder"
Control browsers: "Start a browser session for my profile" "Stop all running browser sessions"
Requirements
- Node.js 18 or higher
- Valid GoLogin API token
- Active GoLogin account
Установка GoLogin MCP server
У этого сервера нет опубликованного пакета — он собирается из исходников. Открой репозиторий и следуй инструкции в README.
▸ github.com/gologinapp/gologin-mcpFAQ
GoLogin MCP server MCP бесплатный?
Да, GoLogin MCP server MCP бесплатный — установка в пару кликов через Unyly без оплаты.
Нужен ли API-ключ для GoLogin MCP server?
Нет, GoLogin MCP server работает без API-ключей и переменных окружения.
GoLogin MCP server — hosted или self-hosted?
Self-hosted: сервер запускается локально на твоей машине командой из раздела установки.
Как установить GoLogin MCP server в Claude Desktop, Claude Code или Cursor?
Открой GoLogin MCP server на unyly.org, выбери вкладку своего клиента (Claude Desktop, Claude Code, Cursor) и нажми Install — конфиг сгенерируется автоматически, без правки JSON.
Похожие MCP
Playwright
Browser automation, scraping, screenshots
 автор: Microsoft
Puppeteer
Browser automation and web scraping.
 автор: modelcontextprotocol
opentabs-dev/opentabs
Plugin-based MCP server + Chrome extension that gives AI agents access to web applications through the user's authenticated browser session. 100+ plugins with a
 автор: opentabs-dev
robhunter/agentdeals
1,500+ developer infrastructure deals, free tiers, and startup programs across 54 categories. Search deals, compare vendors, plan stacks, and track pricing chan
 автор: robhunter
Compare GoLogin MCP server with
Не уверен что выбрать?
Найди свой стек за 60 секунд
Автор?
Embed-бейдж для README
Похожее
Все в категории browse