
Meteo Swiss
БесплатноНе проверенExposes Swiss weather forecast data as MCP tools, including rainfall, sunshine, temperature, wind, and more, with local caching.

Описание
Exposes Swiss weather forecast data as MCP tools, including rainfall, sunshine, temperature, wind, and more, with local caching.
README



A Model Context Protocol (MCP) server that exposes Swiss weather forecast data callable tools.
It fetches data from the official MeteoSwiss meteodata-lab, caches it locally, and serves predictions such as rainfall, sunshine, temperature, etc. The prediction data is from the ICON-CH2-EPS forecast system that produces data for up to 5 days ahead.
Additionally there is also a MCP client that can be run to test the server using the stdio transport.
Note:
This project is not an official MeteoSwiss product.
All forecast data are from the MeteoSwiss Open Data portal.
Source: MeteoSwiss
📦 Installation
# Clone the repo
git clone https://github.com/cuolm/meteo-swiss-mcp.git
cd meteo-swiss-mcp

# Create a virtual environment
python -m venv .venv
source .venv/bin/activate   # Windows: .\.venv\Scripts\activate

# Install dependencies
pip install -r requirements.txt
Note:
- Ollama is optional – only needed if you want to use the MCP client
meteo_swiss_mcp_client.py. - The server uses a cache (
cache/EarthKitCache) to avoid re‑downloading weather data. Clear it withrm -rf cache/EarthKitCacheif needed. - The server uses a cache (
cache/nominatim_geocode_cache.json) for lat/lon lookups. Clear it withrm -rf cache/nominatim_geocode_cache.jsonif needed.
⚙️ Server Configuration
Create a .env file in the root directory and specify an environment variable that tells Nominatim (the geocoding service) who is making the call.
echo 'NOMINATIM_USER_AGENT="YourWeatherMCPServer/1.0 ([email protected])"' > .env
🚀 Running the Server
# stdio (default)
python src/meteo_swiss_mcp_server.py

# streamable-http
python src/meteo_swiss_mcp_server.py --transport=streamable-http --host=localhost --port=8050
Optional flags: --help
🐳 Running the Server with Docker
Run the MCP server in Docker with these steps:
- Create a
.envfile in the project root containing your Nominatim user agent environment variable (replace"YourWeatherMCPServer/1.0 ([email protected])"):
echo 'NOMINATIM_USER_AGENT="YourWeatherMCPServer/1.0 ([email protected])"' > .env
- Build the Docker image from the root folder:
docker build -t meteo_swiss_mcp_server .
- Run the container, passing the
.envfile and mapping port 8050:
docker run --env-file .env -p 8050:8050 meteo_swiss_mcp_server
- Access the server at:
http://localhost:8050/mcp/
This runs the MCP server isolated with all dependencies and environment variables preconfigured.
🖥️ Running the MCP Client using Stdio Transport
The MCP client src/meteo_swiss_mcp_client.py can be used to test the server over the stdio transport.
Make sure Ollama is installed on your system. You can download it here or install via Homebrew on macOS: brew install ollama
# Pull a local Ollama LLM model (e.g. qwen3:4b)
ollama pull qwen3:4b

# Run the MCP client (the client script will automatically start the server)
python src/meteo_swiss_mcp_client.py --model=qwen3:4b --server-script=src/meteo_swiss_mcp_server.py
🔧 Available Tools
| Tool | Purpose | Example Call |
|---|---|---|
current_date_and_time() |
Current date and time (weekday day.month.year hour:minute:second) in Swiss local time | current_date_and_time() |
total_rainfall(location, lead_time_start_swiss, lead_time_end_swiss) |
Total rainfall (mm) for a period | total_rainfall("Zurich", 24, 48) |
sunshine_hours(location, lead_time_start_swiss, lead_time_end_swiss) |
Sunshine hours for a period | sunshine_hours("Zurich", 24, 48) |
temperature(location, lead_time_swiss) |
Max temperature (°C) at a specific lead time | temperature("Zurich", 36) |
wind_speed(location, lead_time_swiss) |
Wind speed (m/s) at a specific lead time | wind_speed("Zurich", 36) |
pressure_msl(location, lead_time_swiss) |
Sea‑level pressure (Pa) at a specific lead time | pressure_msl("Zurich", 36) |
total_cloud_cover(location, lead_time_swiss) |
Cloud cover (%) at a specific lead time | total_cloud_cover("Zurich", 36) |
snow_depth(location, lead_time_swiss) |
Snow depth (m) at a specific lead time | snow_depth("Zurich", 36) |
precipitation_rate(location, lead_time_swiss) |
Precipitation rate (mm/s) at a specific lead time | precipitation_rate("Zurich", 36) |
| Lead Time |
- Lead time is the number of hours counted from Swiss local time 00:00, internally converted to UTC (the ICON-CH2-EPS forecast system uses UTC).
- Example: A lead time of 36 hours returns the forecast for 12:00 Swiss local time tomorrow.
- Minimum lead time: 2 hours; maximum lead time: 121 hours.
📂 Project Structure
meteo-swiss-mcp/
├── src/
│   ├── meteo_swiss_mcp_server.py   # MCP server
│   ├── meteo_swiss_predictions.py  # Data fetching logic
│   └── meteo_swiss_mcp_client.py   # MCP client (optional)
├── requirements.txt
├── .env
│
├── cache/
├── tests/
├── docs/
└── Dockerfile
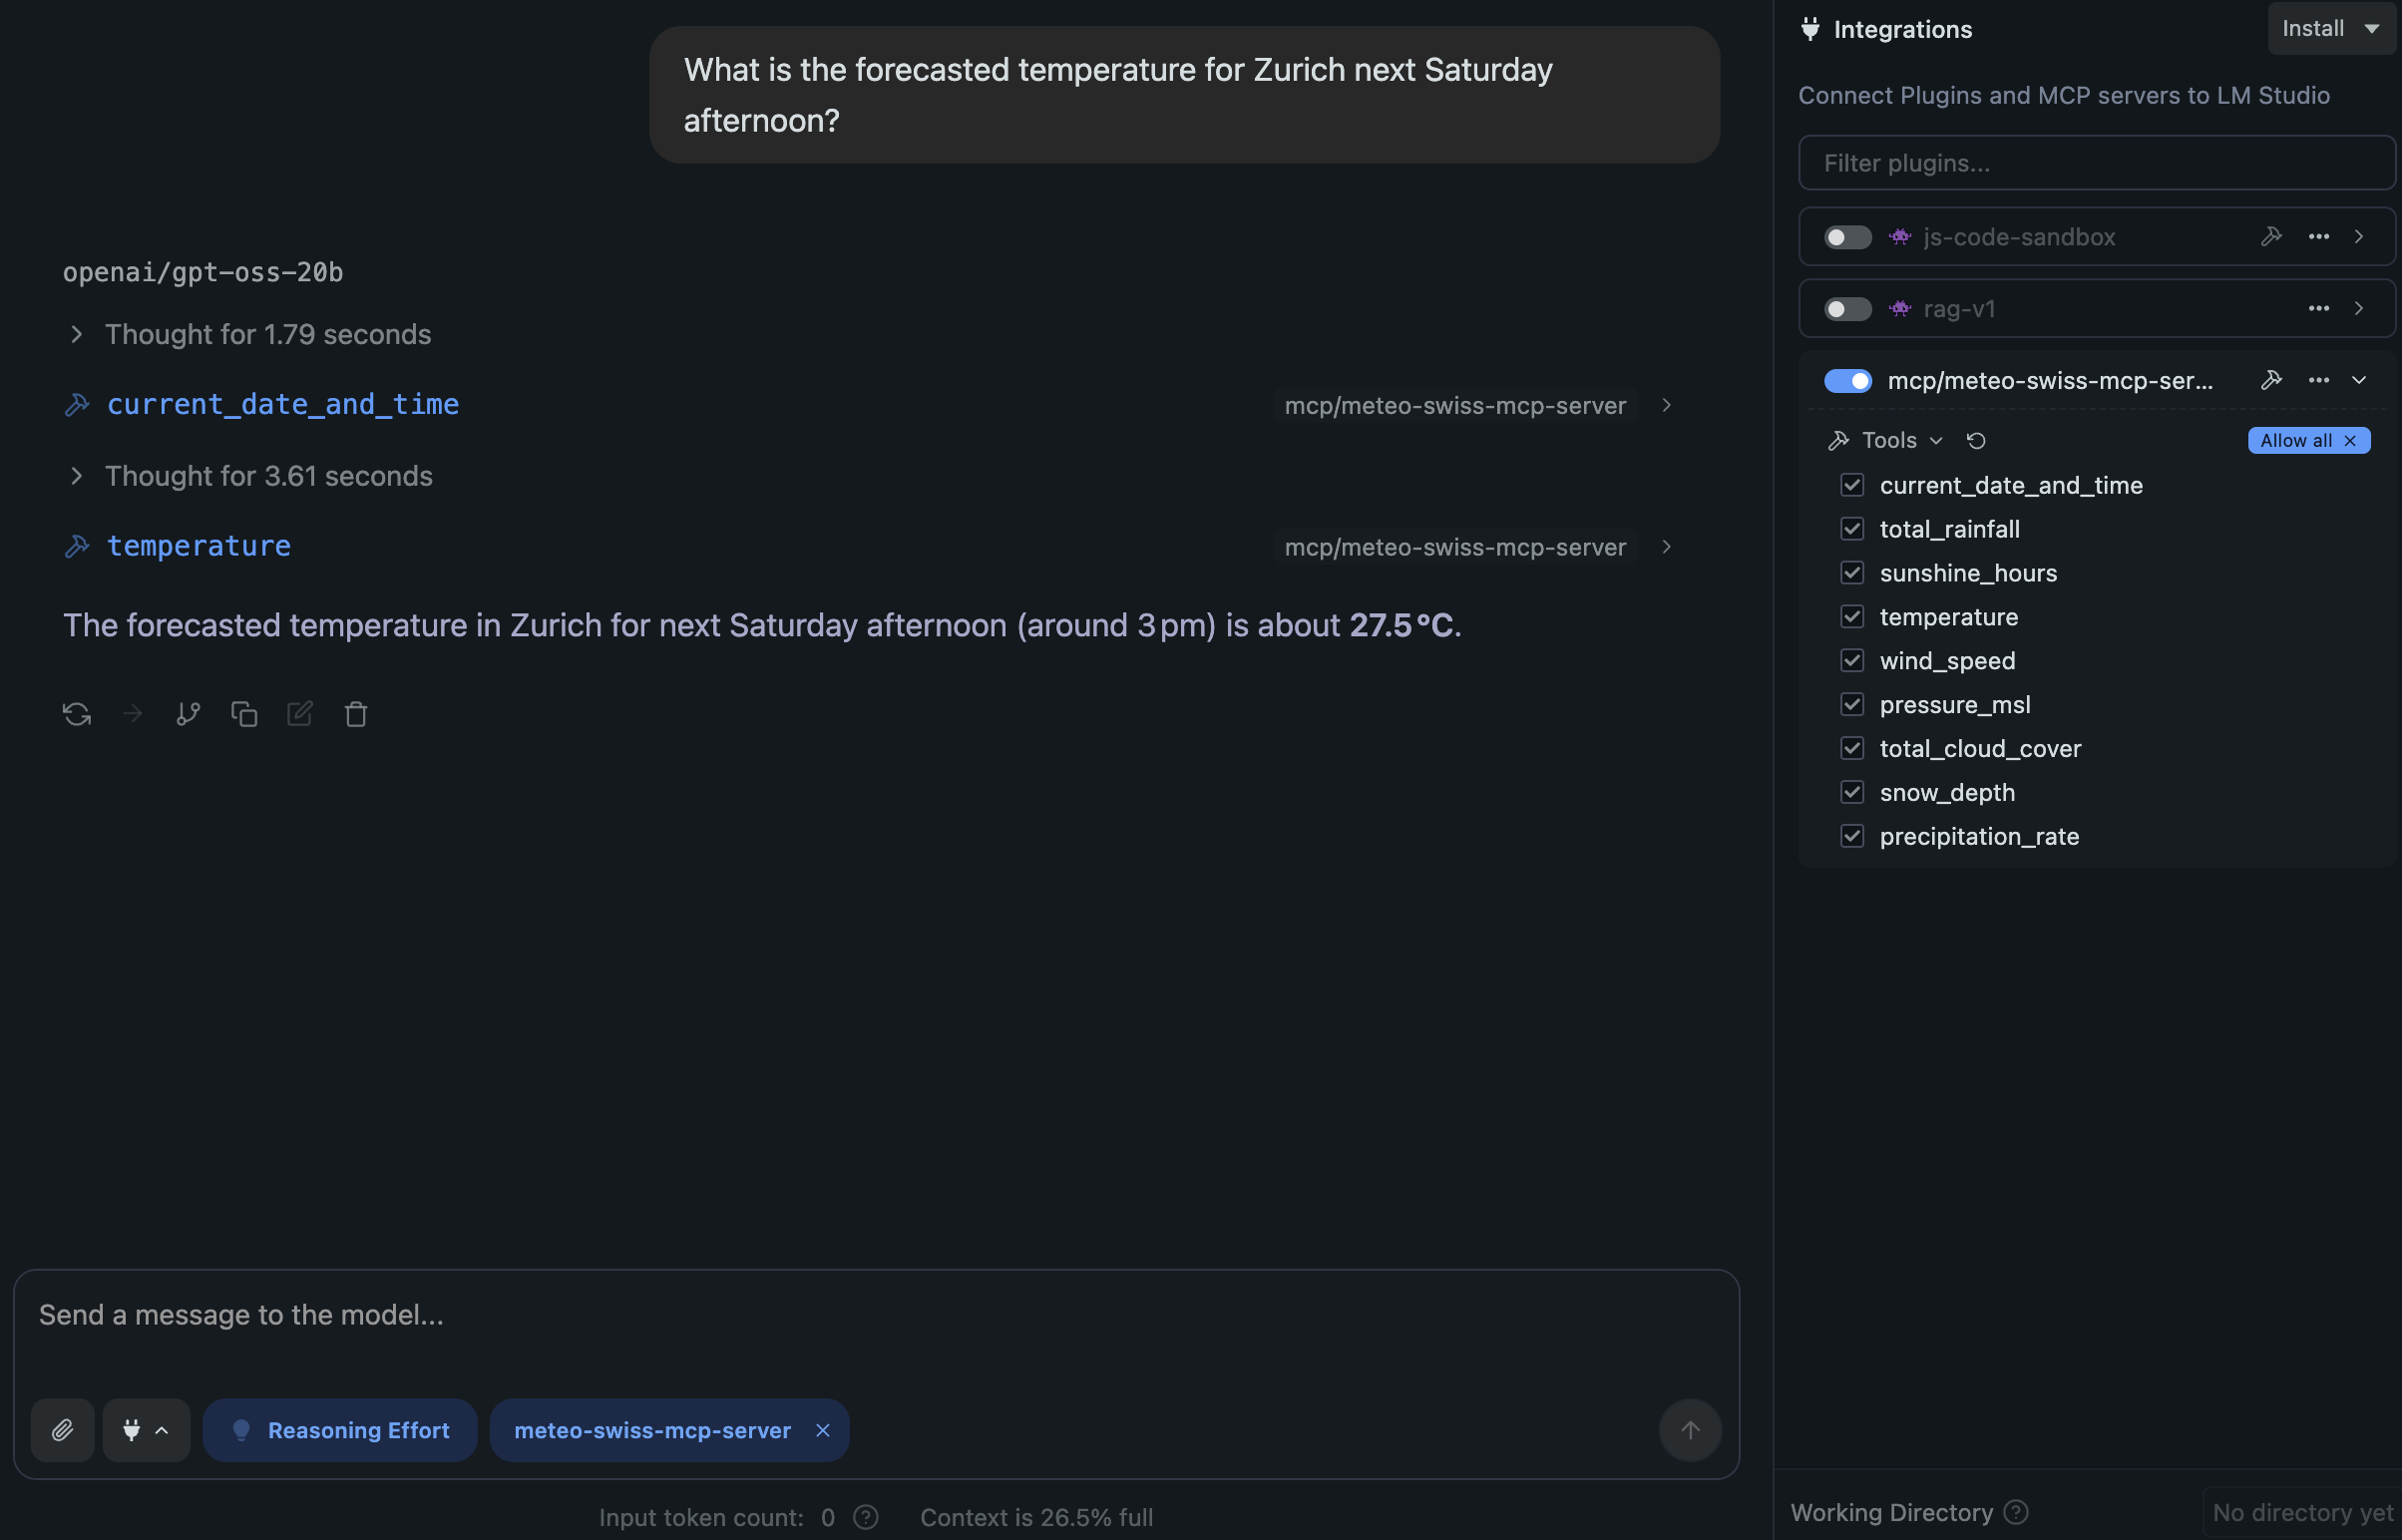
⚡ Example Usage with LMStudio
Using the streamable-http transport layer
Configure the mcp.json file in LMStudio:
{
  "mcpServers": {
    "meteo_swiss_mcp_server": {
      "url": "http://localhost:8050/mcp/"
    }
  }
}
Run the MCP server with the streamable-http transport layer:
# Make sure the virtual environment is activated
source .venv/bin/activate

python src/meteo_swiss_mcp_server.py --transport=streamable-http --host=localhost --port=8050
Using the stdio transport layer
Configure the mcp.json file in LMStudio. Replace <path-to-the-project> with your actual local path:
{
  "mcpServers": {
    "meteo_swiss_mcp_server": {
      "command": "<path-to-the-project>/.venv/bin/python",
      "args": [
        "<path-to-the-project>/src/meteo_swiss_mcp_server.py"
      ]
    }
  }
}
🧪 Tests
Run all tests with:
cd tests
pytest
📚 Useful Resources
📄 License
This project is licensed under the Apache License 2.0.
Установка Meteo Swiss
У этого сервера нет опубликованного пакета — он собирается из исходников. Открой репозиторий и следуй инструкции в README.
▸ github.com/cuolm/meteo-swiss-mcpFAQ
Meteo Swiss MCP бесплатный?
Да, Meteo Swiss MCP бесплатный — установка в пару кликов через Unyly без оплаты.
Нужен ли API-ключ для Meteo Swiss?
Нет, Meteo Swiss работает без API-ключей и переменных окружения.
Meteo Swiss — hosted или self-hosted?
Доступен hosted-вариант: Unyly запускает сервер в облаке, локальная установка не обязательна.
Как установить Meteo Swiss в Claude Desktop, Claude Code или Cursor?
Открой Meteo Swiss на unyly.org, выбери вкладку своего клиента (Claude Desktop, Claude Code, Cursor) и нажми Install — конфиг сгенерируется автоматически, без правки JSON.
Похожие MCP
GitHub
PRs, issues, code search, CI status
 автор: GitHub
Filesystem
Secure file operations with configurable access controls.
Memory
Knowledge graph-based persistent memory system.
Template MCP Server
A CLI tool to create a new Model Context Protocol server project with TypeScript support, dual transport options, and an extensible structure
 автор: mcpdotdirect
Compare Meteo Swiss with
Не уверен что выбрать?
Найди свой стек за 60 секунд
Автор?
Embed-бейдж для README
Похожее
Все в категории development