loading…
en/
Browse all
SJTU
FreeWraps the SJTU Zhiyuan No.1 API as a local MCP server, allowing direct use of SJTU models in Claude Code and Codex without custom integration scripts.
About
Wraps the SJTU Zhiyuan No.1 API as a local MCP server, allowing direct use of SJTU models in Claude Code and Codex without custom integration scripts.
README
English | 中文
Turn your SJTU Zhiyuan No.1 API key into something you can actually use in Claude Code and Codex.
SJTU MCP wraps the SJTU-hosted model API as a local MCP server, so you can call these models directly from your normal agent workflow instead of hand-writing integration scripts over and over again.
Why This Exists
Have you already applied for an SJTU Zhiyuan No.1 API key, but still found it hard to actually use in practice?
This project exists to solve exactly that problem:
- you already have API access
- you want to use it from
Claude CodeorCodex - but the SJTU endpoint itself does not plug directly into these agent tools out of the box
- you do not want to rewrite the integration layer every time
Highlights
- Supports
Claude Code - Supports
Codex - Supports both text and vision tasks
- Uses the SJTU OpenAI-compatible endpoint
- Fits naturally into existing MCP workflows
Contents
Quick Start
For most users, the simplest path is:
git clonethis repocdinto the project directory- install it once
- add it as a global MCP server in
Claude CodeorCodex
git clone https://github.com/EternalWavee/sjtu-mcp.git
cd sjtu-mcp
pip install -e .
After installation, your MCP client can start the server automatically when needed. In normal use, you do not need to manually run the server command every time.
Environment Variables
Required:
SJTU_API_KEY
Optional:
SJTU_API_BASE_URLSJTU_DEFAULT_TEXT_MODELSJTU_DEFAULT_REASONING_MODELSJTU_DEFAULT_VISION_MODELSJTU_REQUEST_TIMEOUT
How to use them:
- .env.example is only a template showing which variables you need
- in actual use, put these values into the
envblock of your MCP configuration
Claude Code
Recommended: User Scope
Use this if you want sjtu available in all your Claude Code projects on this machine.
claude mcp add sjtu --scope user -- python -m sjtu_mcp.server
Then:
- open
~/.claude.json - find the
sjtuentry - copy the
envsection from examples/claude-project.mcp.json - replace
your-api-keywith your real key
Verify:
claude mcp list
Project Scope
Use this if you want to commit a shared config into the repo for teammates.
How to use it:
- copy examples/claude-project.mcp.json into your project root as
.mcp.json - replace
your-api-keywith your real key - adjust default models and timeout if needed
Windows / macOS example:
{
  "mcpServers": {
    "sjtu": {
      "command": "python",
      "args": ["-m", "sjtu_mcp.server"],
      "env": {
        "SJTU_API_BASE_URL": "https://models.sjtu.edu.cn/api/v1",
        "SJTU_API_KEY": "your-api-key",
        "SJTU_DEFAULT_TEXT_MODEL": "deepseek-chat",
        "SJTU_DEFAULT_REASONING_MODEL": "deepseek-reasoner",
        "SJTU_DEFAULT_VISION_MODEL": "qwen3vl",
        "SJTU_REQUEST_TIMEOUT": "180"
      }
    }
  }
}
Local Scope
Use this if you only want the server for the current project and do not want to commit the config.
claude mcp add sjtu --scope local -- python -m sjtu_mcp.server
Then add the same env values to the corresponding MCP config entry.
Codex
Recommended: Global Setup
Use this if you want sjtu available in all your Codex projects on this machine.
codex mcp add sjtu -- python -m sjtu_mcp.server
Then:
- open your own
~/.codex/config.toml - copy the content from examples/codex-config.toml
- replace
your-api-keywith your real key - save and reload Codex or reload MCP
Verify:
codex mcp list
Config File Setup
If you already manage ~/.codex/config.toml directly, you can use this template:
[mcp_servers.sjtu]
command = "python"
args = ["-m", "sjtu_mcp.server"]

[mcp_servers.sjtu.env]
SJTU_API_BASE_URL = "https://models.sjtu.edu.cn/api/v1"
SJTU_API_KEY = "your-api-key"
SJTU_DEFAULT_TEXT_MODEL = "deepseek-chat"
SJTU_DEFAULT_REASONING_MODEL = "deepseek-reasoner"
SJTU_DEFAULT_VISION_MODEL = "qwen3vl"
SJTU_REQUEST_TIMEOUT = "180"
Tools
sjtu_modelssjtu_textsjtu_visionsjtu_cheap_task
Example
Input
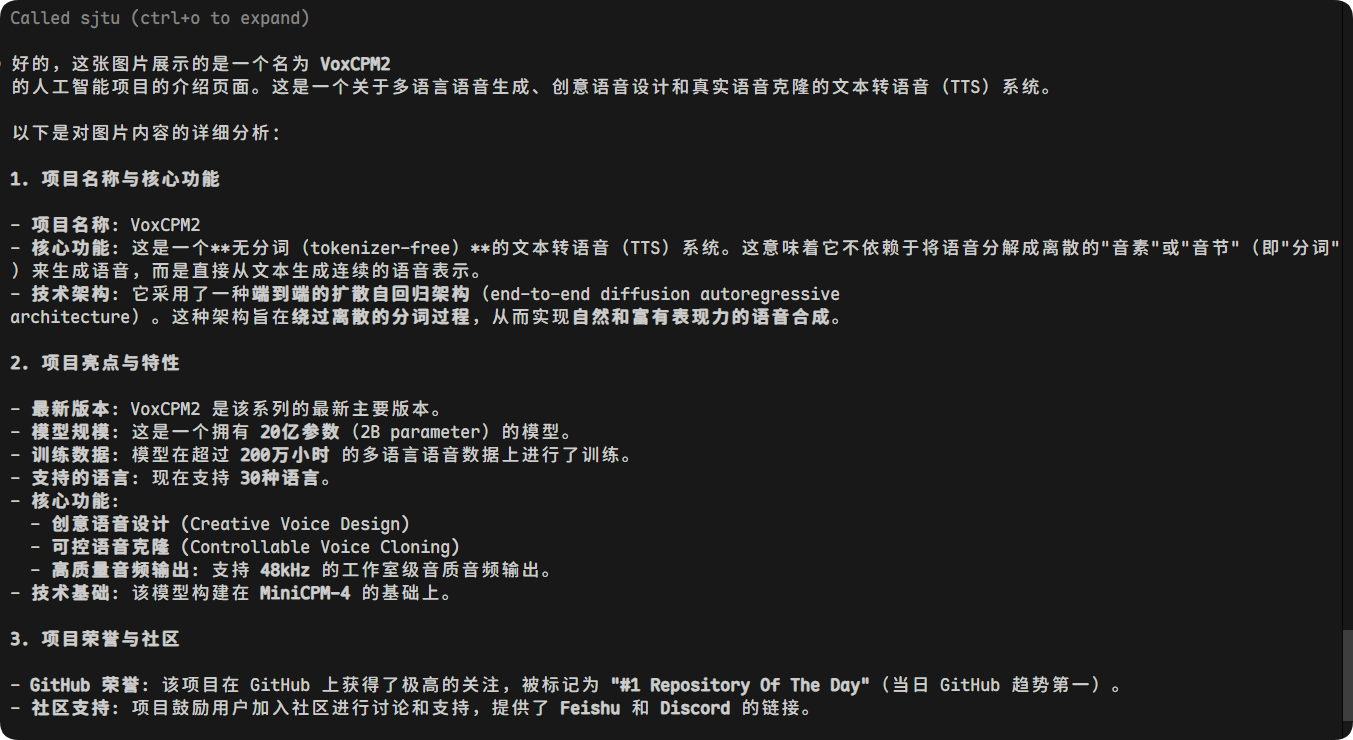
请调用 sjtu_vision 分析图片里面的内容 .assets/test.png

Output
Suggested Model Usage
deepseek-chat- default for summaries, rewrites, cleanup, and low-risk text tasks
minimaxorglm-5- useful for lightweight rewriting, classification, or extraction
deepseek-reasoner- better for tasks that truly need multi-step reasoning
qwen3vl- a strong starting point for screenshots, OCR-style extraction, and image understanding
qwen3coder- useful for code-adjacent utility tasks
Notes
- This server currently assumes the SJTU endpoint supports OpenAI-compatible
/modelsand/chat/completions. - Local images are encoded as data URLs before sending.
- If your campus endpoint has model-specific quirks, extend the routing in src/sjtu_mcp/server.py.
Install SJTU in Claude Desktop, Claude Code & Cursor
Run in your terminal:
claude mcp add sjtu-mcp -- npx FAQ
Is SJTU MCP free?
Yes, SJTU MCP is free — one-click install via Unyly at no cost.
Does SJTU need an API key?
No, SJTU runs without API keys or environment variables.
Is SJTU hosted or self-hosted?
Self-hosted: the server runs locally on your machine via the install command above.
How do I install SJTU in Claude Desktop, Claude Code or Cursor?
Open SJTU on unyly.org, pick your client tab (Claude Desktop, Claude Code, Cursor) and press Install — the config is generated automatically, no JSON editing.


