
ABsmartly Server
БесплатноНе проверенProvides access to the ABsmartly experimentation platform with 230+ commands across 33 groups for experiment lifecycle, metrics, goals, teams, etc.

Описание
Provides access to the ABsmartly experimentation platform with 230+ commands across 33 groups for experiment lifecycle, metrics, goals, teams, etc.
README
A Model Context Protocol server that provides full access to the ABsmartly experimentation platform through the CLI core library — 230+ commands across 33 groups including experiment lifecycle, metrics, goals, teams, and more.
Quick install for Claude Desktop
Install DXT for Claude Desktop
Download and double-click the file to install. For other clients (Cursor, VS Code, Windsurf, ChatGPT, Claude Code), see Setup below.
How It Works
The server exposes 4 tools that give AI assistants access to the full ABsmartly CLI:
| Tool | Purpose |
|---|---|
discover_commands |
Browse command groups or search by keyword |
get_command_docs |
Get detailed docs for a specific command |
execute_command |
Execute any command with typed parameters |
get_auth_status |
Check authentication status |
"What experiments are running?"
  → discover_commands(group: "experiments")
  → execute_command(group: "experiments", command: "listExperiments", params: {state: "running"})
Setup
Authentication Methods
The MCP server supports two authentication methods:
| Method | Best for | How it works |
|---|---|---|
| API Key | Programmatic access, CI/CD, headless | Pass key in headers or CLI config |
| OAuth | Interactive use in Claude Desktop/web | Browser-based login via ABsmartly SAML |
Option 1: Claude Desktop
With OAuth (recommended)
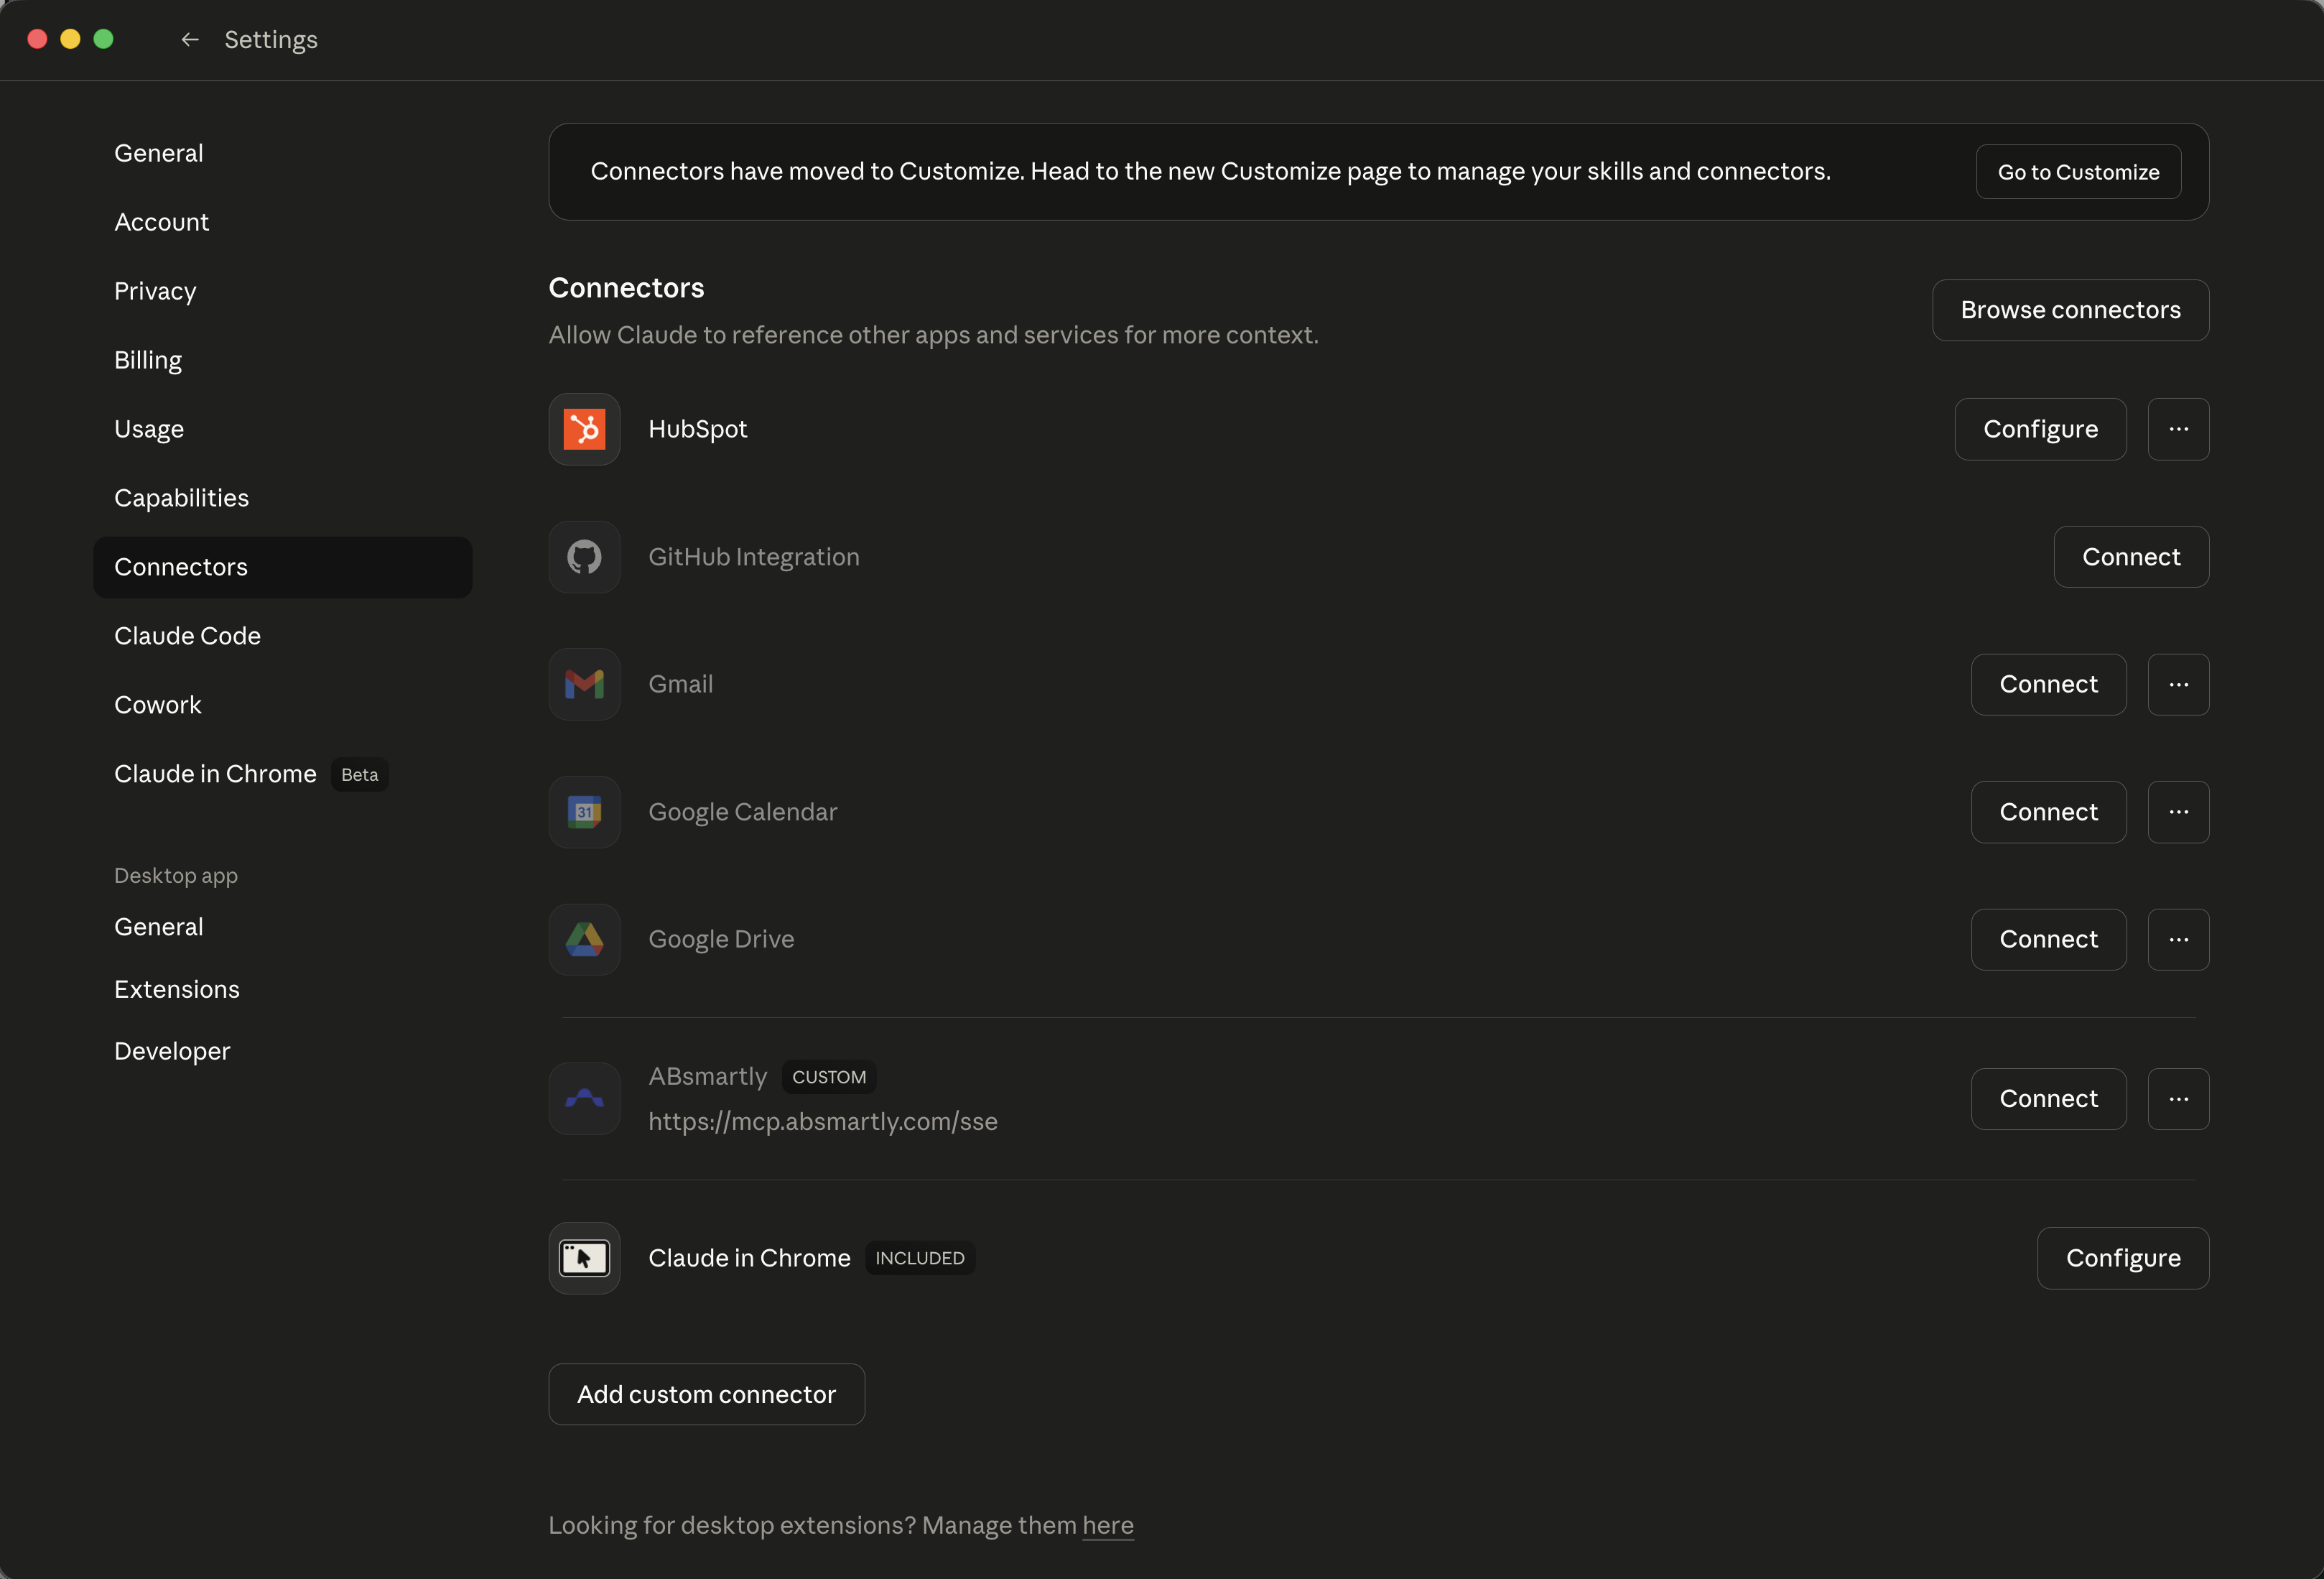
Open Settings → Connectors, scroll to the bottom, and click Add custom connector:
In the dialog, give the connector a Name (e.g. "ABsmartly") and paste the URL into Remote MCP server URL:
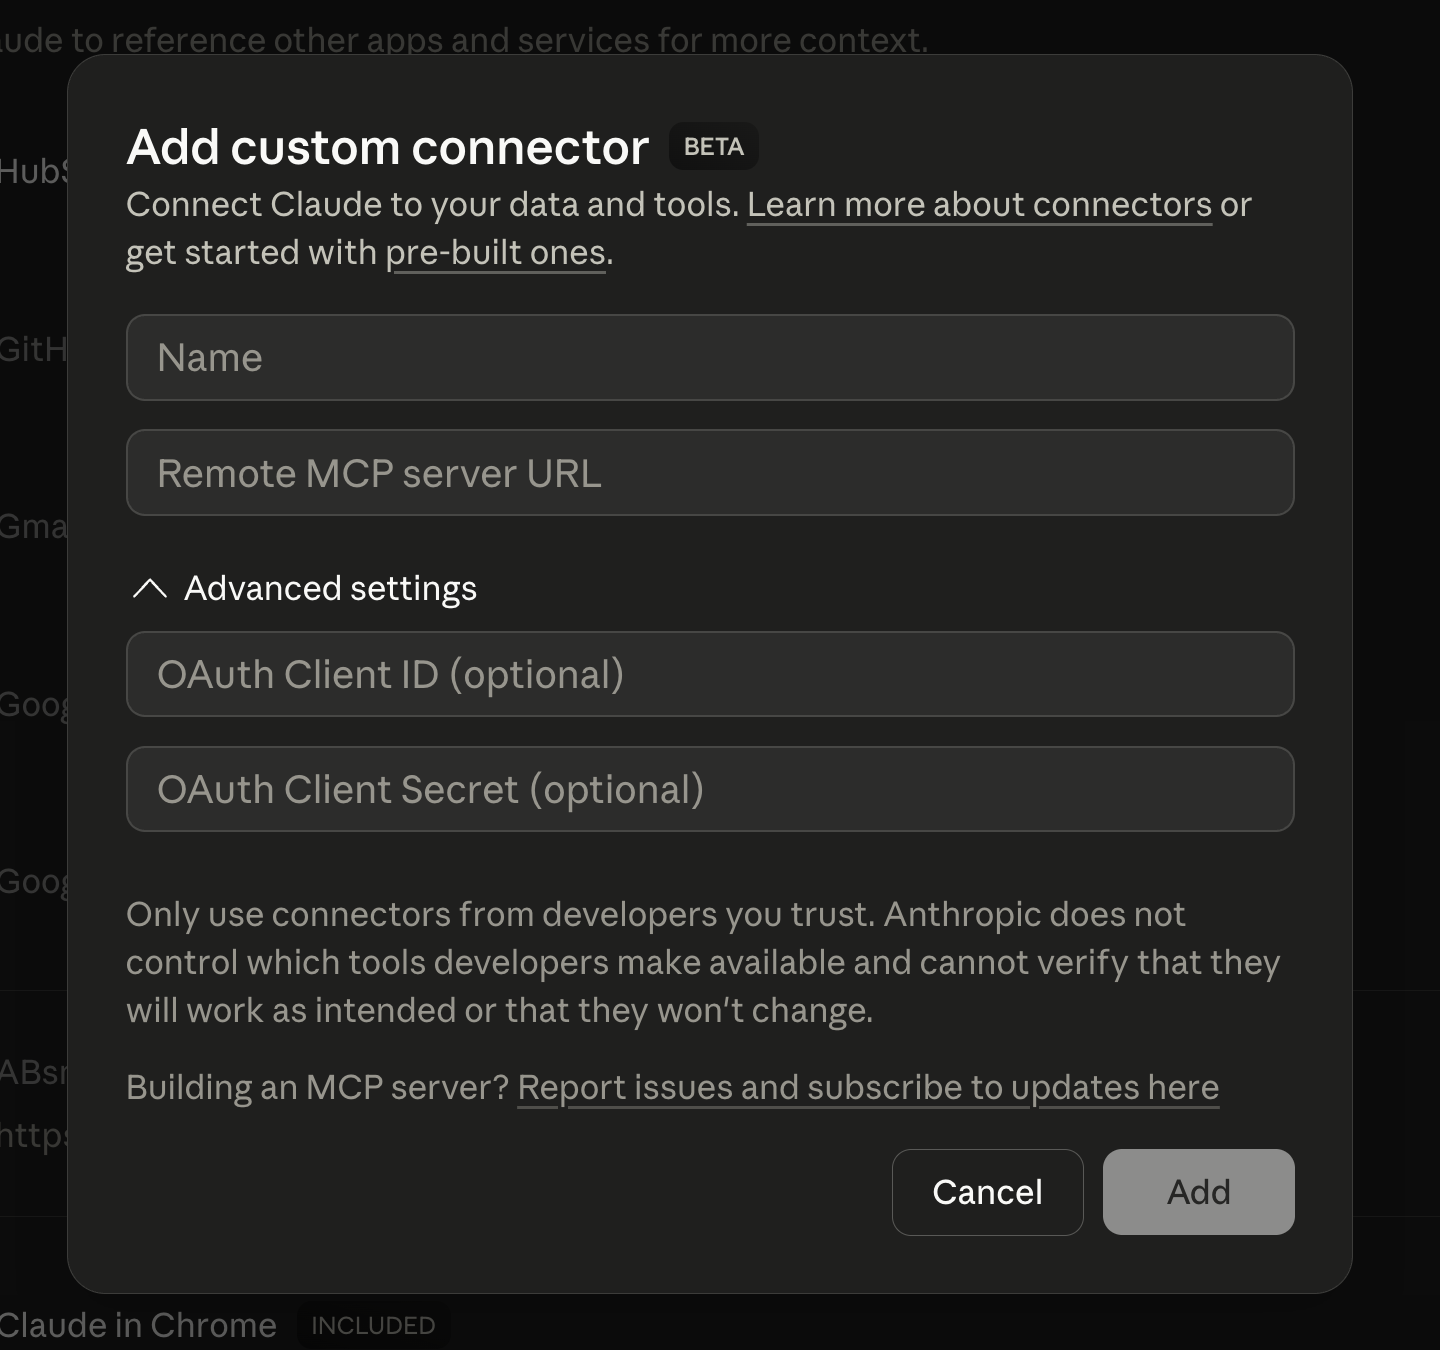
URL:
https://mcp.absmartly.com/sse?absmartly-endpoint=https://your-instance.absmartly.com
Click Add, then Connect. Claude Desktop will open your browser for ABsmartly login (SAML/credentials). After authentication, the MCP connection is established automatically.
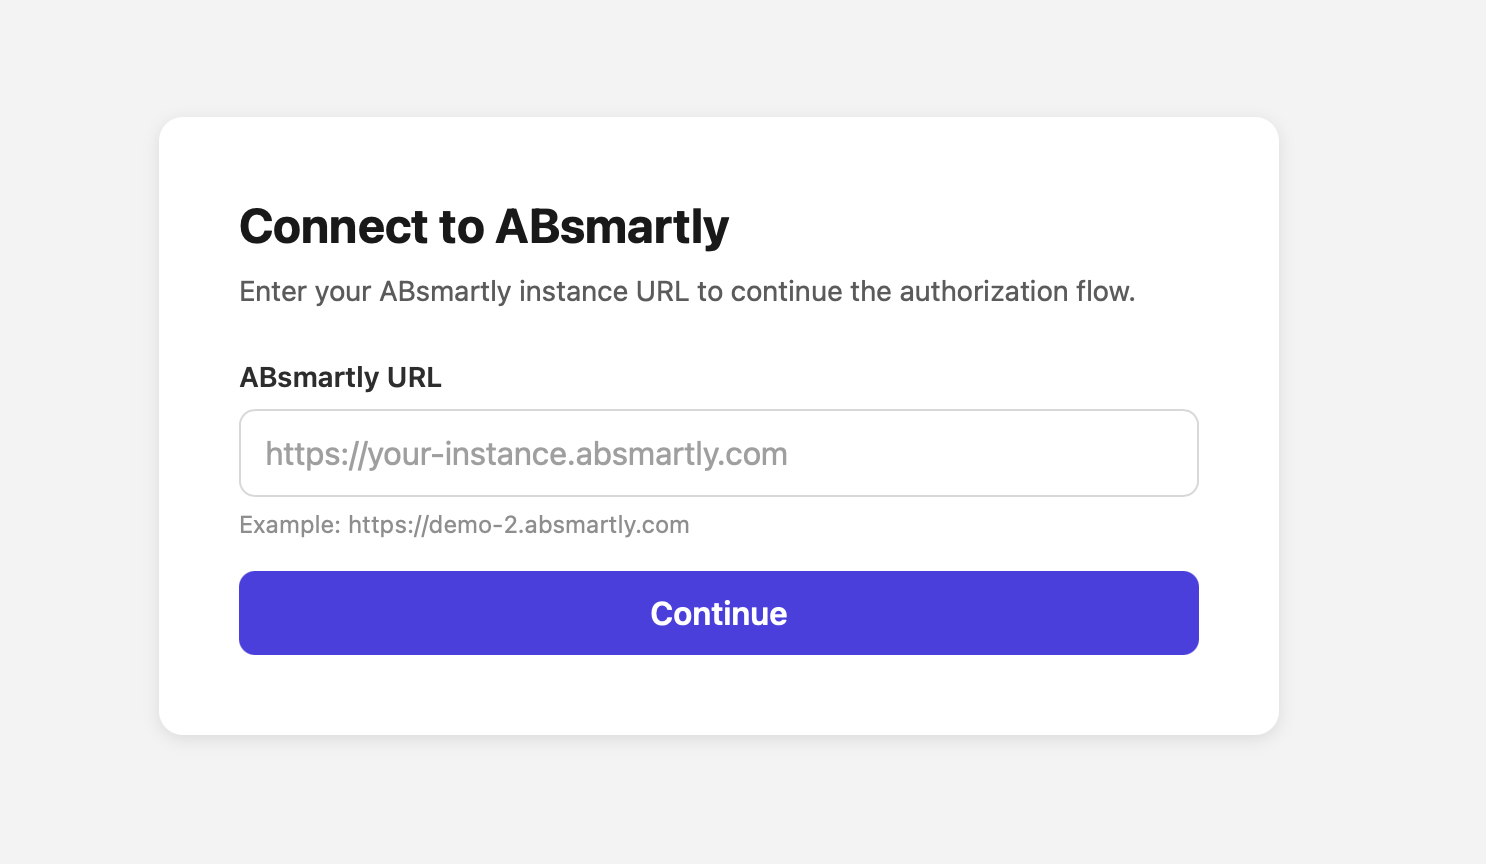
The
absmartly-endpointquery parameter is optional. If omitted, the OAuth flow will prompt you to enter the URL of your ABsmartly instance in the browser before login:
With API Key
Pass the API key directly in the URL — no mcp-remote bridge needed:
URL:
https://mcp.absmartly.com/sse?api_key=YOUR_API_KEY&absmartly-endpoint=https://your-instance.absmartly.com
With API Key (via mcp-remote)
If you'd rather pass the key via headers instead of the URL, use the mcp-remote bridge — Claude Desktop doesn't support custom headers natively for remote servers:
~/Library/Application Support/Claude/claude_desktop_config.json (macOS):
{
  "mcpServers": {
    "absmartly": {
      "command": "npx",
      "args": [
        "mcp-remote@latest",
        "https://mcp.absmartly.com/sse",
        "--header", "Authorization:YOUR_API_KEY",
        "--header", "x-absmartly-endpoint:https://your-instance.absmartly.com"
      ]
    }
  }
}
With Local Server (stdio)
Uses your ABsmartly CLI config and macOS Keychain credentials:
{
  "mcpServers": {
    "absmartly": {
      "command": "npx",
      "args": ["@absmartly/mcp", "--profile=production"]
    }
  }
}
Option 2: Claude Code
Remote with API Key
claude mcp add --transport sse --scope user absmartly \
  https://mcp.absmartly.com/sse \
  -H "Authorization:YOUR_API_KEY" \
  -H "x-absmartly-endpoint:https://your-instance.absmartly.com"
Subdomain shorthand — auto-constructs https://<subdomain>.absmartly.com/v1:
claude mcp add --transport sse --scope user absmartly \
  https://mcp.absmartly.com/sse \
  -H "Authorization:my-subdomain YOUR_API_KEY"
Remote with API Key (Streamable HTTP — recommended for new installations)
claude mcp add --transport http --scope user absmartly \
  https://mcp.absmartly.com/mcp \
  -H "Authorization:YOUR_API_KEY" \
  -H "x-absmartly-endpoint:https://your-instance.absmartly.com"
Streamable HTTP is the modern MCP transport (the MCP spec deprecated SSE in March 2025). The
/sseURL still works for older clients.
Remote with OAuth
claude mcp add --transport sse --scope user absmartly \
  "https://mcp.absmartly.com/sse?absmartly-endpoint=https://your-instance.absmartly.com"
Then run /mcp in Claude Code to authenticate when prompted. The absmartly-endpoint query parameter is optional — omit it and the OAuth flow will prompt you for the instance URL in the browser.
Local Server (stdio)
claude mcp add --scope user absmartly -- npx @absmartly/mcp --profile=production
Project Config (.mcp.json)
{
  "mcpServers": {
    "absmartly": {
      "type": "sse",
      "url": "https://mcp.absmartly.com/sse",
      "headers": {
        "Authorization": "YOUR_API_KEY",
        "x-absmartly-endpoint": "https://your-instance.absmartly.com"
      }
    }
  }
}
Use --scope project instead of --scope user to write to .mcp.json (shared via VCS).
Option 3: Cursor
Click the badge above to install with one click (OAuth). After Cursor prompts you for the ABsmartly instance URL in the browser, the flow completes automatically. Or configure manually:
With API Key
.cursor/mcp.json (project) or ~/.cursor/mcp.json (global):
{
  "mcpServers": {
    "absmartly": {
      "url": "https://mcp.absmartly.com/sse",
      "headers": {
        "Authorization": "YOUR_API_KEY",
        "x-absmartly-endpoint": "https://your-instance.absmartly.com"
      }
    }
  }
}
Or with Streamable HTTP transport (modern, recommended):
{
  "mcpServers": {
    "absmartly": {
      "type": "http",
      "url": "https://mcp.absmartly.com/mcp",
      "headers": {
        "Authorization": "YOUR_API_KEY",
        "x-absmartly-endpoint": "https://your-instance.absmartly.com"
      }
    }
  }
}
With OAuth
{
  "mcpServers": {
    "absmartly": {
      "url": "https://mcp.absmartly.com/sse?absmartly-endpoint=https://your-instance.absmartly.com"
    }
  }
}
Cursor will detect the OAuth requirement and open your browser for login. The absmartly-endpoint query parameter is optional — omit it and the OAuth flow will prompt for the instance URL.
Local Server (stdio)
{
  "mcpServers": {
    "absmartly": {
      "command": "npx",
      "args": ["@absmartly/mcp", "--profile=production"]
    }
  }
}
Option 4: Windsurf
~/.codeium/windsurf/mcp_config.json:
With API Key
{
  "mcpServers": {
    "absmartly": {
      "serverUrl": "https://mcp.absmartly.com/sse",
      "headers": {
        "Authorization": "YOUR_API_KEY",
        "x-absmartly-endpoint": "https://your-instance.absmartly.com"
      }
    }
  }
}
Note: Windsurf uses
"serverUrl"instead of"url".
Or with Streamable HTTP transport:
{
  "mcpServers": {
    "absmartly": {
      "serverUrl": "https://mcp.absmartly.com/mcp",
      "headers": {
        "Authorization": "YOUR_API_KEY",
        "x-absmartly-endpoint": "https://your-instance.absmartly.com"
      }
    }
  }
}
With OAuth
{
  "mcpServers": {
    "absmartly": {
      "serverUrl": "https://mcp.absmartly.com/sse?absmartly-endpoint=https://your-instance.absmartly.com"
    }
  }
}
Local Server (stdio)
{
  "mcpServers": {
    "absmartly": {
      "command": "npx",
      "args": ["@absmartly/mcp", "--profile=production"]
    }
  }
}
Option 5: VS Code (GitHub Copilot)
Install in VS Code Install in VS Code Insiders
Click a badge above for one-click install (OAuth). You'll be prompted for your ABsmartly instance URL in the browser. Or configure manually:
.vscode/mcp.json (workspace) or via Command Palette → MCP: Open User Configuration:
Note: VS Code uses
"servers"as root key, not"mcpServers".
With API Key
{
  "servers": {
    "absmartly": {
      "type": "sse",
      "url": "https://mcp.absmartly.com/sse",
      "headers": {
        "Authorization": "${input:absmartly-api-key}",
        "x-absmartly-endpoint": "https://your-instance.absmartly.com"
      }
    }
  },
  "inputs": [
    {
      "type": "promptString",
      "id": "absmartly-api-key",
      "description": "ABsmartly API Key",
      "password": true
    }
  ]
}
Or with Streamable HTTP transport (recommended):
{
  "servers": {
    "absmartly": {
      "type": "http",
      "url": "https://mcp.absmartly.com/mcp",
      "headers": {
        "Authorization": "${input:absmartly-api-key}",
        "x-absmartly-endpoint": "https://your-instance.absmartly.com"
      }
    }
  },
  "inputs": [
    {
      "type": "promptString",
      "id": "absmartly-api-key",
      "description": "ABsmartly API Key",
      "password": true
    }
  ]
}
With OAuth
{
  "servers": {
    "absmartly": {
      "type": "sse",
      "url": "https://mcp.absmartly.com/sse?absmartly-endpoint=https://your-instance.absmartly.com"
    }
  }
}
VS Code will detect the OAuth requirement and show an Auth CodeLens to trigger the flow. The absmartly-endpoint query parameter is optional — omit it and the OAuth flow will prompt for the instance URL.
Local Server (stdio)
{
  "servers": {
    "absmartly": {
      "command": "npx",
      "args": ["@absmartly/mcp", "--profile=production"]
    }
  }
}
MCP tools only appear in Agent mode in VS Code, not in Ask or Edit mode.
Option 6: Gemini (CLI + Code Assist)
Works for Gemini CLI (terminal) and Gemini Code Assist (VS Code / JetBrains / Android Studio agent mode). Both read ~/.gemini/settings.json (user-wide) or .gemini/settings.json (per-project). JetBrains IDEs use mcp.json instead.
With OAuth
{
  "mcpServers": {
    "absmartly": {
      "url": "https://mcp.absmartly.com/sse?absmartly-endpoint=https://your-instance.absmartly.com"
    }
  }
}
Gemini auto-discovers the OAuth requirement. In Gemini CLI, run /mcp auth absmartly when prompted; in Code Assist agent mode the browser opens automatically.
With API Key
{
  "mcpServers": {
    "absmartly": {
      "url": "https://mcp.absmartly.com/sse",
      "headers": {
        "Authorization": "YOUR_API_KEY",
        "x-absmartly-endpoint": "https://your-instance.absmartly.com"
      }
    }
  }
}
One-liner via Gemini CLI
gemini mcp add --transport sse --scope user absmartly \
  https://mcp.absmartly.com/sse \
  -H "Authorization: YOUR_API_KEY" \
  -H "x-absmartly-endpoint: https://your-instance.absmartly.com"
Gemini Enterprise (Google Cloud Console)
Gemini Enterprise's Custom MCP Server connector (Preview) requires Streamable HTTP transport — use the /mcp endpoint:
- Google Cloud Console → Gemini Enterprise → Data stores → Create data store.
- Search "Custom MCP Server" → Add MCP server.
- Server URL:
https://mcp.absmartly.com/mcp - Authentication: OAuth — register Gemini Enterprise as an OAuth client against your identity provider, then provide the
client_id/client_secret. Grant themcp:accessscope. - Save and wait for the connector status to become Active.
SSE transport (
/sse) is not supported by this connector. The legacy Gemini CLI / Code Assist sections above continue to use/sseuntil those clients add Streamable HTTP support.Reload the IDE window after editing settings (VS Code: Command Palette → Developer: Reload Window). MCP support in Code Assist requires agent preview mode — set
"geminicodeassist.updateChannel": "Insiders"in VS Code settings if not already enabled.
Option 7: ChatGPT (Developer Mode)
ChatGPT does not support one-click install deeplinks — you connect remote MCP servers via the Custom Connectors UI. Requires a Pro, Team, Enterprise, or Edu plan, and Developer Mode enabled (Settings → Connectors → Advanced → Developer mode).
- Go to Settings → Connectors → Create.
- Fill in:
- Name:
ABsmartly - MCP Server URL:
https://mcp.absmartly.com/sse?absmartly-endpoint=https://your-instance.absmartly.com - Authentication: OAuth
- Name:
- Save. In a new chat, click + → Developer mode → select the ABsmartly connector to add it as a tool source.
Workspace admins must first enable Custom MCP connectors in Workspace Settings → Permissions & Roles → Connected Data.
Option 8: DXT Extension
- Download from mcp.absmartly.com/absmartly-mcp.dxt
- Double-click to install in Claude Desktop
- Enter your ABsmartly endpoint when prompted
Authorization Header Formats
When using API key authentication, these header formats are all supported:
| Format | Example |
|---|---|
| Simple API key | Authorization: BxYKd1U2... |
| Explicit Api-Key | Authorization: Api-Key BxYKd1U2... |
| Subdomain shorthand | Authorization: demo-1 BxYKd1U2... |
| Full domain | Authorization: demo-1.absmartly.com BxYKd1U2... |
The subdomain shorthand auto-constructs the endpoint as https://<subdomain>.absmartly.com/v1.
Usage Examples
Discover what's available:
What ABsmartly operations can you help me with?
List running experiments:
Show me all running experiments
Create an experiment from a template:
Create a new A/B test called "checkout_cta_test" with Control and Blue Button variants
Full lifecycle:
Create an experiment, move it to ready, start it, then show me its details
Feature flags:
Create a feature flag called "dark_mode" and start it
Clone and modify:
Clone experiment 42 as "checkout_v2" and update the traffic split to 70/30
Compare experiments:
Show me the differences between experiments 42 and 43
Tools Reference
discover_commands
Browse available command groups or search by keyword. Call without parameters to see all groups.
{ "group": "experiments" }
{ "search": "archive" }
get_command_docs
Get detailed documentation for a specific command including parameters, types, and examples.
{ "group": "experiments", "command": "createExperimentFromTemplate" }
execute_command
Execute any ABsmartly command. Common commands are listed in the tool description; use discover_commands for the full list.
{
  "group": "experiments",
  "command": "listExperiments",
  "params": { "state": "running", "items": 10 }
}
Parameters:
group(required) — command group (e.g.experiments,metrics,goals)command(required) — command name (e.g.listExperiments,createExperimentFromTemplate)params(optional) — command parameters as JSON objectconfirmed(optional) — set totrueto confirm destructive actionsraw(optional) — return full CommandResult with rows/detail/warnings/paginationlimit(optional) — max items for list operations (default: 20)
Destructive actions (start, stop, archive, delete) require confirmation. The server returns a confirmation prompt; call again with confirmed: true to proceed.
Experiment creation from templates also requires confirmation. The first call to createExperimentFromTemplate returns a preview — the resolved API payload (with names mapped to IDs) plus any warnings — without creating the experiment. Show the preview to the user, then call again with confirmed: true to actually create.
Creating Experiments with Templates
The recommended way to create experiments is with markdown templates:
{
  "group": "experiments",
  "command": "createExperimentFromTemplate",
  "params": {
    "templateContent": "---\nname: my_experiment\ntype: test\npercentages: \"50/50\"\nunit_type: user_id\napplication: www\n---\n\n## Variants\n\n### variant_0\n\nname: control\nconfig: {}\n\n---\n\n### variant_1\n\nname: treatment\nconfig: {}\n"
  }
}
Templates use YAML frontmatter for configuration and markdown for variants, audience, and description. Names for applications, unit types, metrics, teams, tags, and owners are automatically resolved to IDs.
Read the absmartly://docs/templates resource for complete examples including:
- Basic A/B test
- Feature flags
- Group Sequential Tests (GST)
- Screenshots
- Custom fields
- Multi-variant (A/B/C) tests
Command Groups
| Group | Description | Key Commands |
|---|---|---|
experiments |
Experiment lifecycle | list, get, create, start, stop, archive, clone, diff, export, bulk |
metrics |
Metric definitions and review | list, get, create, review, access |
goals |
Goal definitions | list, get, create, access |
segments |
Audience segments | list, get, create, delete |
teams |
Team management | list, get, create, members |
users |
User management | list, get, create, api-keys |
apps |
Applications | list, get, create, archive |
envs |
Environments | list, get, create |
units |
Unit types | list, get, create |
tags |
Experiment tags | list, get, create, delete |
auth |
Authentication | whoami, api-keys |
insights |
Analytics | velocity, decisions |
webhooks |
Webhook management | list, get, create, delete |
roles |
Role management | list, get, create |
datasources |
Data source config | list, test, introspect |
exportconfigs |
Export configuration | list, create, pause |
Plus: goaltags, metrictags, metriccategories, apikeys, permissions, assetroles, notifications, favorites, cors, updateschedules, customsections, platformconfig, activity, statistics, events, storageconfigs, actiondialogfields.
Resources
| URI | Description |
|---|---|
absmartly://entities/applications |
Cached applications list |
absmartly://entities/unit-types |
Available unit types |
absmartly://entities/teams |
Teams list |
absmartly://entities/users |
Users list |
absmartly://entities/metrics |
Metrics list |
absmartly://entities/goals |
Goals list |
absmartly://entities/tags |
Experiment tags |
absmartly://entities/custom-fields |
Custom field definitions |
absmartly://docs/templates |
Markdown template examples and reference |
absmartly://docs/api |
API documentation |
absmartly://docs/experiments |
Experiment management docs |
absmartly://docs/metrics |
Metrics docs |
absmartly://docs/goals |
Goals docs |
absmartly://docs/segments |
Segments docs |
absmartly://docs/analytics |
Analytics docs |
absmartly://examples/api-requests |
Common request patterns |
Prompts
| Prompt | Description |
|---|---|
experiment-status |
Quick overview of all running experiments |
create-experiment |
Guided experiment creation with entity context |
create-feature-flag |
Simplified feature flag creation |
analyze-experiment |
Deep analysis of a specific experiment |
experiment-review |
Review running experiments for issues |
Development
Prerequisites
- Node.js 22+
- Cloudflare account (for remote deployment)
- ABsmartly account and API key
Setup
git clone https://github.com/absmartly/mcp.git
cd mcp
npm install
Local Development
npx wrangler dev --port 8787    # Run Worker locally
npx @absmartly/mcp              # Run stdio server
Testing
npm run test:unit     # Unit tests
npm run typecheck     # TypeScript type checking
Integration tests (require credentials):
node tests/integration/claude-mcp-tools.test.js --profile test-1
node tests/integration/claude-user-experience.test.js --profile test-1
node tests/integration/claude-tool-discovery.test.js --profile test-1
CI/CD
GitHub Actions runs automatically:
- CI (every push/PR): typecheck + unit tests
- Deploy (push to main): tests + Cloudflare Workers deployment
Deployment
npm run deploy          # Deploy to Cloudflare Workers
npm run build:dxt       # Build DXT extension
Project Structure
src/
├── index.ts              # Cloudflare Worker (OAuth, auth, resources, prompts)
├── local-server.ts       # Standalone stdio server
├── cli-catalog.ts        # 230+ commands mapped to CLI core functions
├── tools.ts              # Shared MCP tool setup (4 tools)
├── fetch-adapter.ts      # HTTP client bridging APIClient to fetch
├── resources.ts          # MCP resources (docs + entity data)
├── absmartly-oauth-handler.ts  # OAuth flow handler
├── shared.ts             # Shared utilities
└── types.ts              # TypeScript types
Security
- No server-side secrets — credentials provided by the MCP client
- Session isolation — each connection has its own credentials
- OAuth protection — API key sessions block OAuth discovery to prevent auth method confusion
- Destructive action confirmation — start, stop, archive, and delete operations require explicit confirmation
- API error surfacing — validation errors from the API are returned with full detail for correction
License
MIT License - see LICENSE file for details.
Установка ABsmartly Server
У этого сервера нет опубликованного пакета — он собирается из исходников. Открой репозиторий и следуй инструкции в README.
▸ github.com/absmartly/mcpFAQ
ABsmartly Server MCP бесплатный?
Да, ABsmartly Server MCP бесплатный — установка в пару кликов через Unyly без оплаты.
Нужен ли API-ключ для ABsmartly Server?
Нет, ABsmartly Server работает без API-ключей и переменных окружения.
ABsmartly Server — hosted или self-hosted?
Self-hosted: сервер запускается локально на твоей машине командой из раздела установки.
Как установить ABsmartly Server в Claude Desktop, Claude Code или Cursor?
Открой ABsmartly Server на unyly.org, выбери вкладку своего клиента (Claude Desktop, Claude Code, Cursor) и нажми Install — конфиг сгенерируется автоматически, без правки JSON.
Похожие MCP
Gmail
Read, send and search emails from Claude
 автор: Google
Slack
Send, search and summarize Slack messages
 автор: Slack
Runbear
No-code MCP client for team chat platforms, such as Slack, Microsoft Teams, and Discord.
Discord Server
A community discord server dedicated to MCP by [Frank Fiegel](https://github.com/punkpeye)
Compare ABsmartly Server with
Не уверен что выбрать?
Найди свой стек за 60 секунд
Автор?
Embed-бейдж для README
Похожее
Все в категории communication