
Creo
БесплатноНе проверенMCP server enabling CAD interaction with Creo Parametric and knowledge base retrieval from Volcengine.

Описание
MCP server enabling CAD interaction with Creo Parametric and knowledge base retrieval from Volcengine.
README
An MCP (Machine-Collaboration-Platform) server with tools for CAD interaction and knowledge base retrieval. This project exposes several functions as tools that a larger agent or system can call, including interacting with Creo and querying a Volcengine knowledge base.
⚙️ Key Features
- CAD Integration: Opens
.STEPfiles directly in Creo Parametric. - Knowledge Base Retrieval: Connects to and queries a Volcengine knowledge base.
- Code Execution: Provides a tool to execute arbitrary Python code remotely.
- Command-Line Interface: Runs as a standalone server application with configurable credentials.
📦 Installation & Setup
Prerequisites
Python 3.12 or newer
uv package manager:
- On macOS:
brew install uv - On Windows (PowerShell):
You may need to addpowershell -c "irm [https://astral.sh/uv/install.ps1](https://astral.sh/uv/install.ps1) | iex"uvto your Path manually:# Add this line to your PowerShell profile $env:Path = "C:\Users\YOUR_USERNAME\.local\bin;" + $env:Path - For other systems, see the official uv installation instructions.
⚠️ Do not proceed before installing uv.
- On macOS:
🌋 Volcengine Setup Guide
Follow these steps to retrieve the credentials required for the integration.
- Navigate to the Knowledge Base. From the main Volcengine dashboard, select 知识库 (Knowledge Base) from the left-hand navigation menu.

- Select Your KB. Click on the specific knowledge base you intend to use.
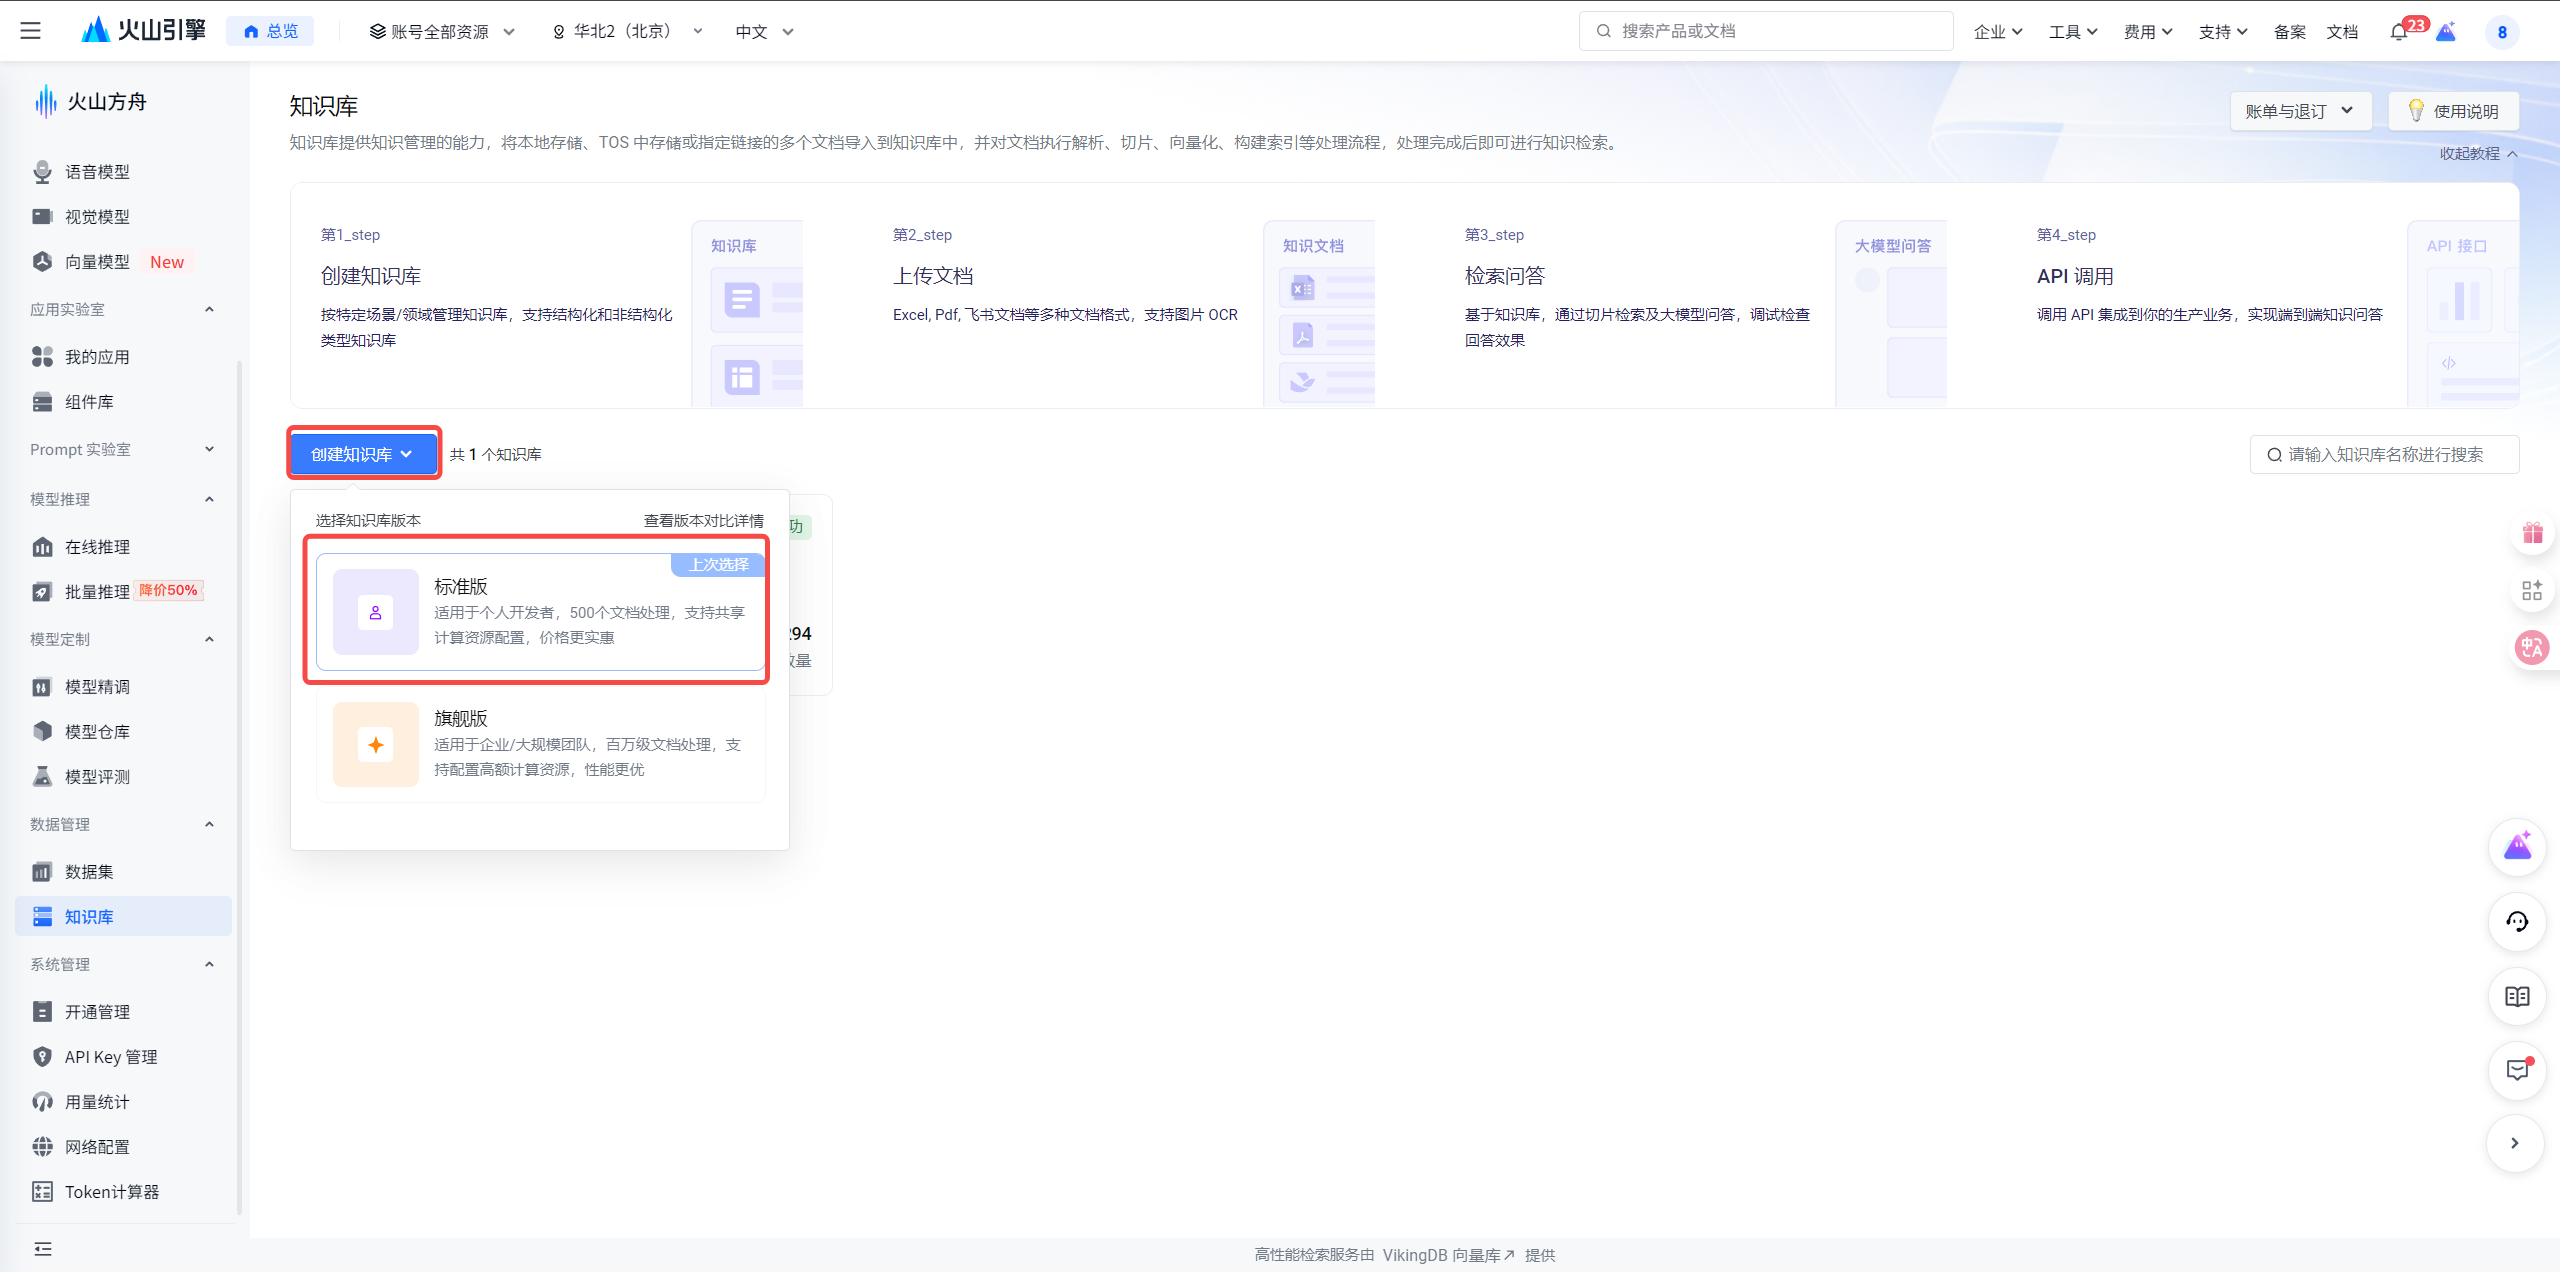
- Create a New KB. Follow the following steps to create a new knowledge base:
- Click the 创建知识库 (Create Knowledge Base) button.
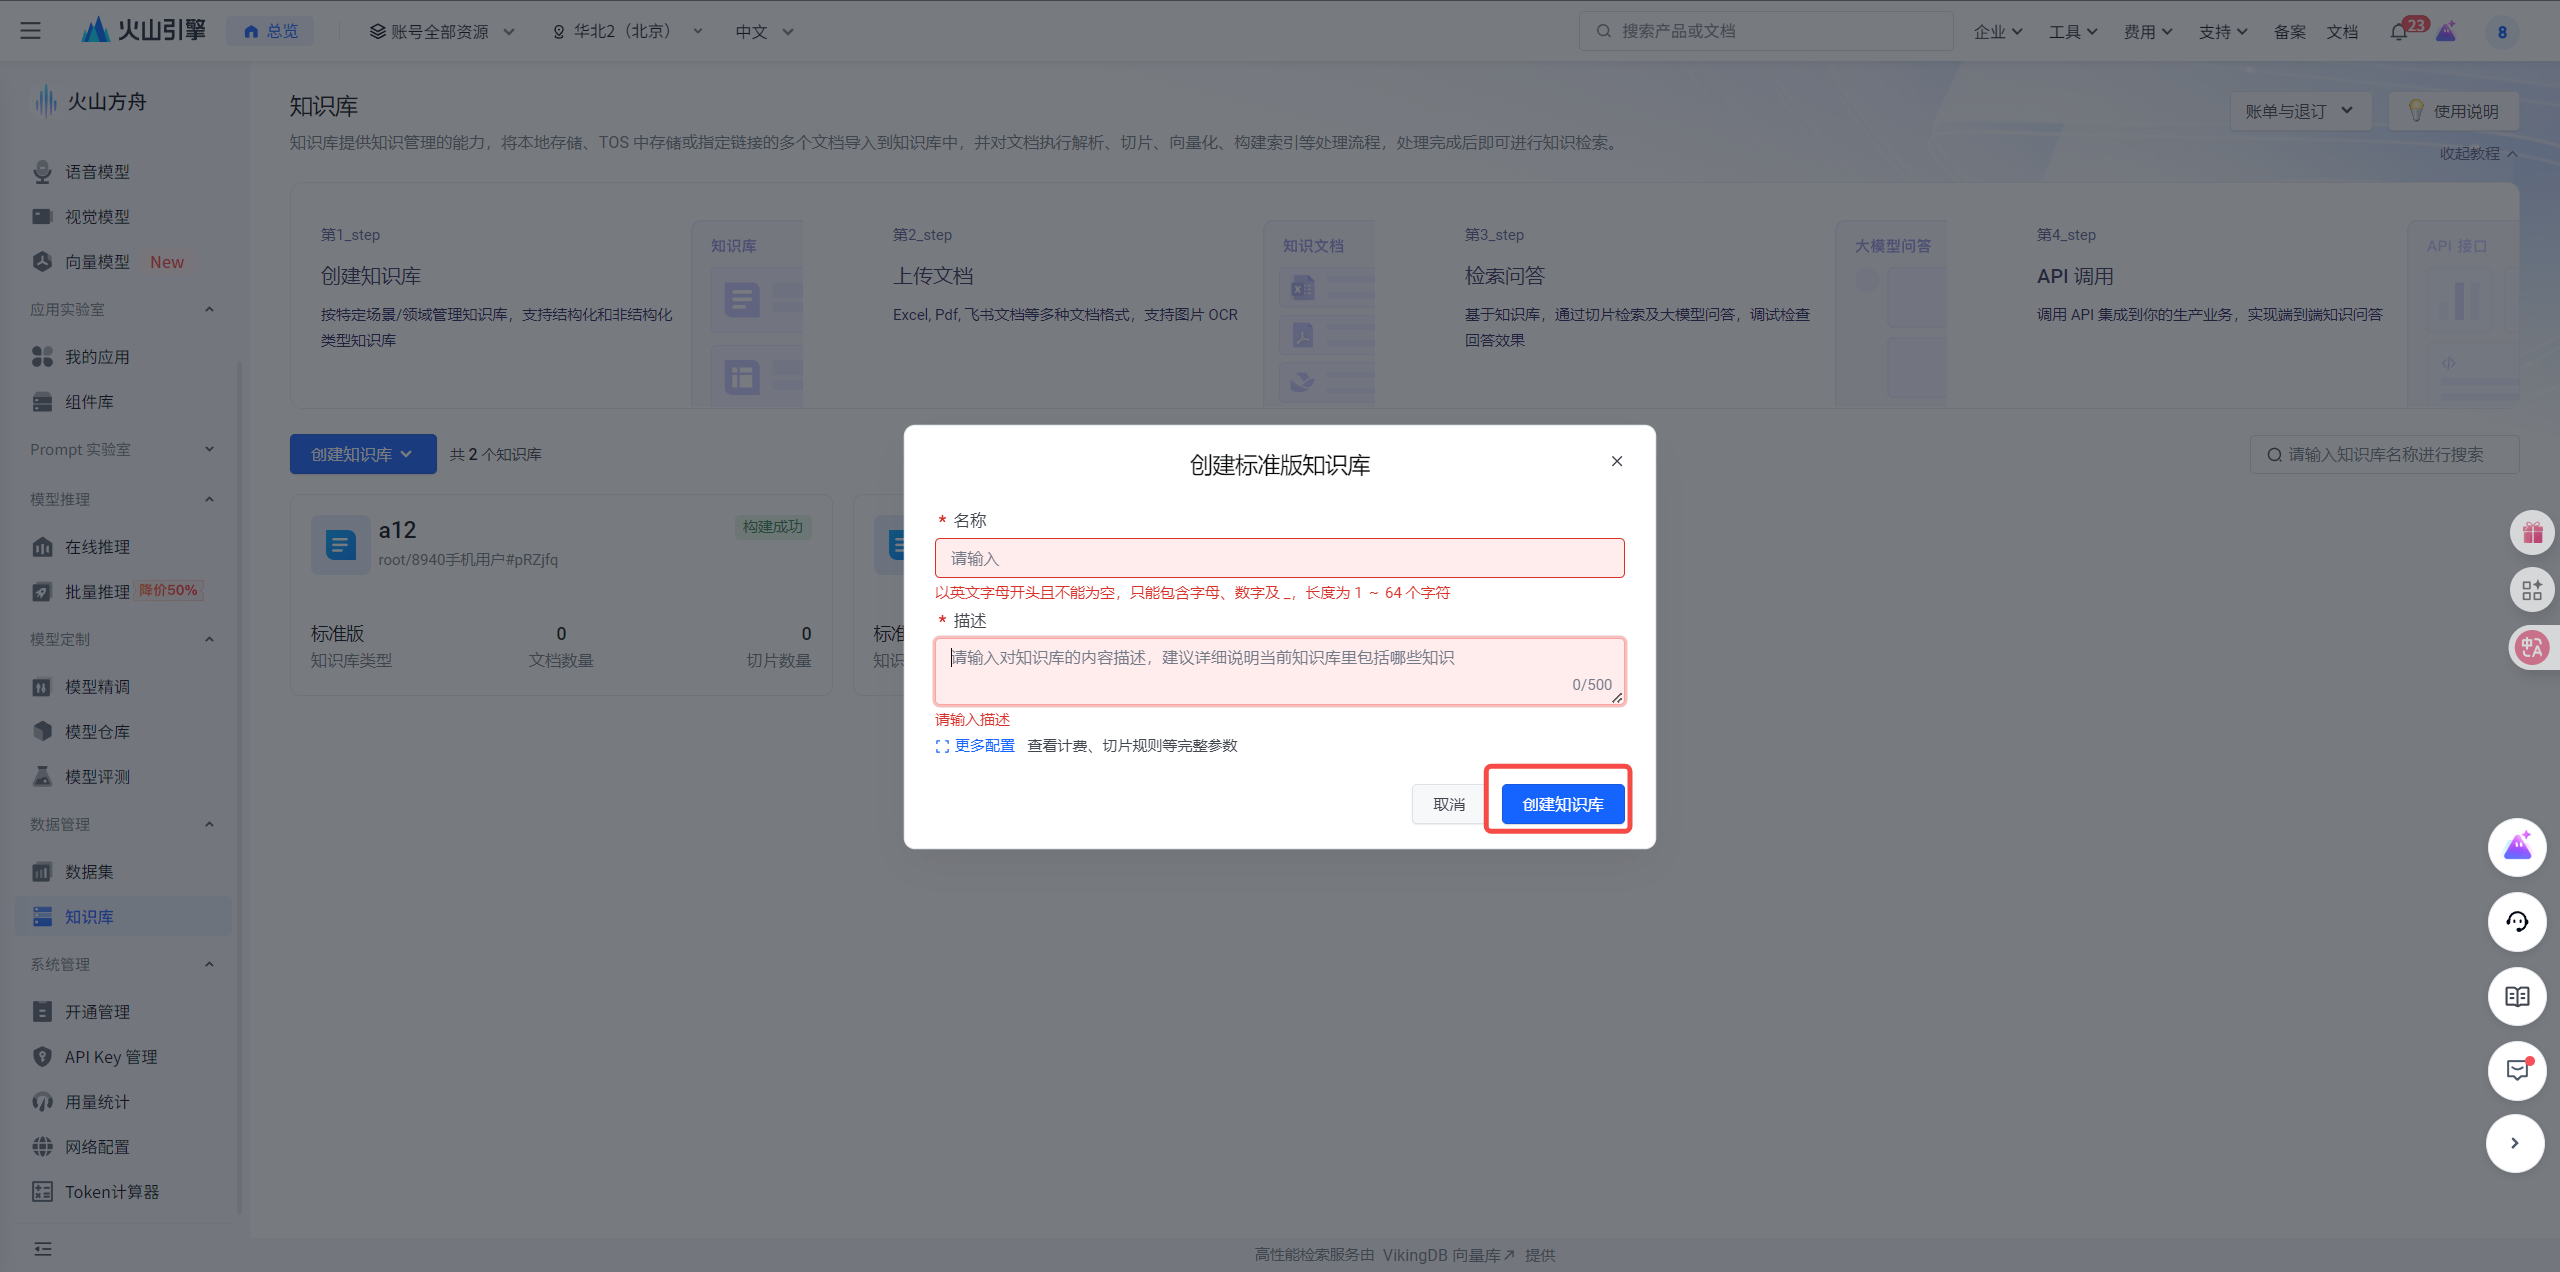
- Enter a name for your knowledge base and describption for it.
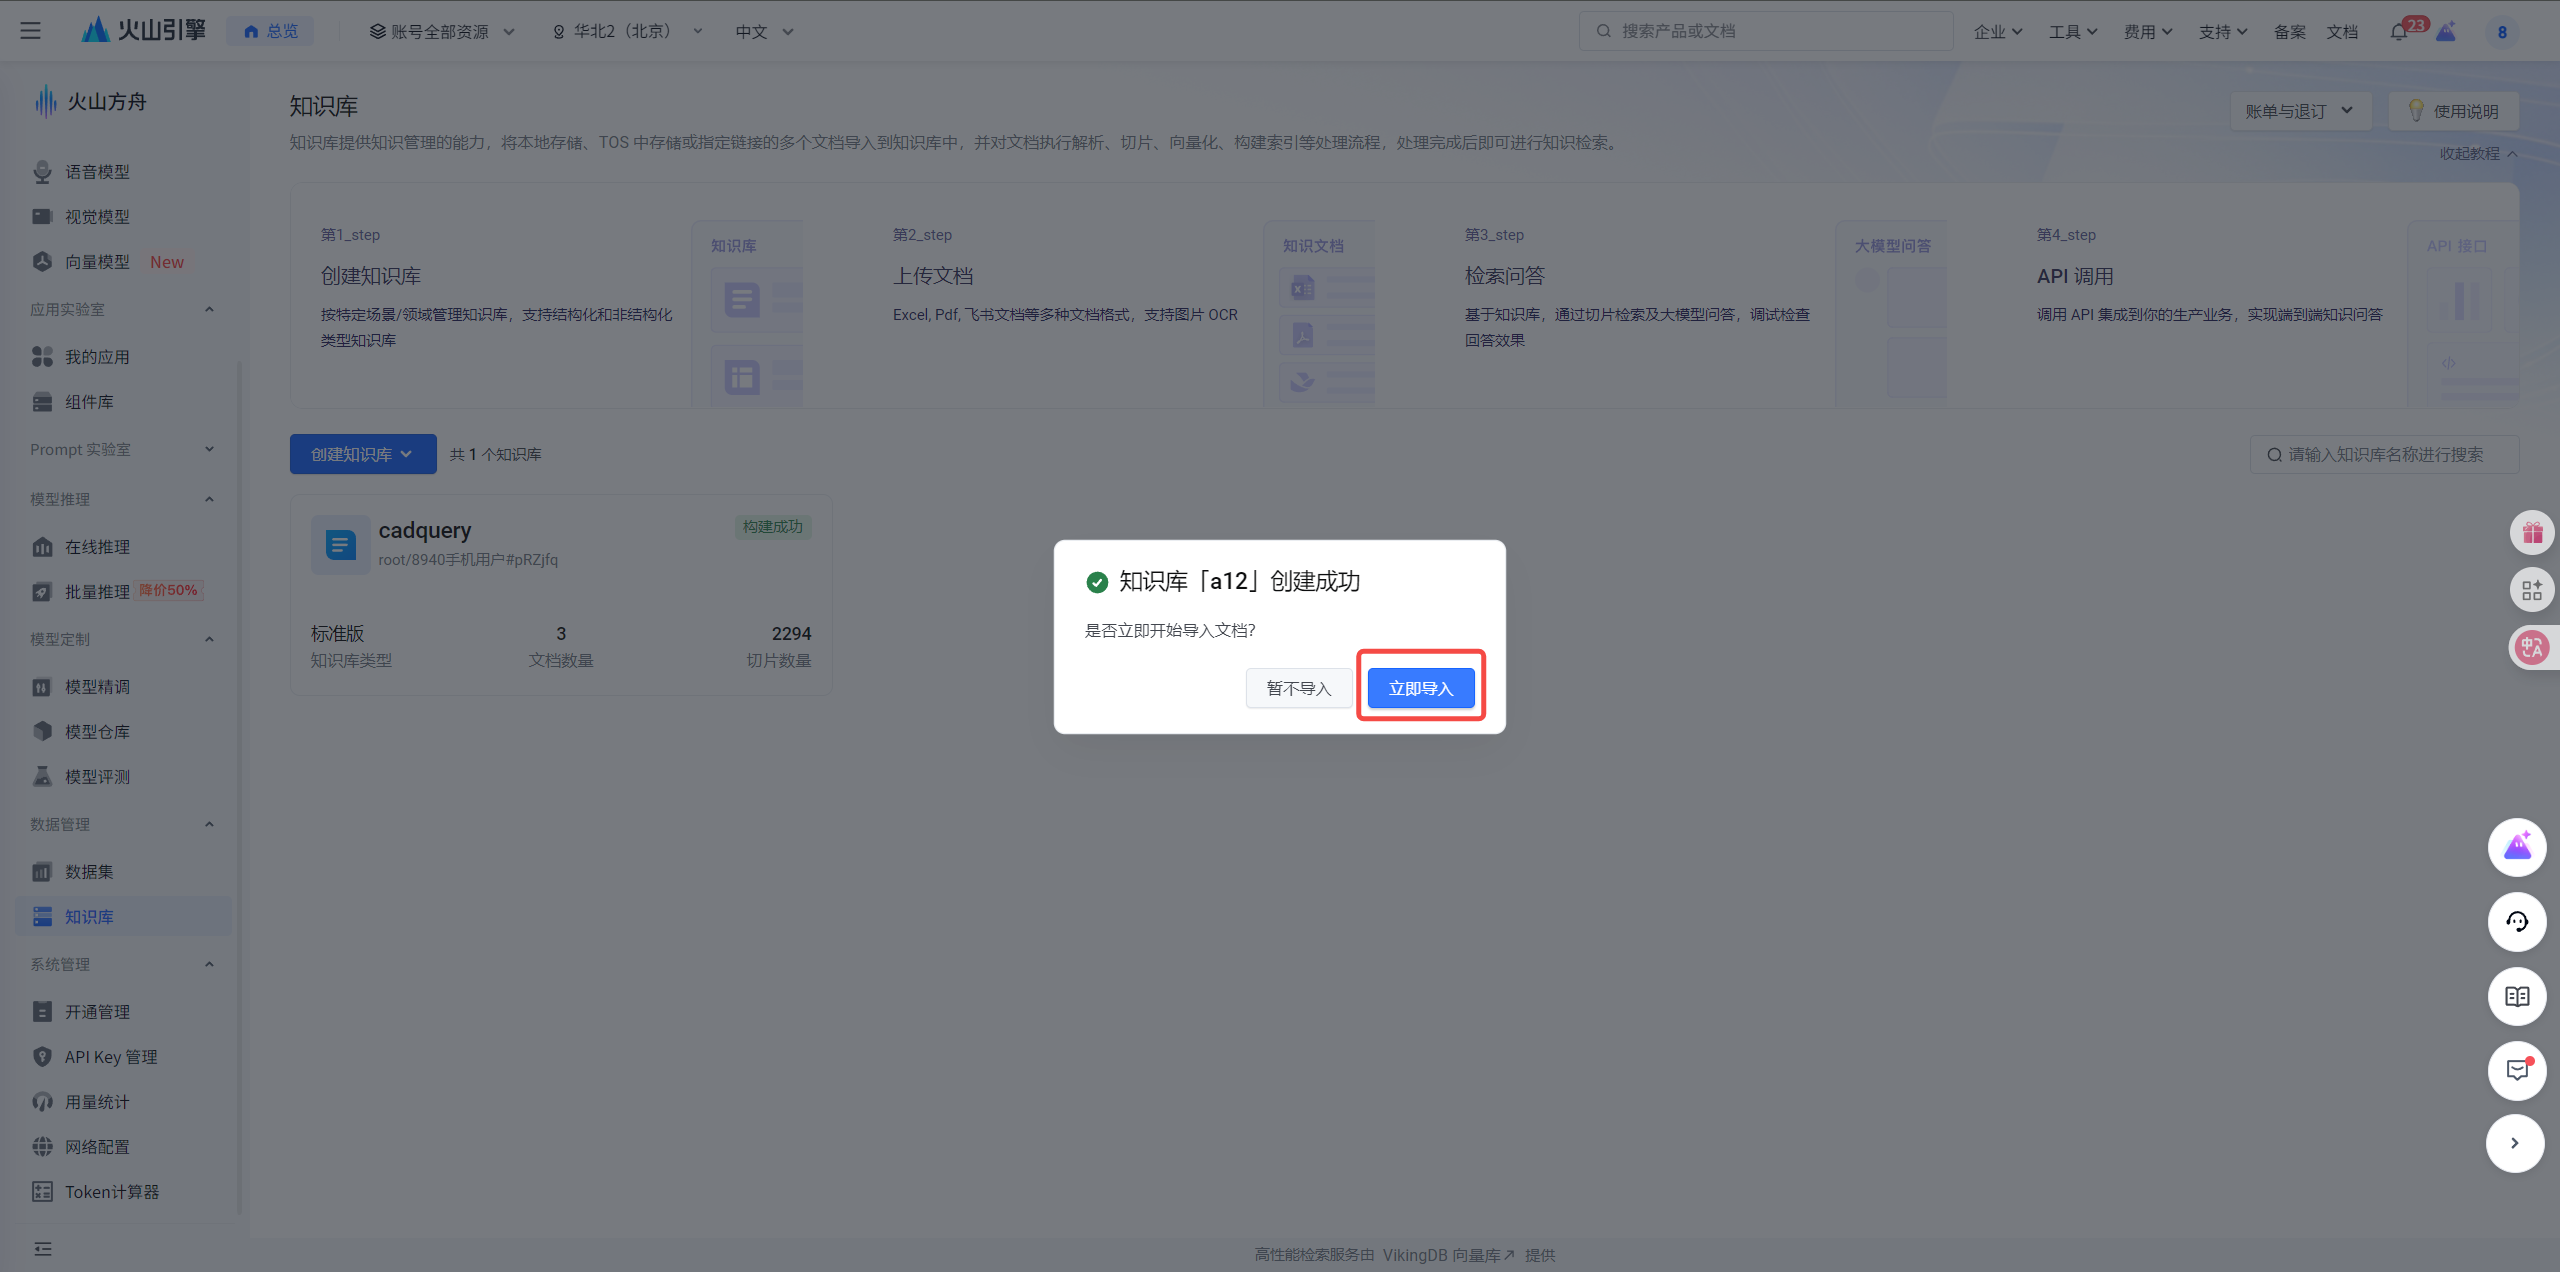
- Click the 立即导入 (Import Now) button.
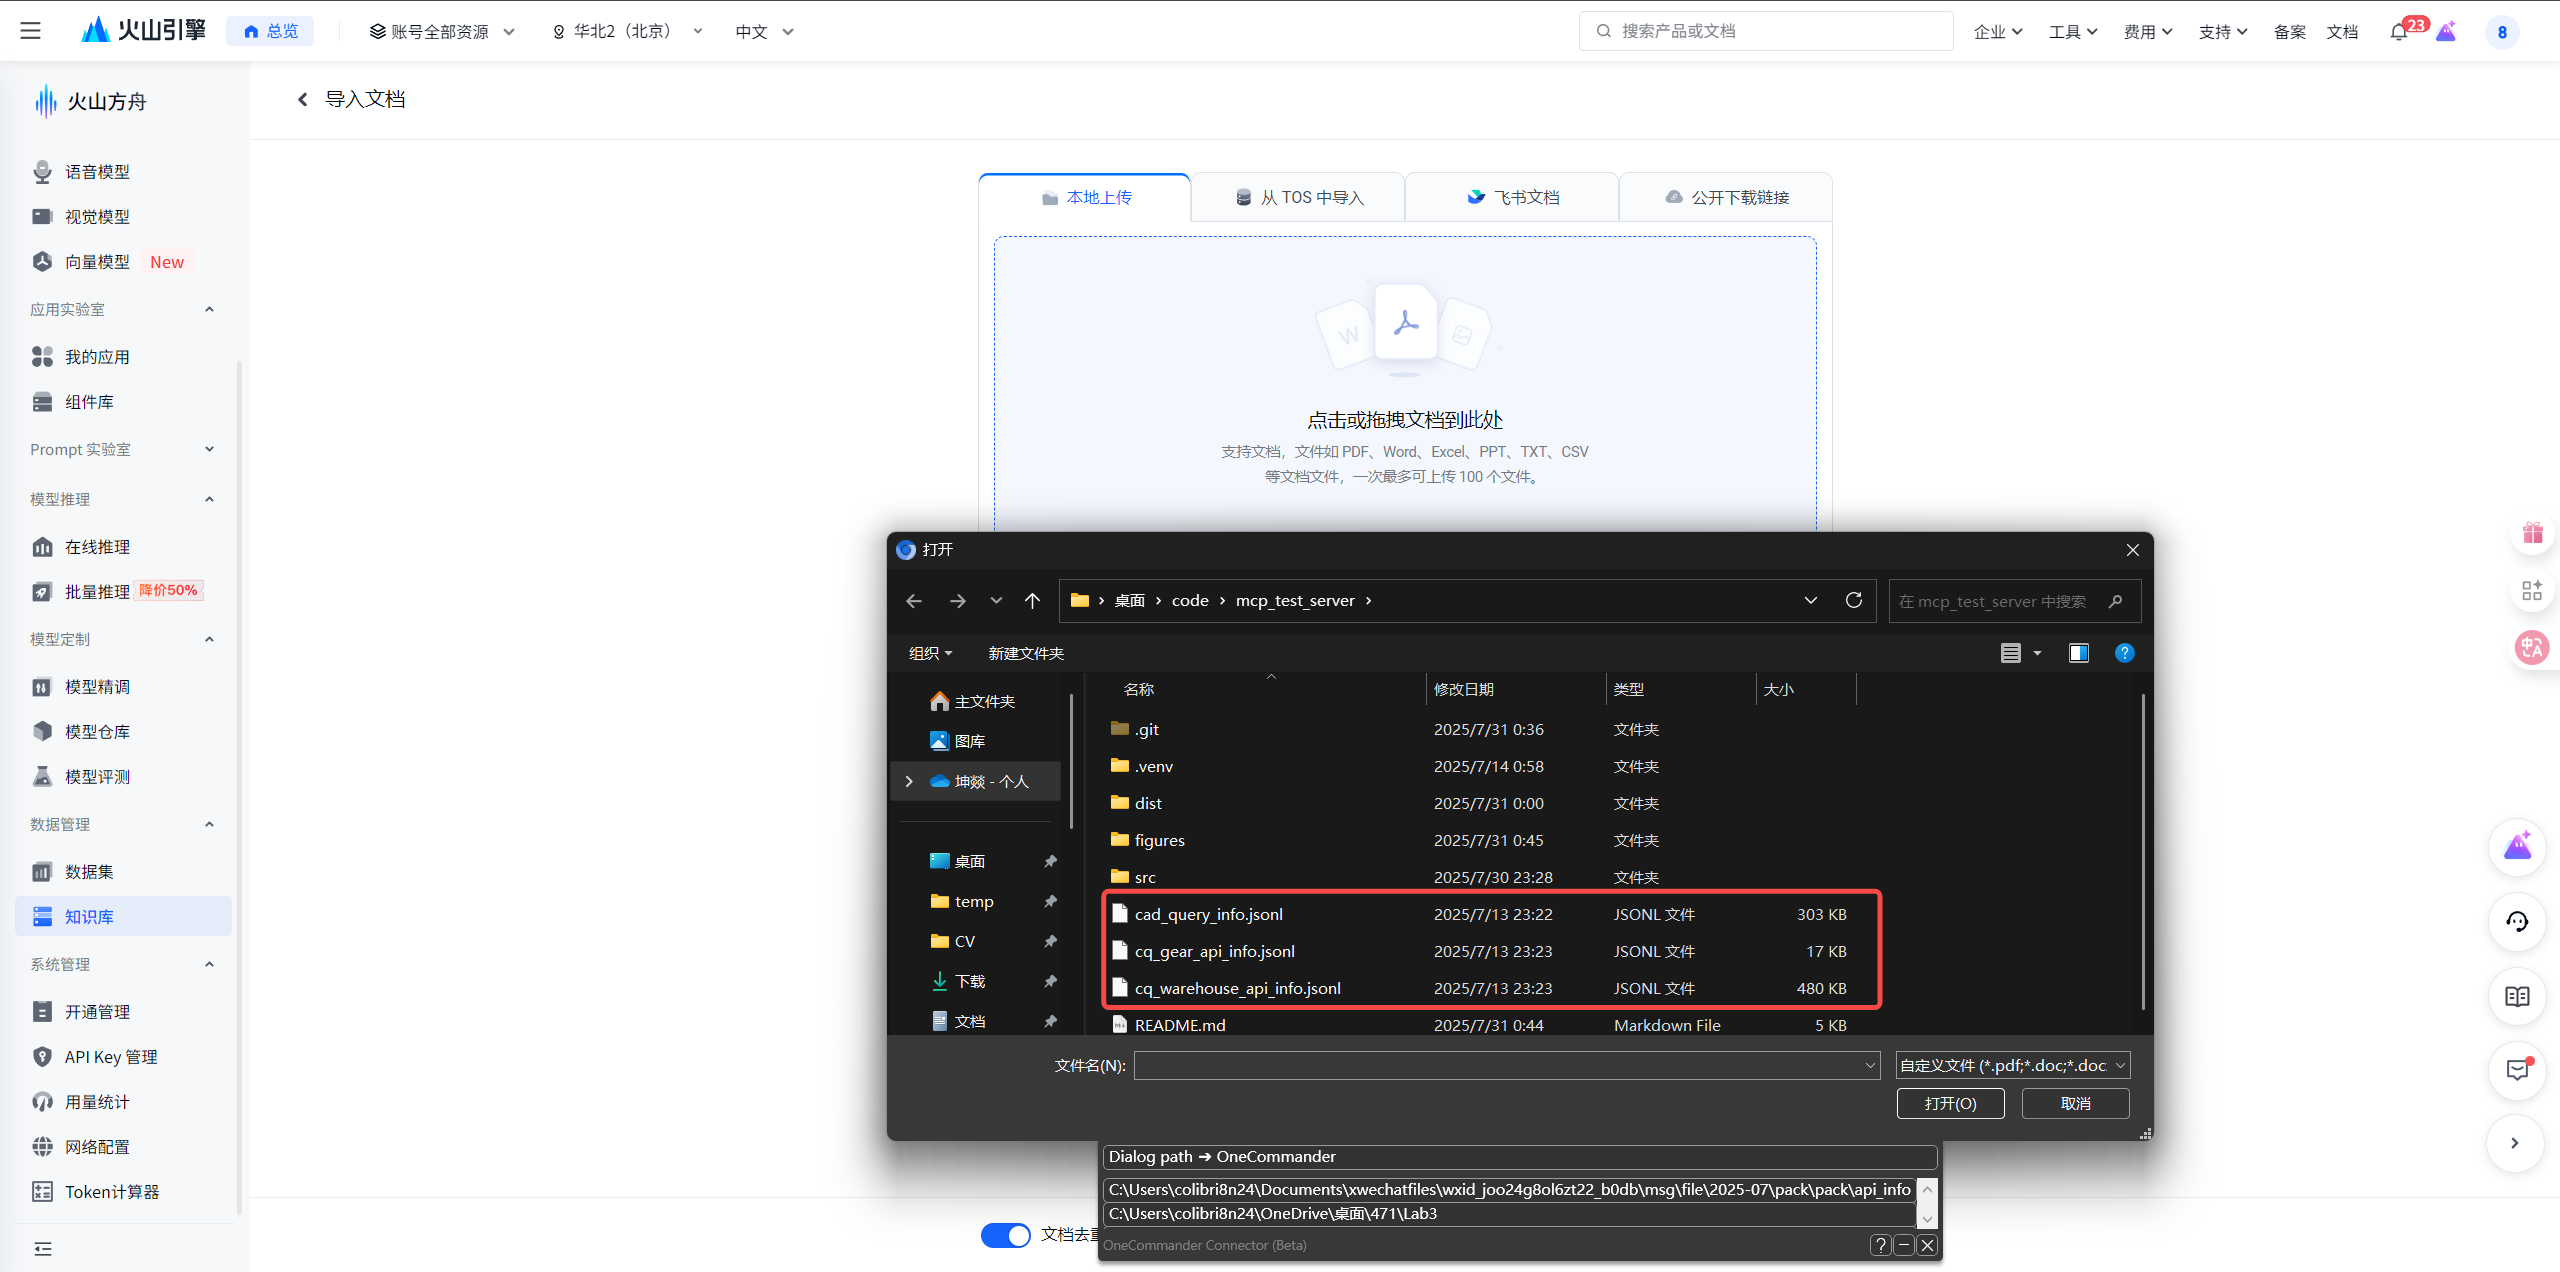
- Import the three
.jsonlfiles contained in the repository. - Click 导入 (Import) to complete the process.
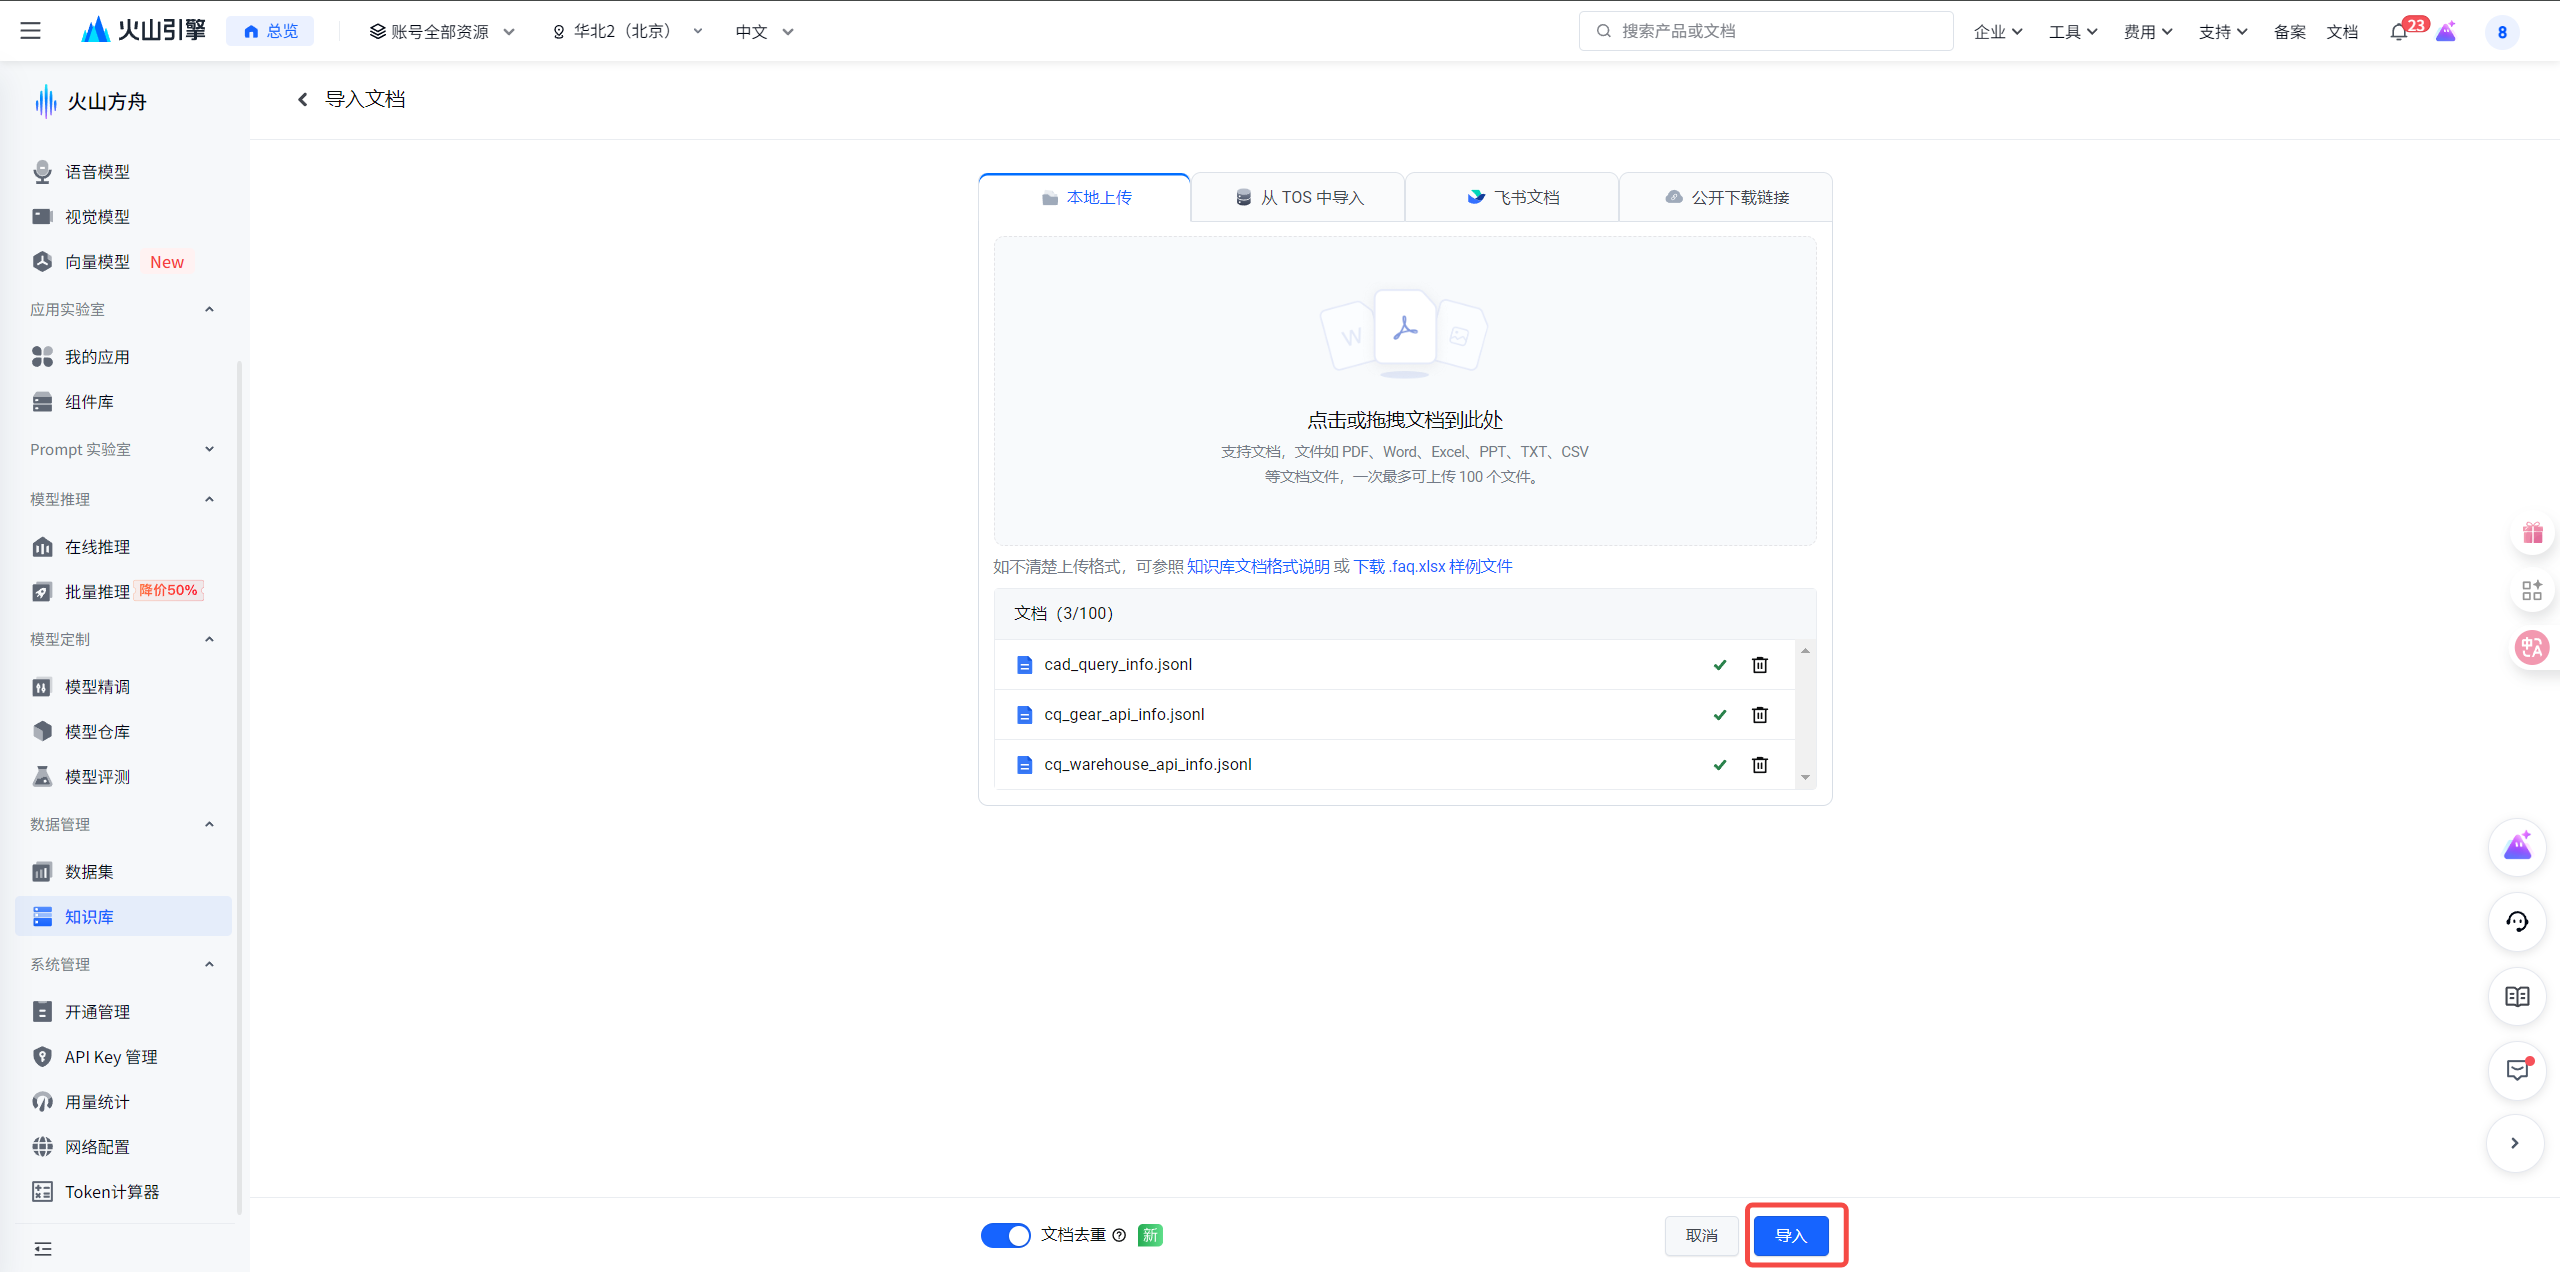
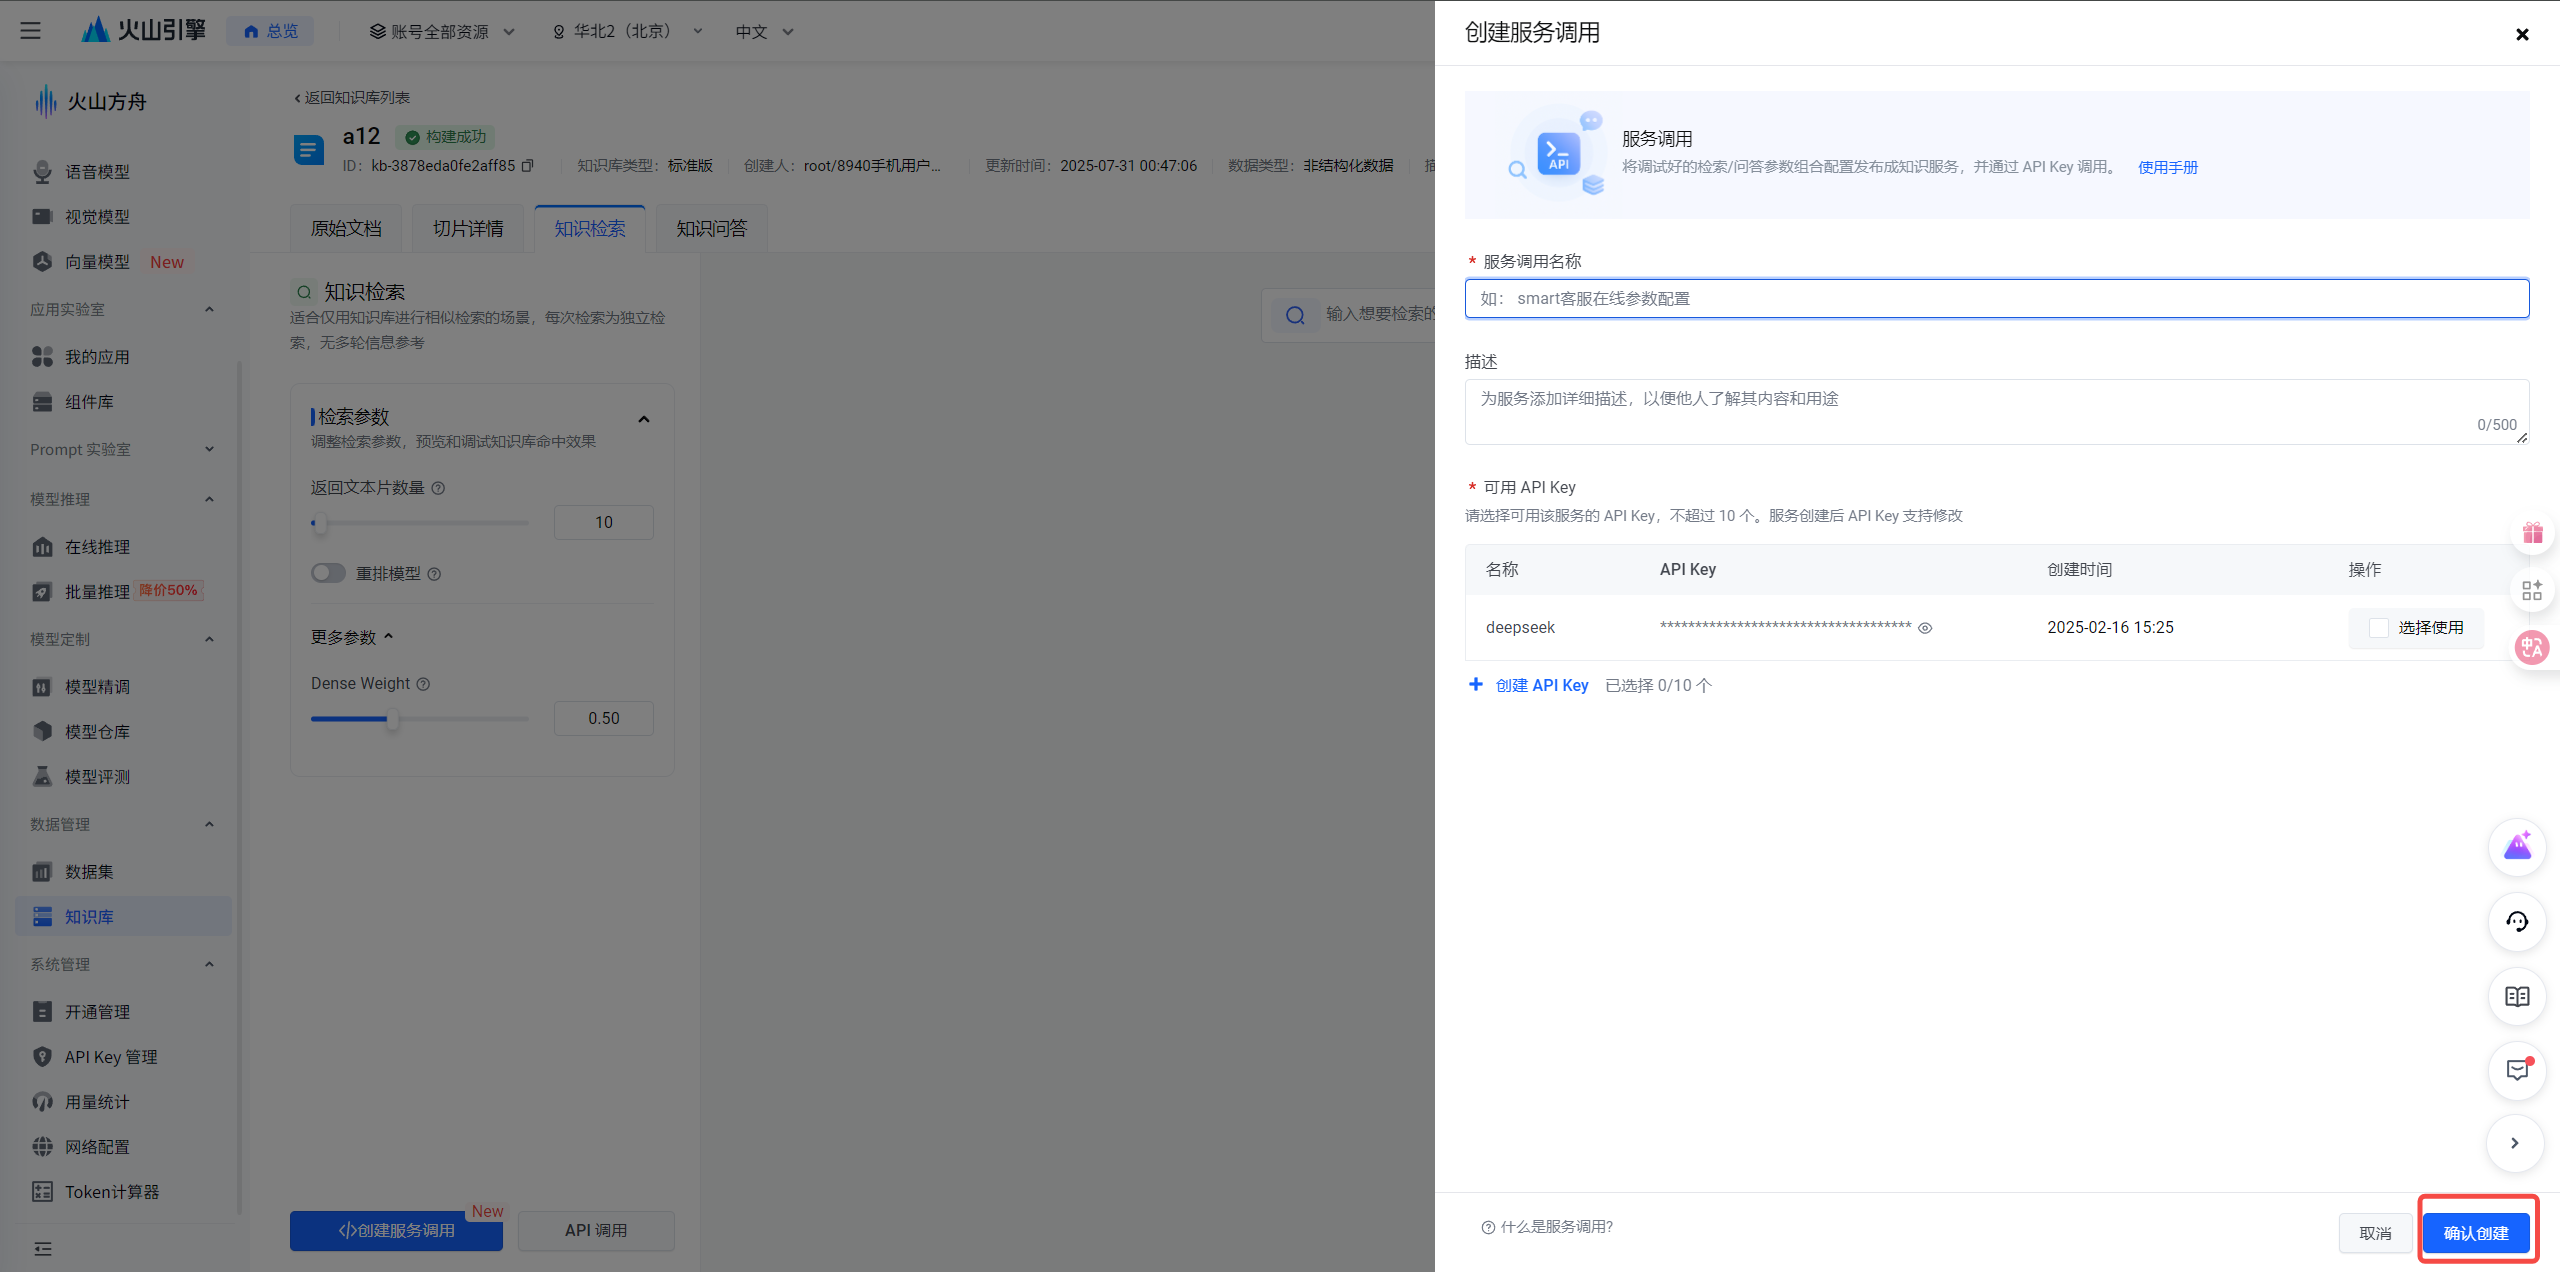
- Create a New Service Call. Follow the steps below to create a new service call:
- Click the 知识检索 (Knowledge Retrieval) tab.
- Click the 创建服务调用 (Create Service Call) button.
- Enter a name for your service call and description for it.
- Now you will choose the API key for the service call. This is the authentication key you will use in the next step.
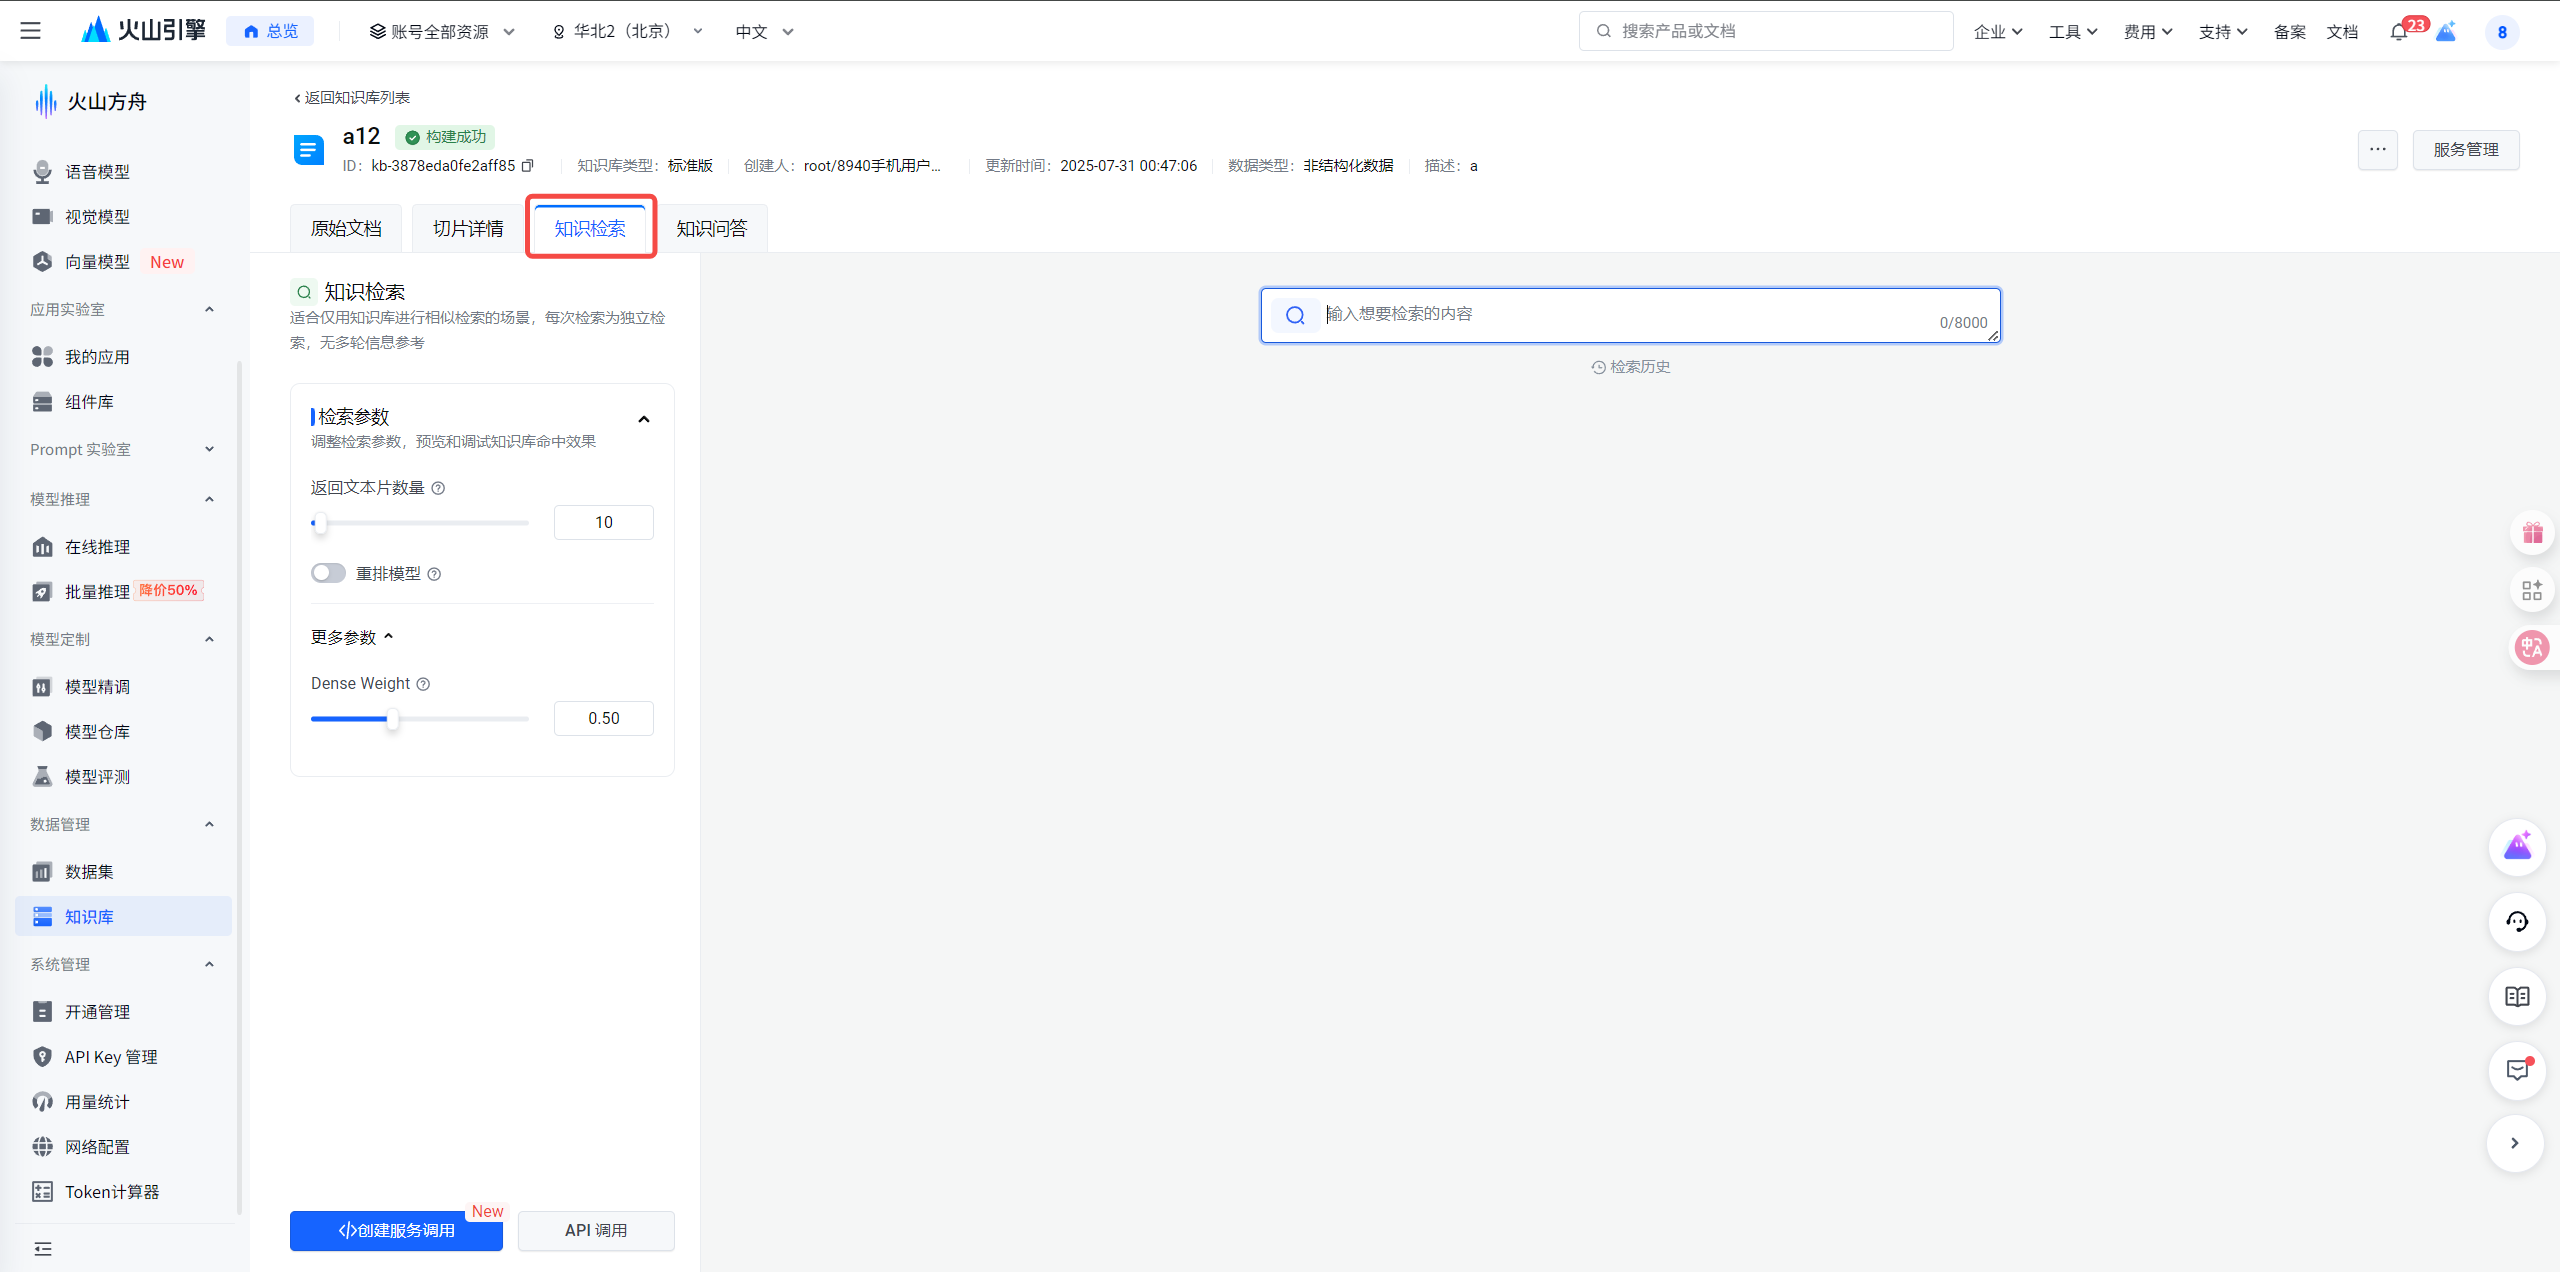
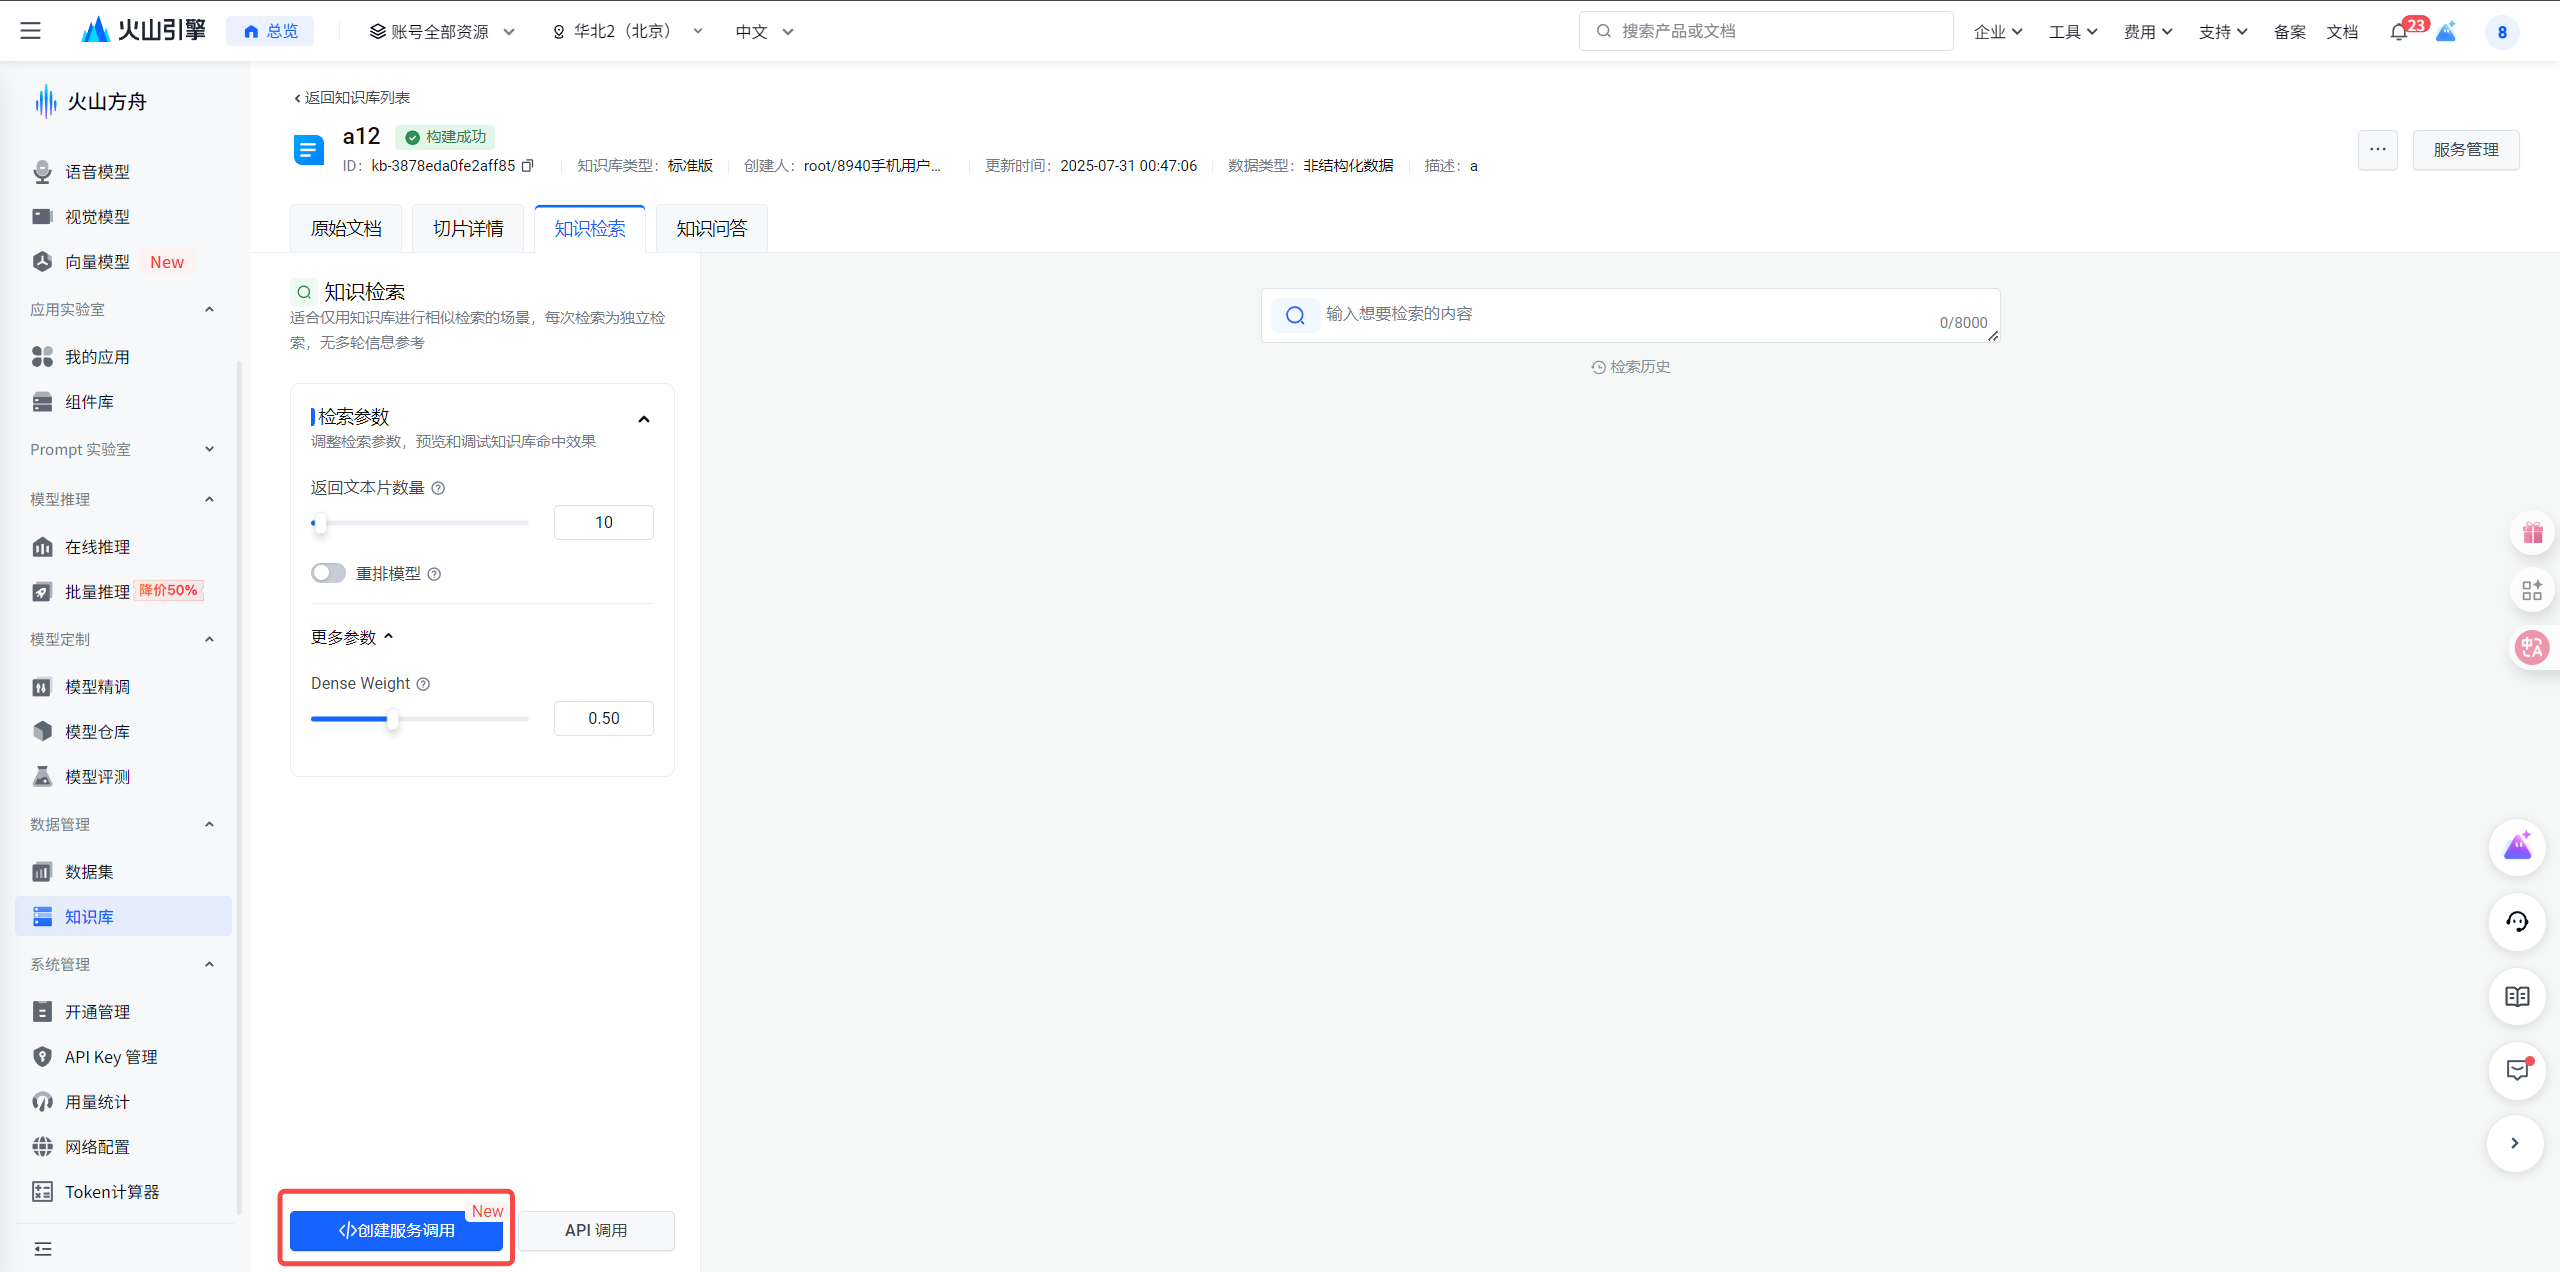
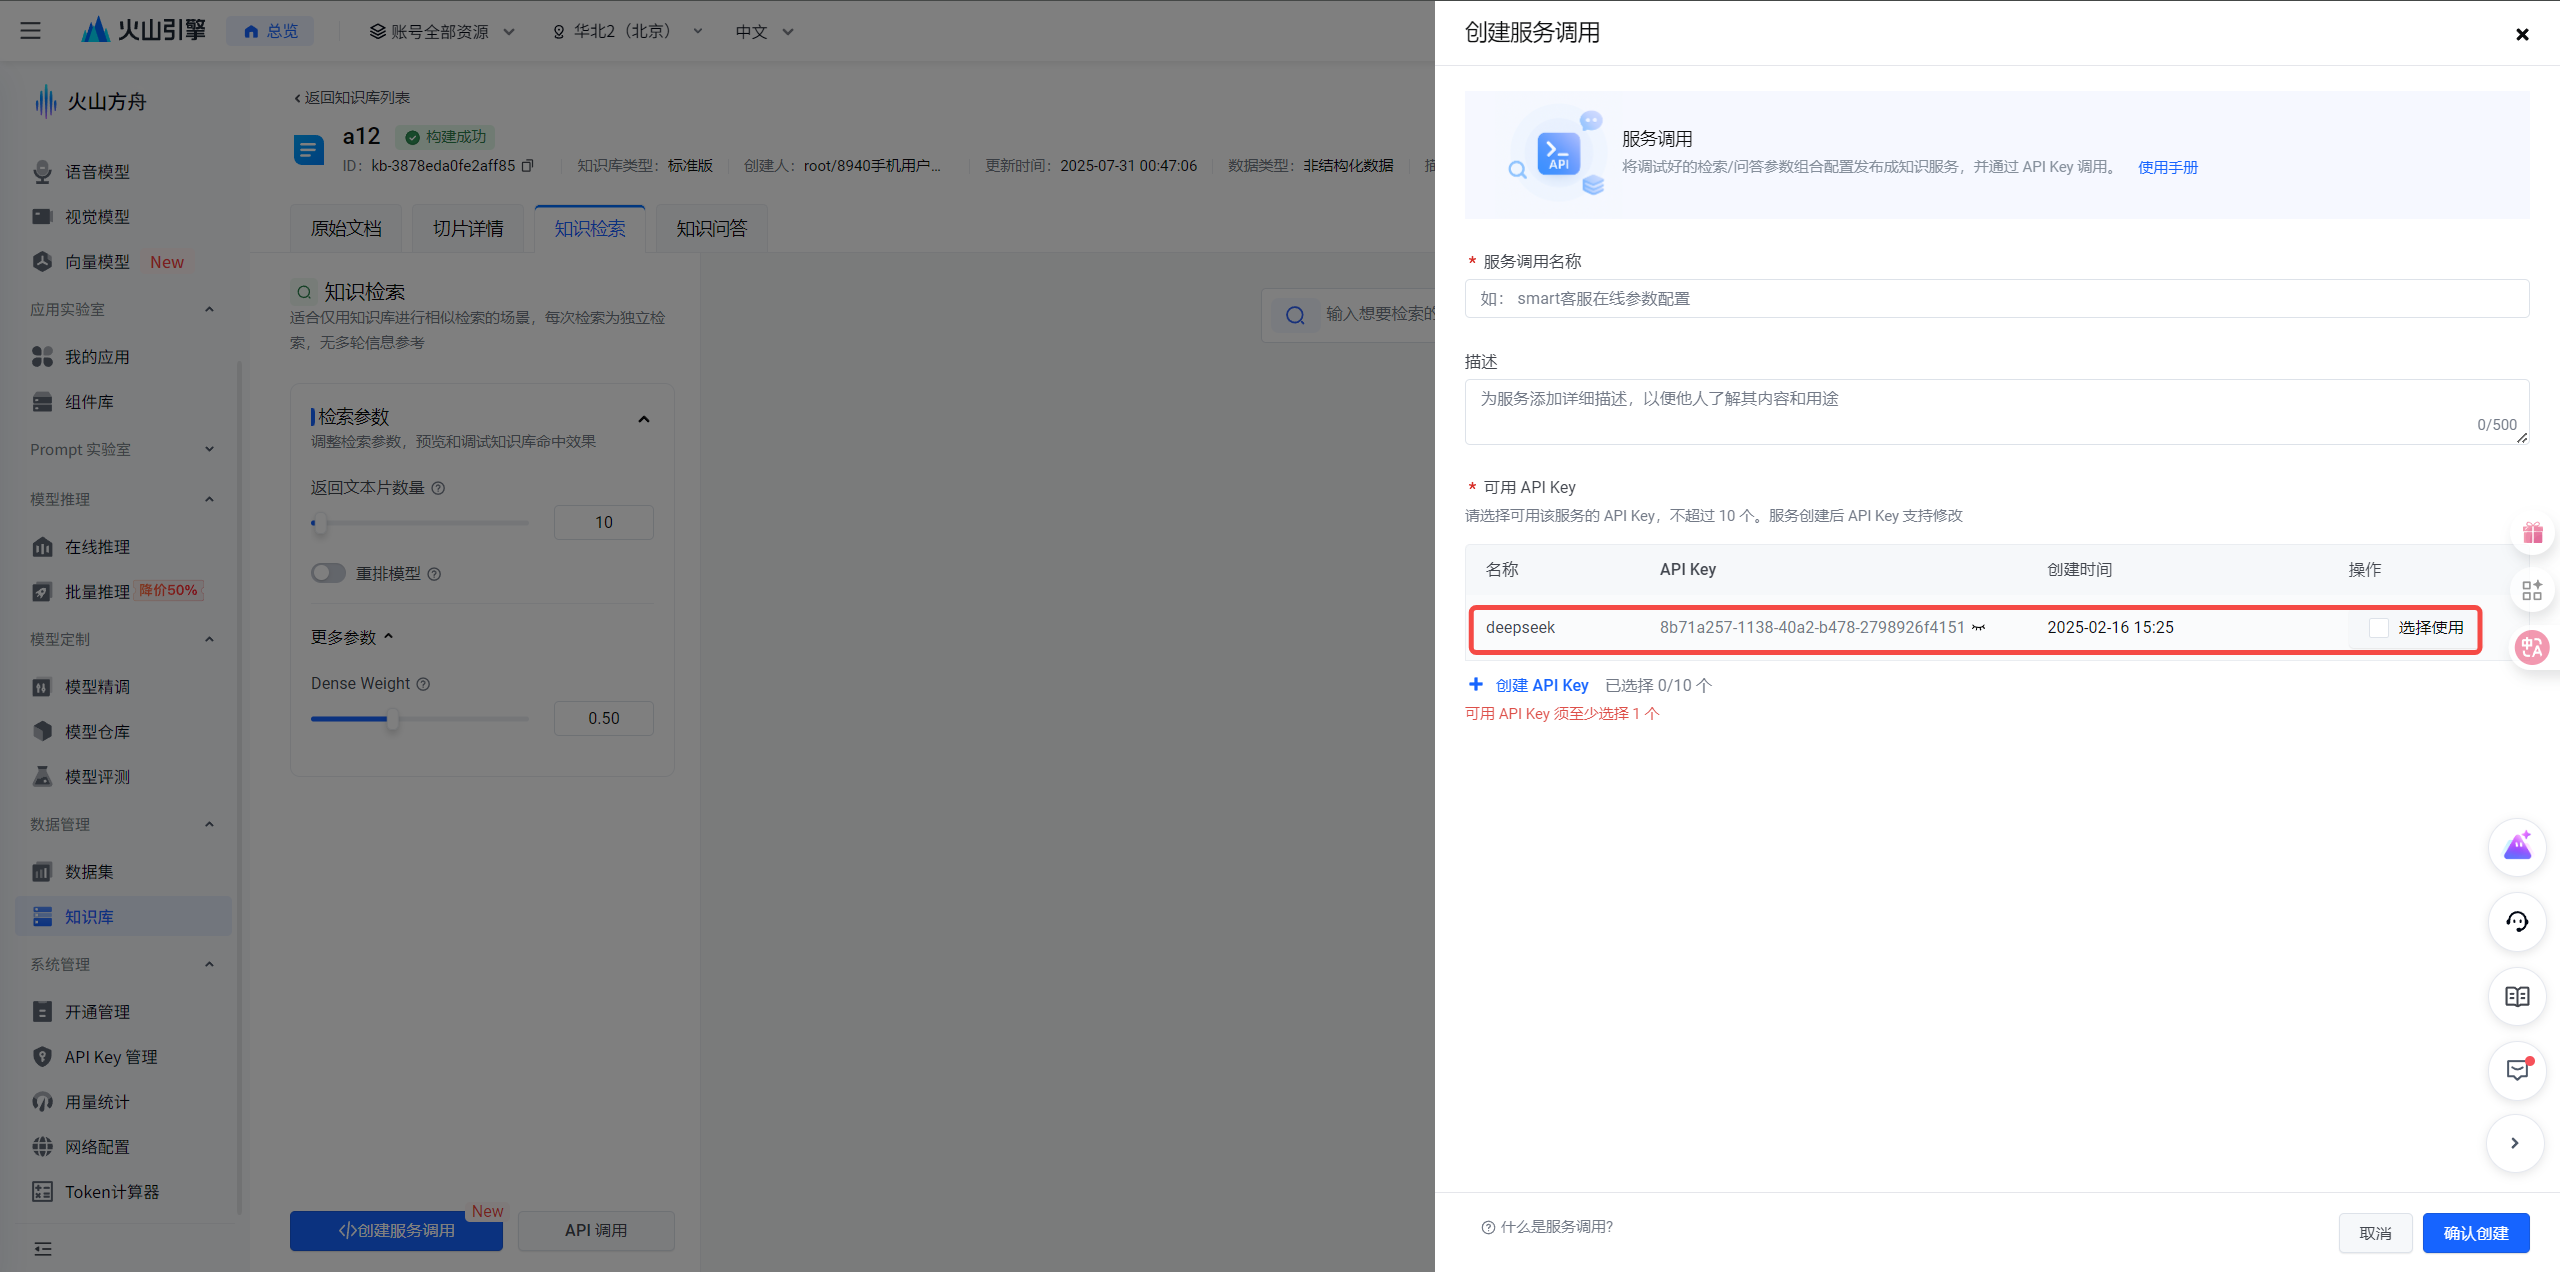
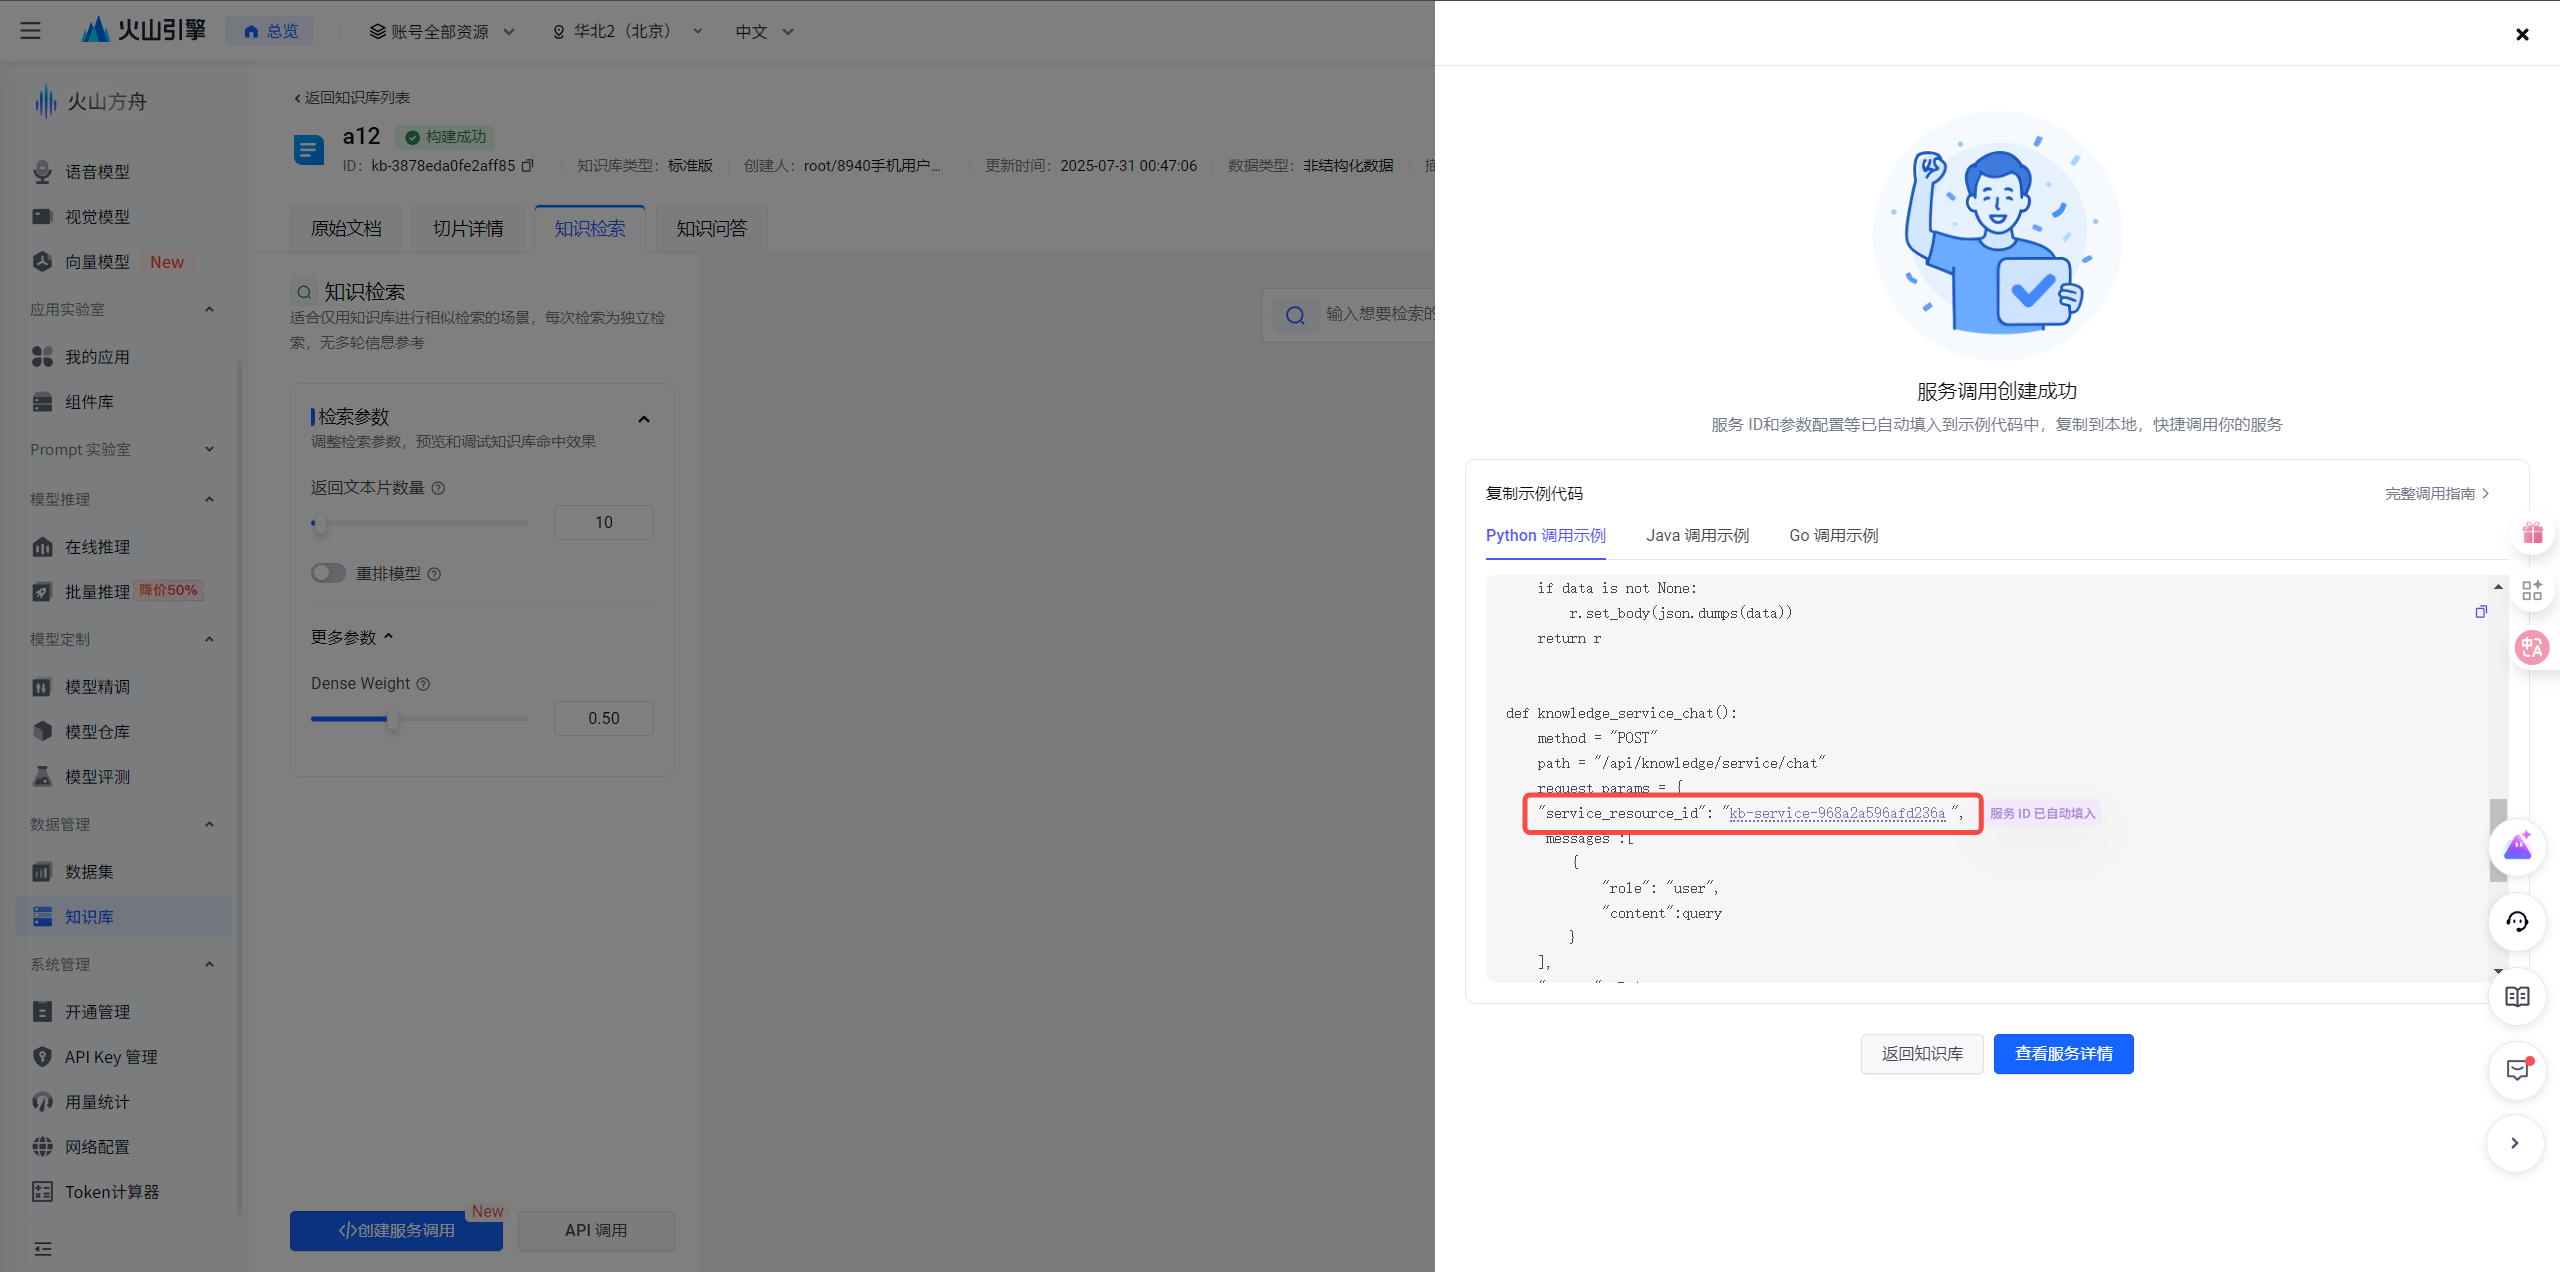
- Get the Service Resource ID. Follow the steps below to retrieve the service resource ID:
- Click the 确认创建 (Confirm Creation) button.
- Scroll down the Python 调用示例 (Python Call Example) section. You will find the Service Resource ID in the code snippet.
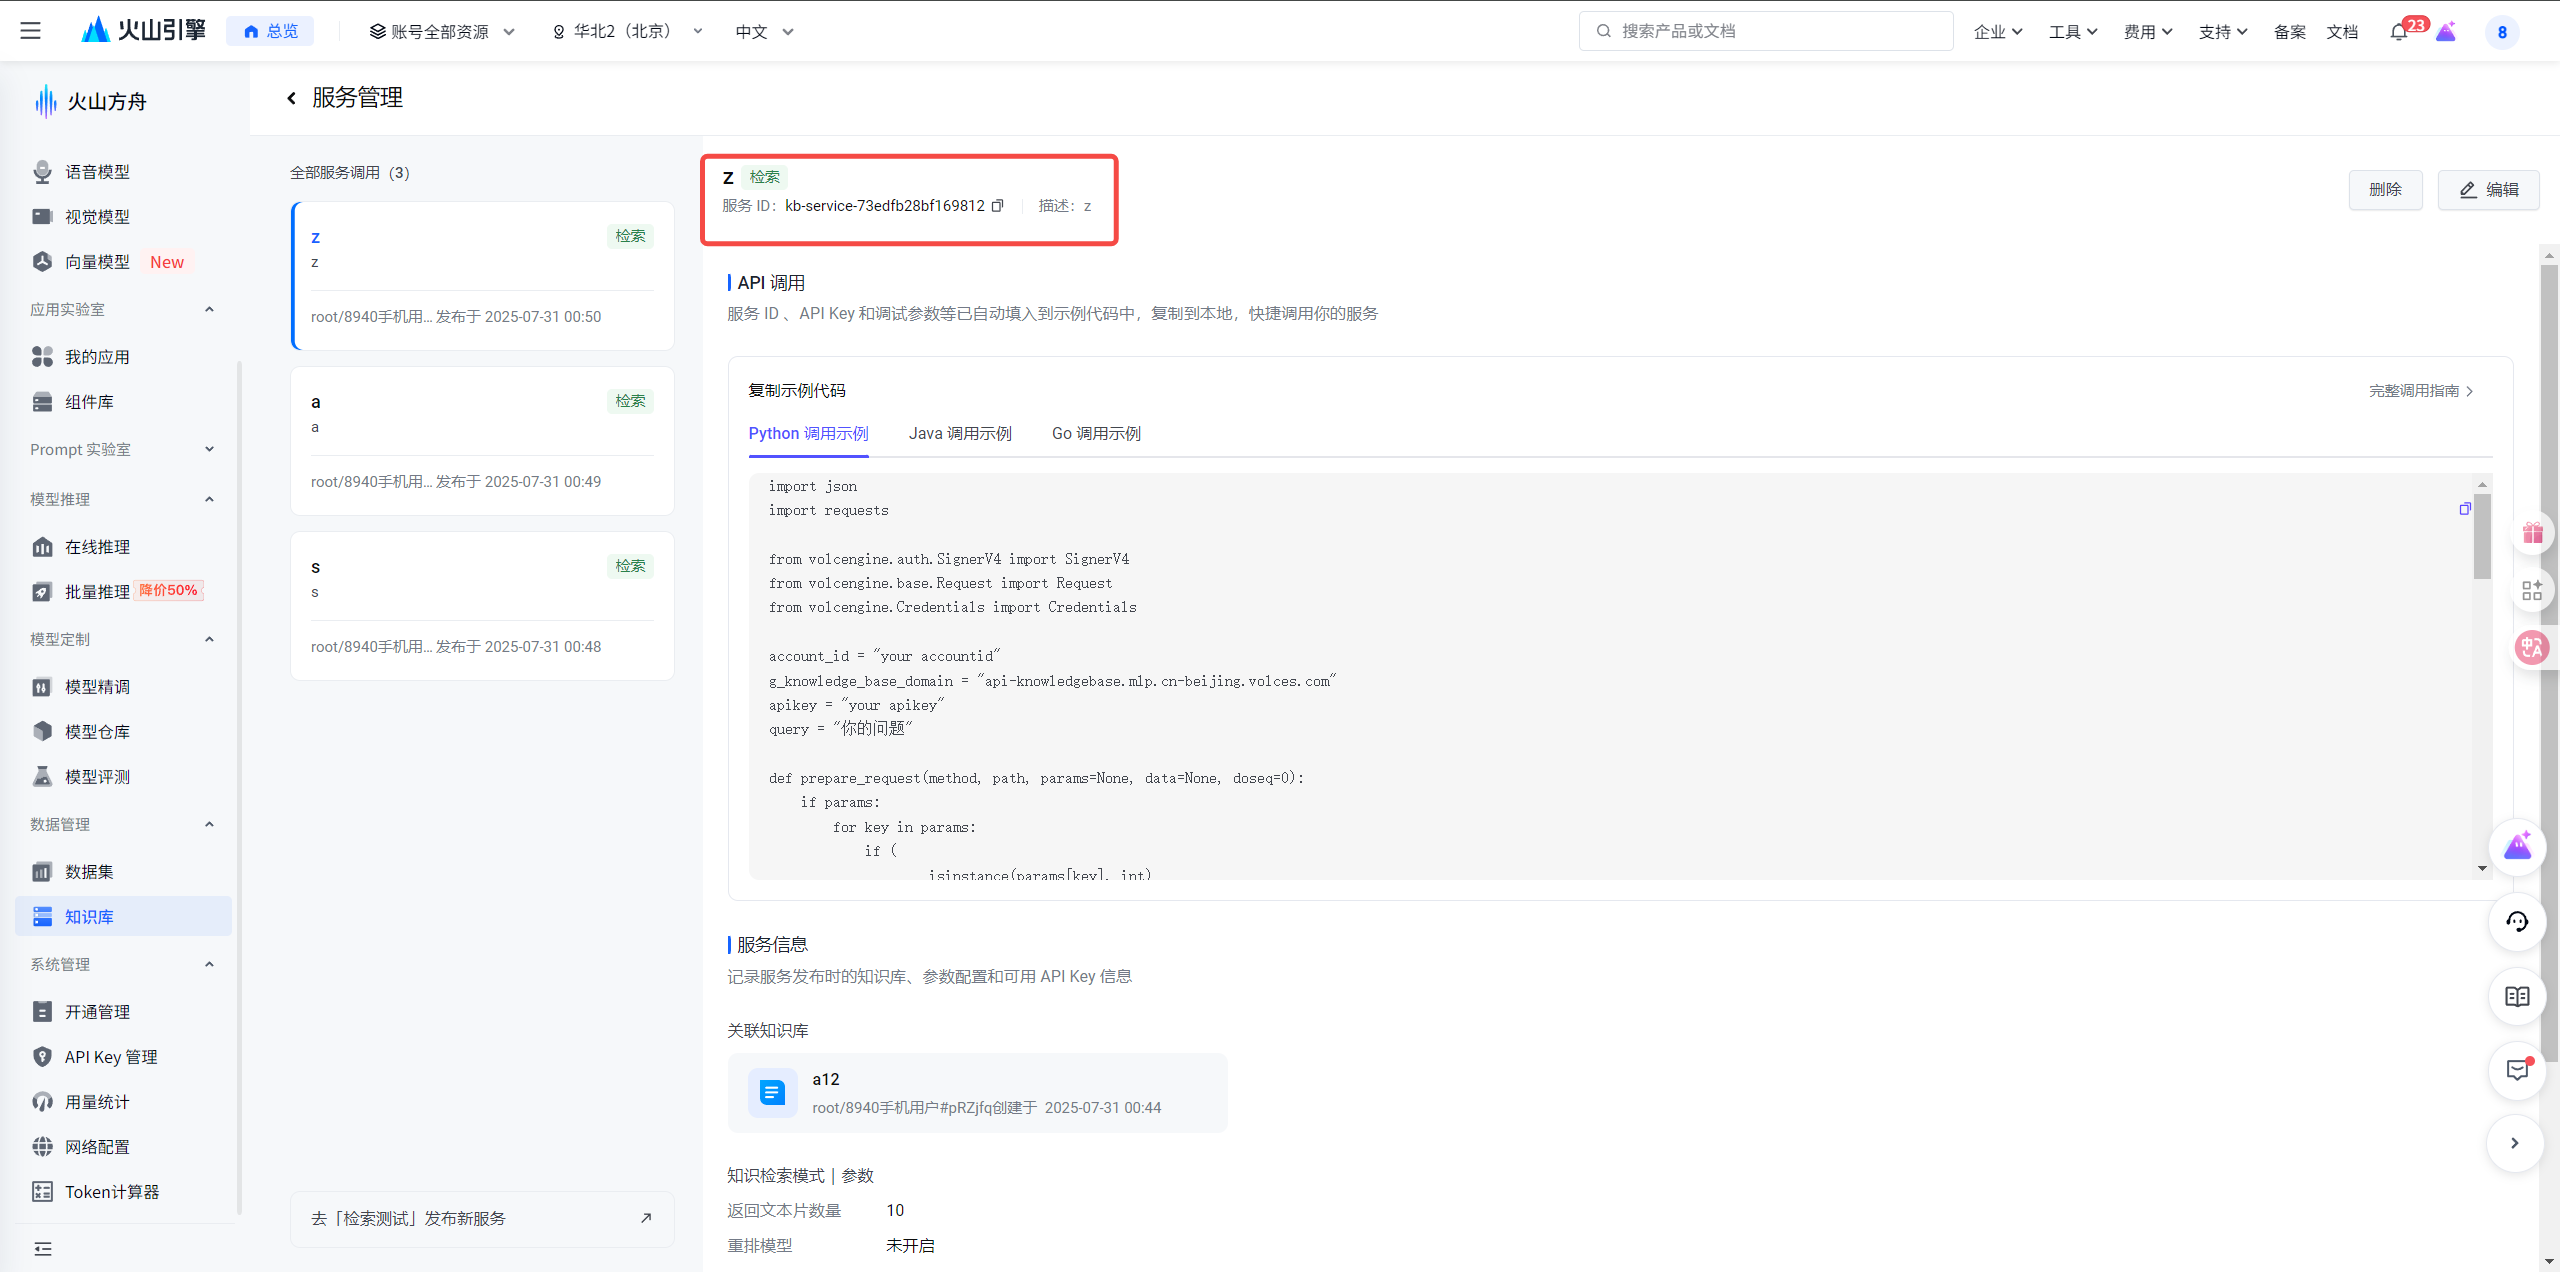
- Copy the service resource ID and save it for later use.
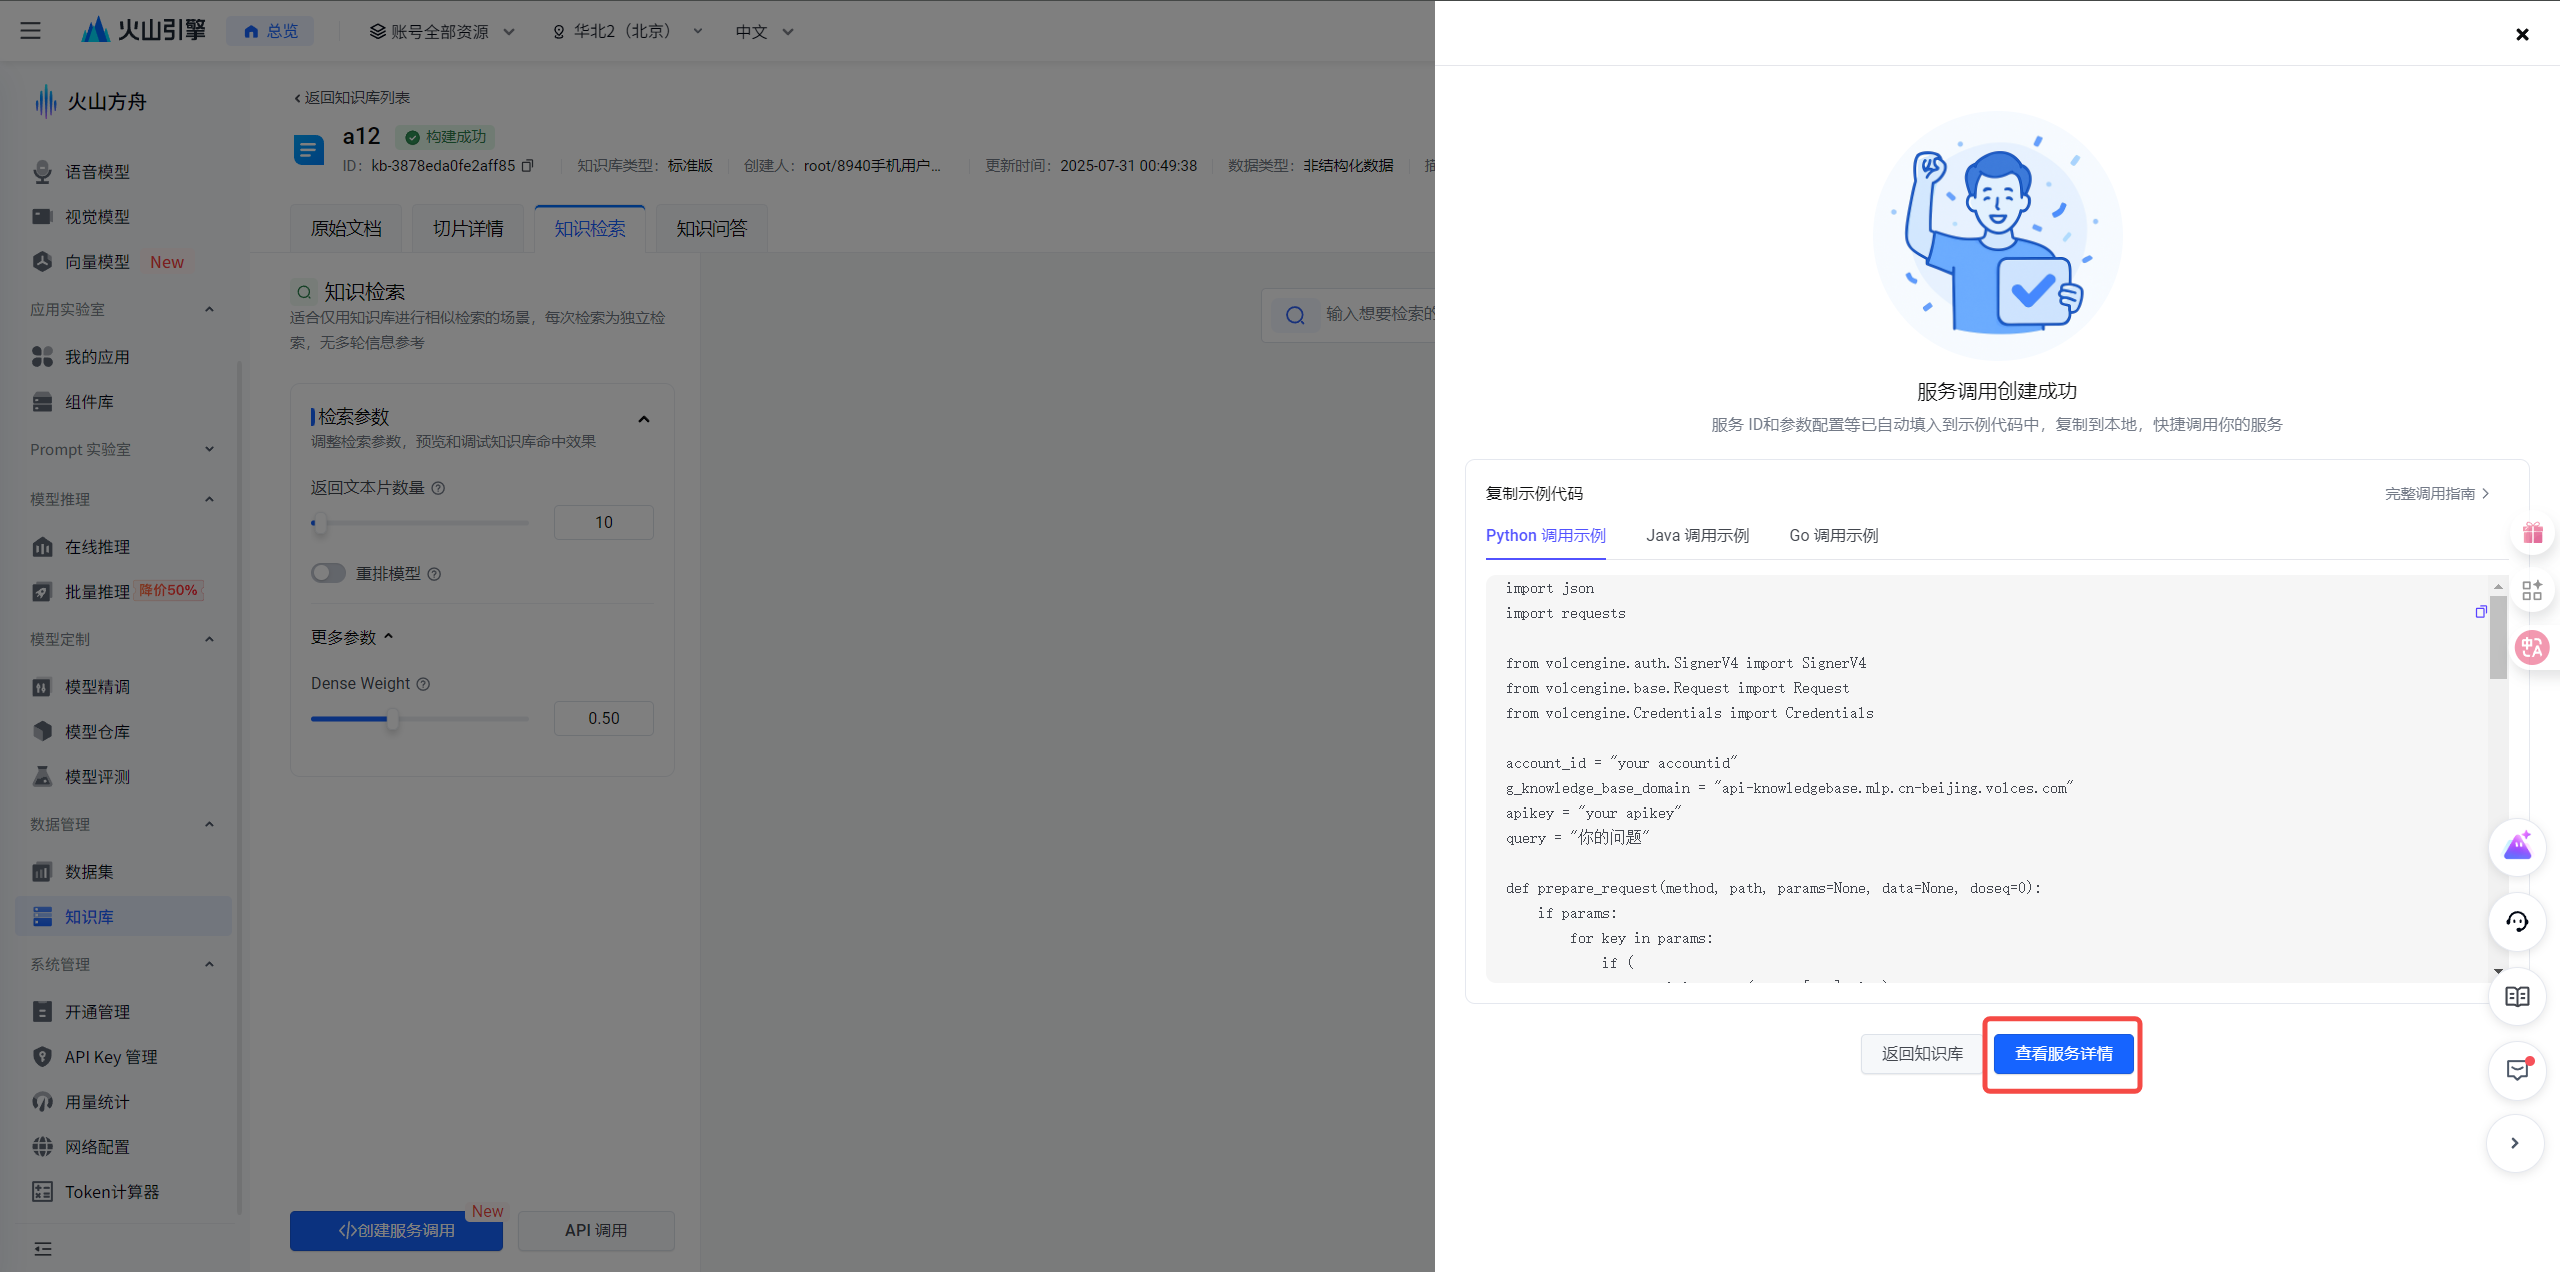
- Or you can click the 查看服务详情 (View Service Details) button to view the service resource ID.
Claude for Desktop Integration
- Go to
Claude > Settings > Developer > Edit Config > claude_desktop_config.json. - Add the following configuration to the
mcpServersobject:
This allows Claude to automatically start your server when needed.{ "mcpServers": { "creo_mcp": { "command": "uvx", "args": [ "creo-mcp", "--authorization", "YOUR_TOKEN_HERE", "--service-resource-id", "YOUR_ID_HERE" ] } } }
Cursor Integration
- Go to
Settings > MCPin Cursor. - Add a new server configuration.
- For macOS: Use "add new global MCP server" or create a
.cursor/mcp.jsonfile in your project with the following content:{ "mcpServers": { "creo_mcp": { "command": "uvx", "args": [ "creo-mcp", "--authorization", "YOUR_TOKEN_HERE", "--service-resource-id", "YOUR_ID_HERE" ] } } } - For Windows: Add a new server with the following settings:
{
    "mcpServers": {
        "creo_mcp": {
            "command": "cmd",
            "args": [
                "/c",
                "uvx",
                "creo-mcp",
                "--authorization",
                "YOUR_TOKEN_HERE",
                "--service-resource-id",
                "YOUR_ID_HERE"
            ]
        }
    }
}
- For macOS: Use "add new global MCP server" or create a
⚠️ Only run one instance of the MCP server (either via Cursor or Claude Desktop), not both simultaneously.
▶️ Manual Execution
If you need to run the server manually for debugging, first install it locally:
# Clone the repo
git clone https://github.com/yangkunyi/creo-mcp.git
cd creo-mcp

# Create a virtual environment and install in editable mode
uv venv
source .venv/bin/activate
uv pip install -e .
Then, run the server with your credentials:
creo-mcp --authorization YOUR_TOKEN_HERE --service-resource-id YOUR_ID_HERE
🛠️ Available Tools
The following tools are exposed by the server for remote execution:
execute_python_code: Executes a given string of Python code.open_file_in_cad: Imports a.STEPfile into Creo and opens it.retrieve_from_knowledge_base: Performs a retrieval query against the configured Volcengine knowledge base.
🙏 Acknowledgements
The structure and setup instructions for this project were heavily inspired by the blender-mcp project. Many thanks to its contributors for paving the way.
📄 License
This project is licensed under the MIT License. See the LICENSE file for more details.
Установка Creo
У этого сервера нет опубликованного пакета — он собирается из исходников. Открой репозиторий и следуй инструкции в README.
▸ github.com/yangkunyi/creo-mcpFAQ
Creo MCP бесплатный?
Да, Creo MCP бесплатный — установка в пару кликов через Unyly без оплаты.
Нужен ли API-ключ для Creo?
Нет, Creo работает без API-ключей и переменных окружения.
Creo — hosted или self-hosted?
Self-hosted: сервер запускается локально на твоей машине командой из раздела установки.
Как установить Creo в Claude Desktop, Claude Code или Cursor?
Открой Creo на unyly.org, выбери вкладку своего клиента (Claude Desktop, Claude Code, Cursor) и нажми Install — конфиг сгенерируется автоматически, без правки JSON.
Похожие MCP
GitHub
PRs, issues, code search, CI status
 автор: GitHub
Filesystem
Secure file operations with configurable access controls.
Memory
Knowledge graph-based persistent memory system.
Template MCP Server
A CLI tool to create a new Model Context Protocol server project with TypeScript support, dual transport options, and an extensible structure
 автор: mcpdotdirect
Compare Creo with
Не уверен что выбрать?
Найди свой стек за 60 секунд
Автор?
Embed-бейдж для README
Похожее
Все в категории development