
Auth0 3lo Server
FreeNot checkedDemonstrates the AgentCore Gateway 3-Legged OAuth flow with Auth0, exposing whoami and echo tools for end-to-end authorization code testing.

About
Demonstrates the AgentCore Gateway 3-Legged OAuth flow with Auth0, exposing whoami and echo tools for end-to-end authorization code testing.
README
A complete working example of the Amazon Bedrock AgentCore Gateway 3-Legged OAuth (Authorization Code) flow using Auth0 as both the inbound JWT authorizer and the outbound credential provider, with a Lambda MCP server as the target.
What This Demonstrates
- Inbound JWT authentication (Auth0 token → Gateway)
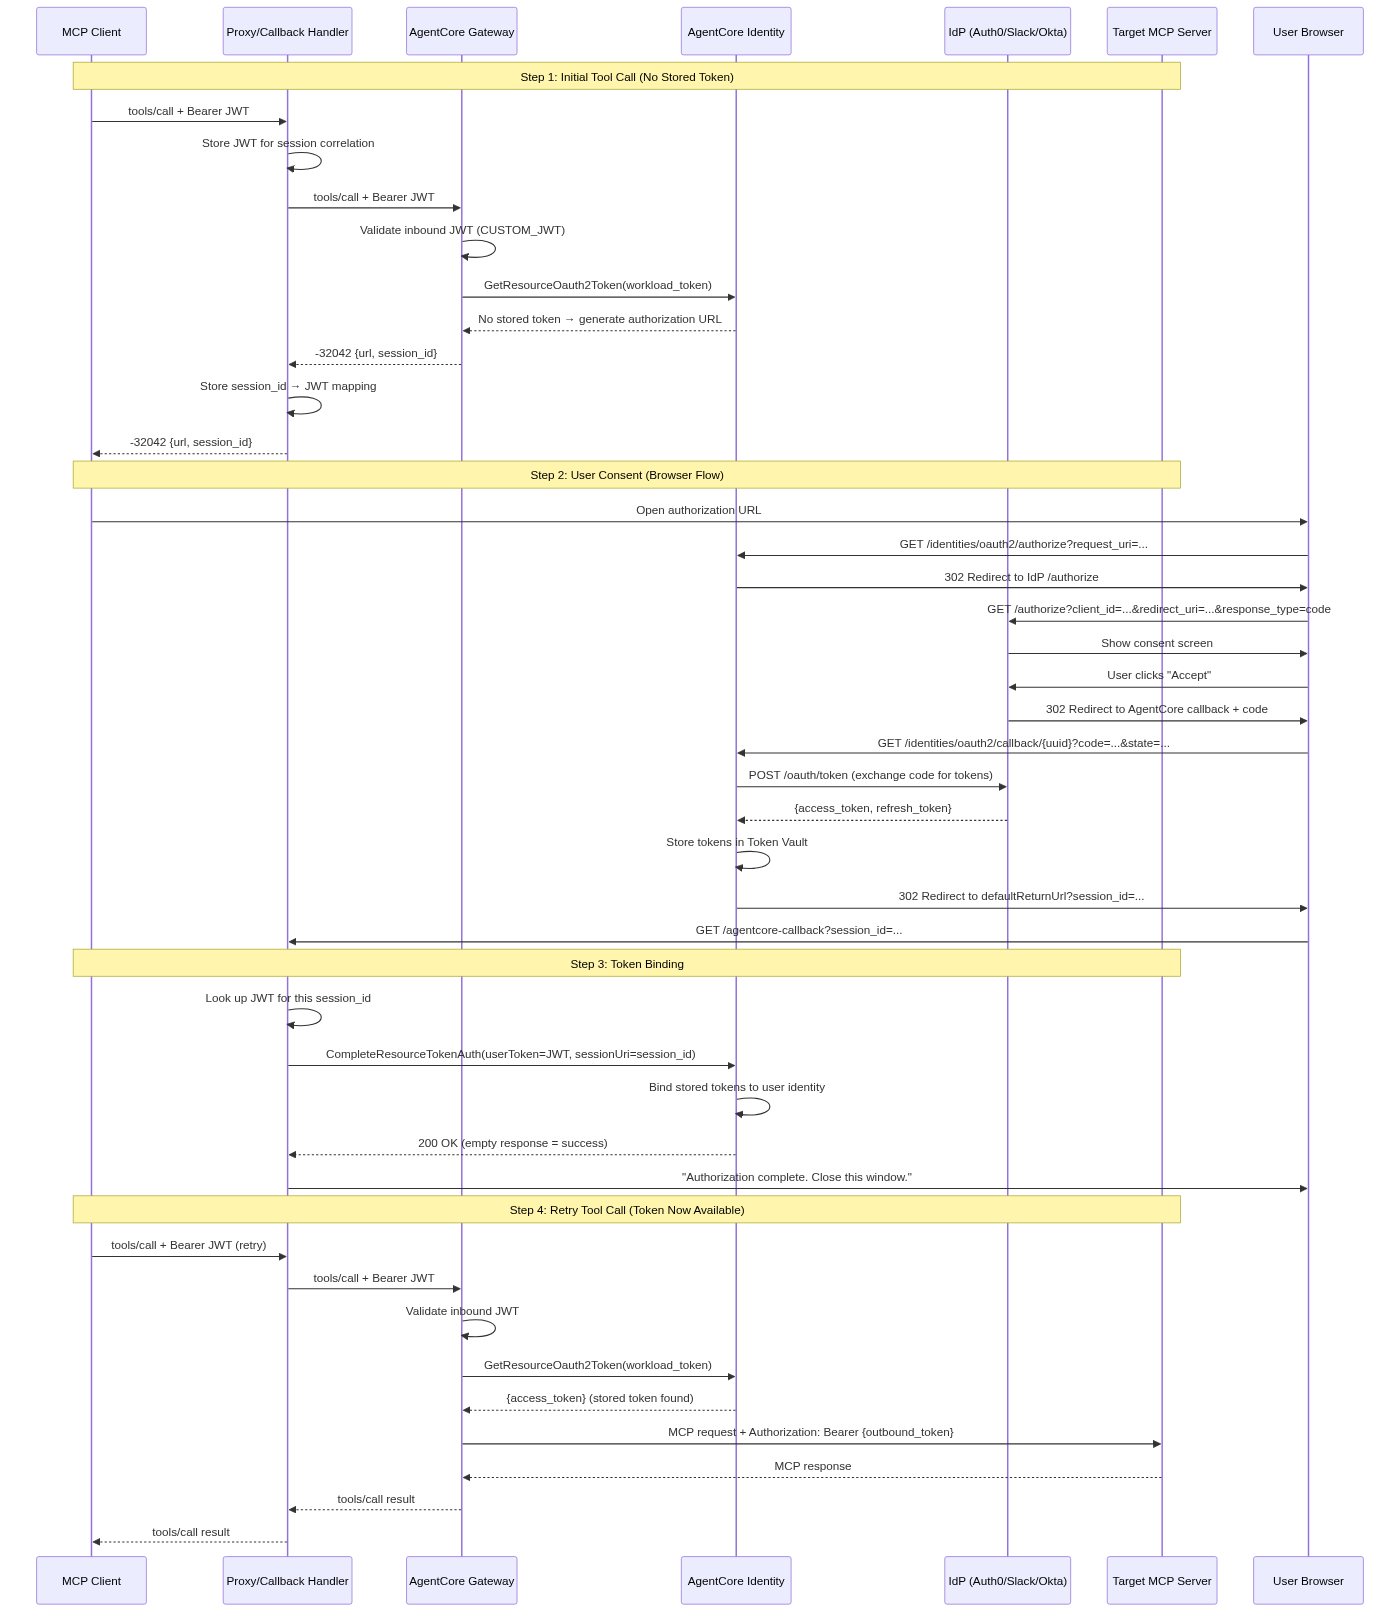
tools/listdiscovering tools from a remote MCP servertools/calltriggering a -32042 OAuth elicitation- User completing OAuth consent at Auth0
- Callback handler receiving the session_id
CompleteResourceTokenAuthbinding the token to the user- Subsequent
tools/callsucceeding end-to-end
Architecture
MCP Client (curl) --> AgentCore Gateway --> Lambda MCP Server
       |                    |
       |                    +--> AgentCore Identity (token store)
       |                                |
       |                                +--> Auth0 (consent + code exchange)
       |
       +--> Callback Handler (Flask @ localhost:5000)
                    |
                    +--> Receives session_id after consent
                    +--> Calls CompleteResourceTokenAuth
Prerequisites
- AWS account with Amazon Bedrock AgentCore access
- AWS CLI with
bedrock-agentcoreandbedrock-agentcore-controlcommands - Auth0 free developer account (sign up)
- Python 3.12+
- pip
Quick Start
# Clone this repo
git clone <repo-url>
cd agentcore-3lo-auth0-example

# Install dependencies
pip install -r requirements.txt

# Copy and fill in your credentials
cp .env.example .env
# Edit .env with your Auth0 and AWS values

# Start the Flask app
python app.py
Then follow the step-by-step guide below.
Step-by-Step Guide
Step 1: Auth0 Configuration
Create an API
- Auth0 Dashboard > APIs > Create API
- Name:
agentcore-gateway-api - Identifier:
https://agentcore-gateway-api - Signing Algorithm: RS256
Configure API Settings
- Permissions tab: Add
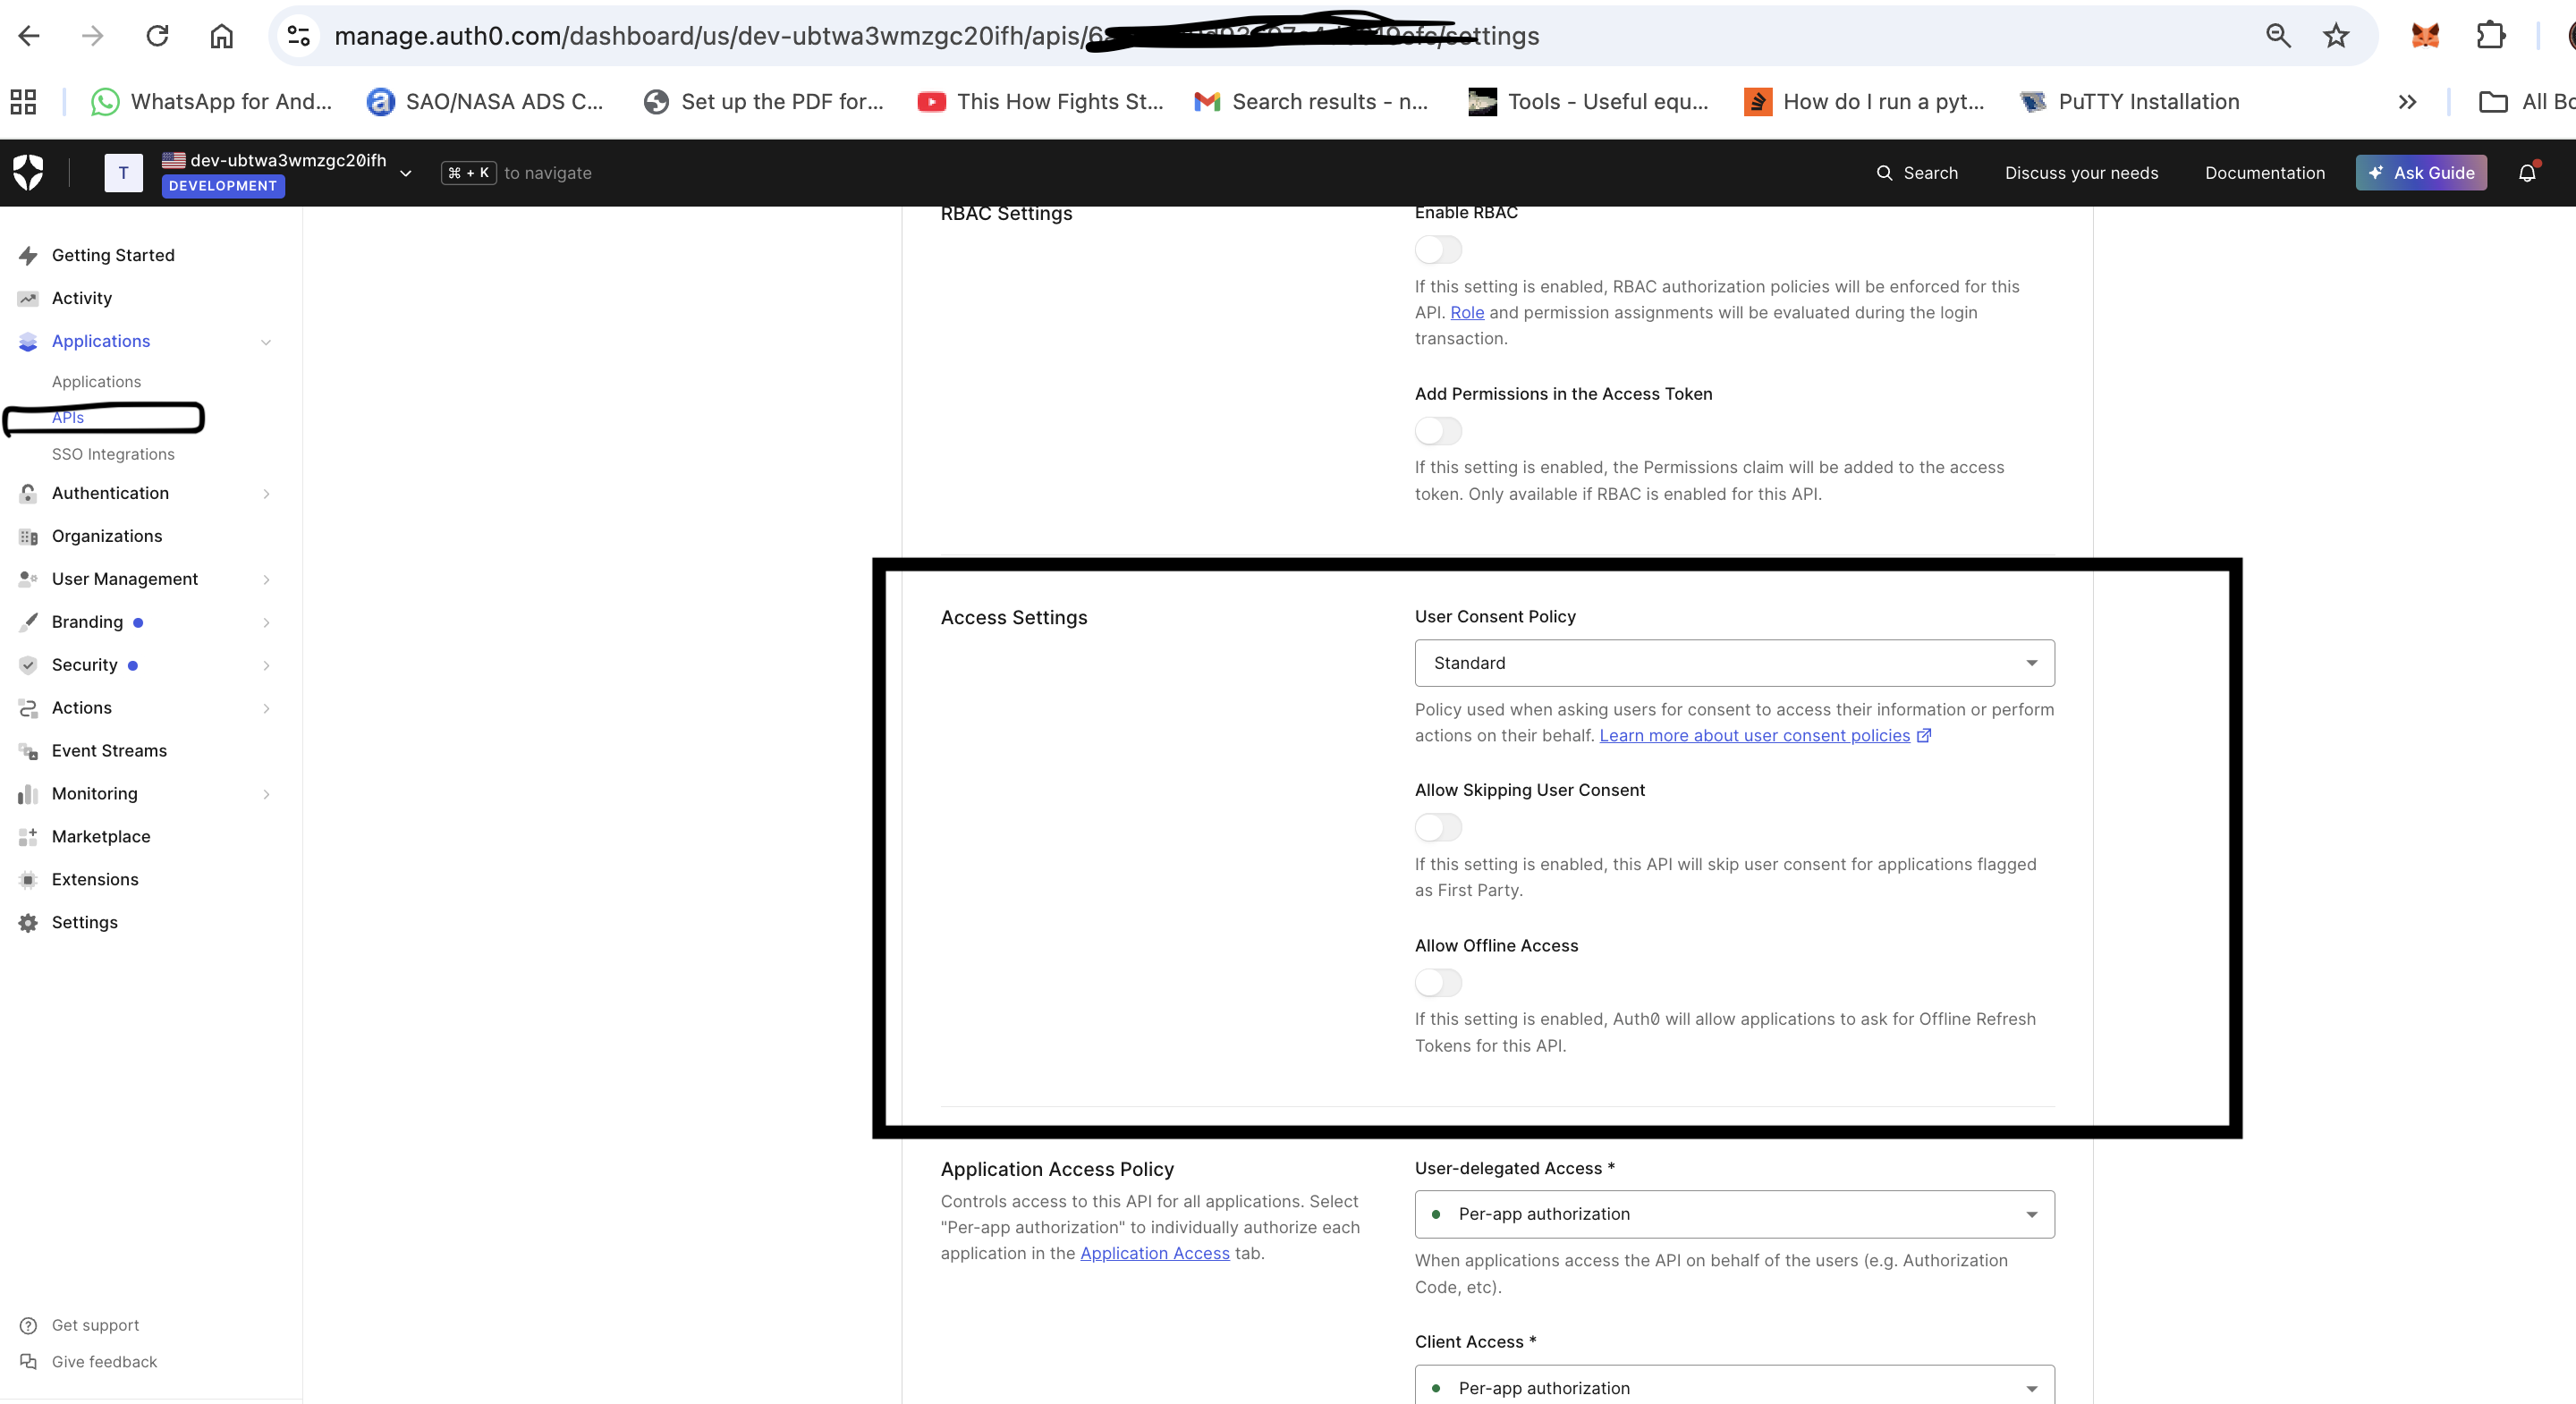
access:tools(description: "Access MCP tools") - Settings tab: Set "Allow Skipping User Consent" to OFF
Create an Application
- Auth0 Dashboard > Applications > Create Application
- Name:
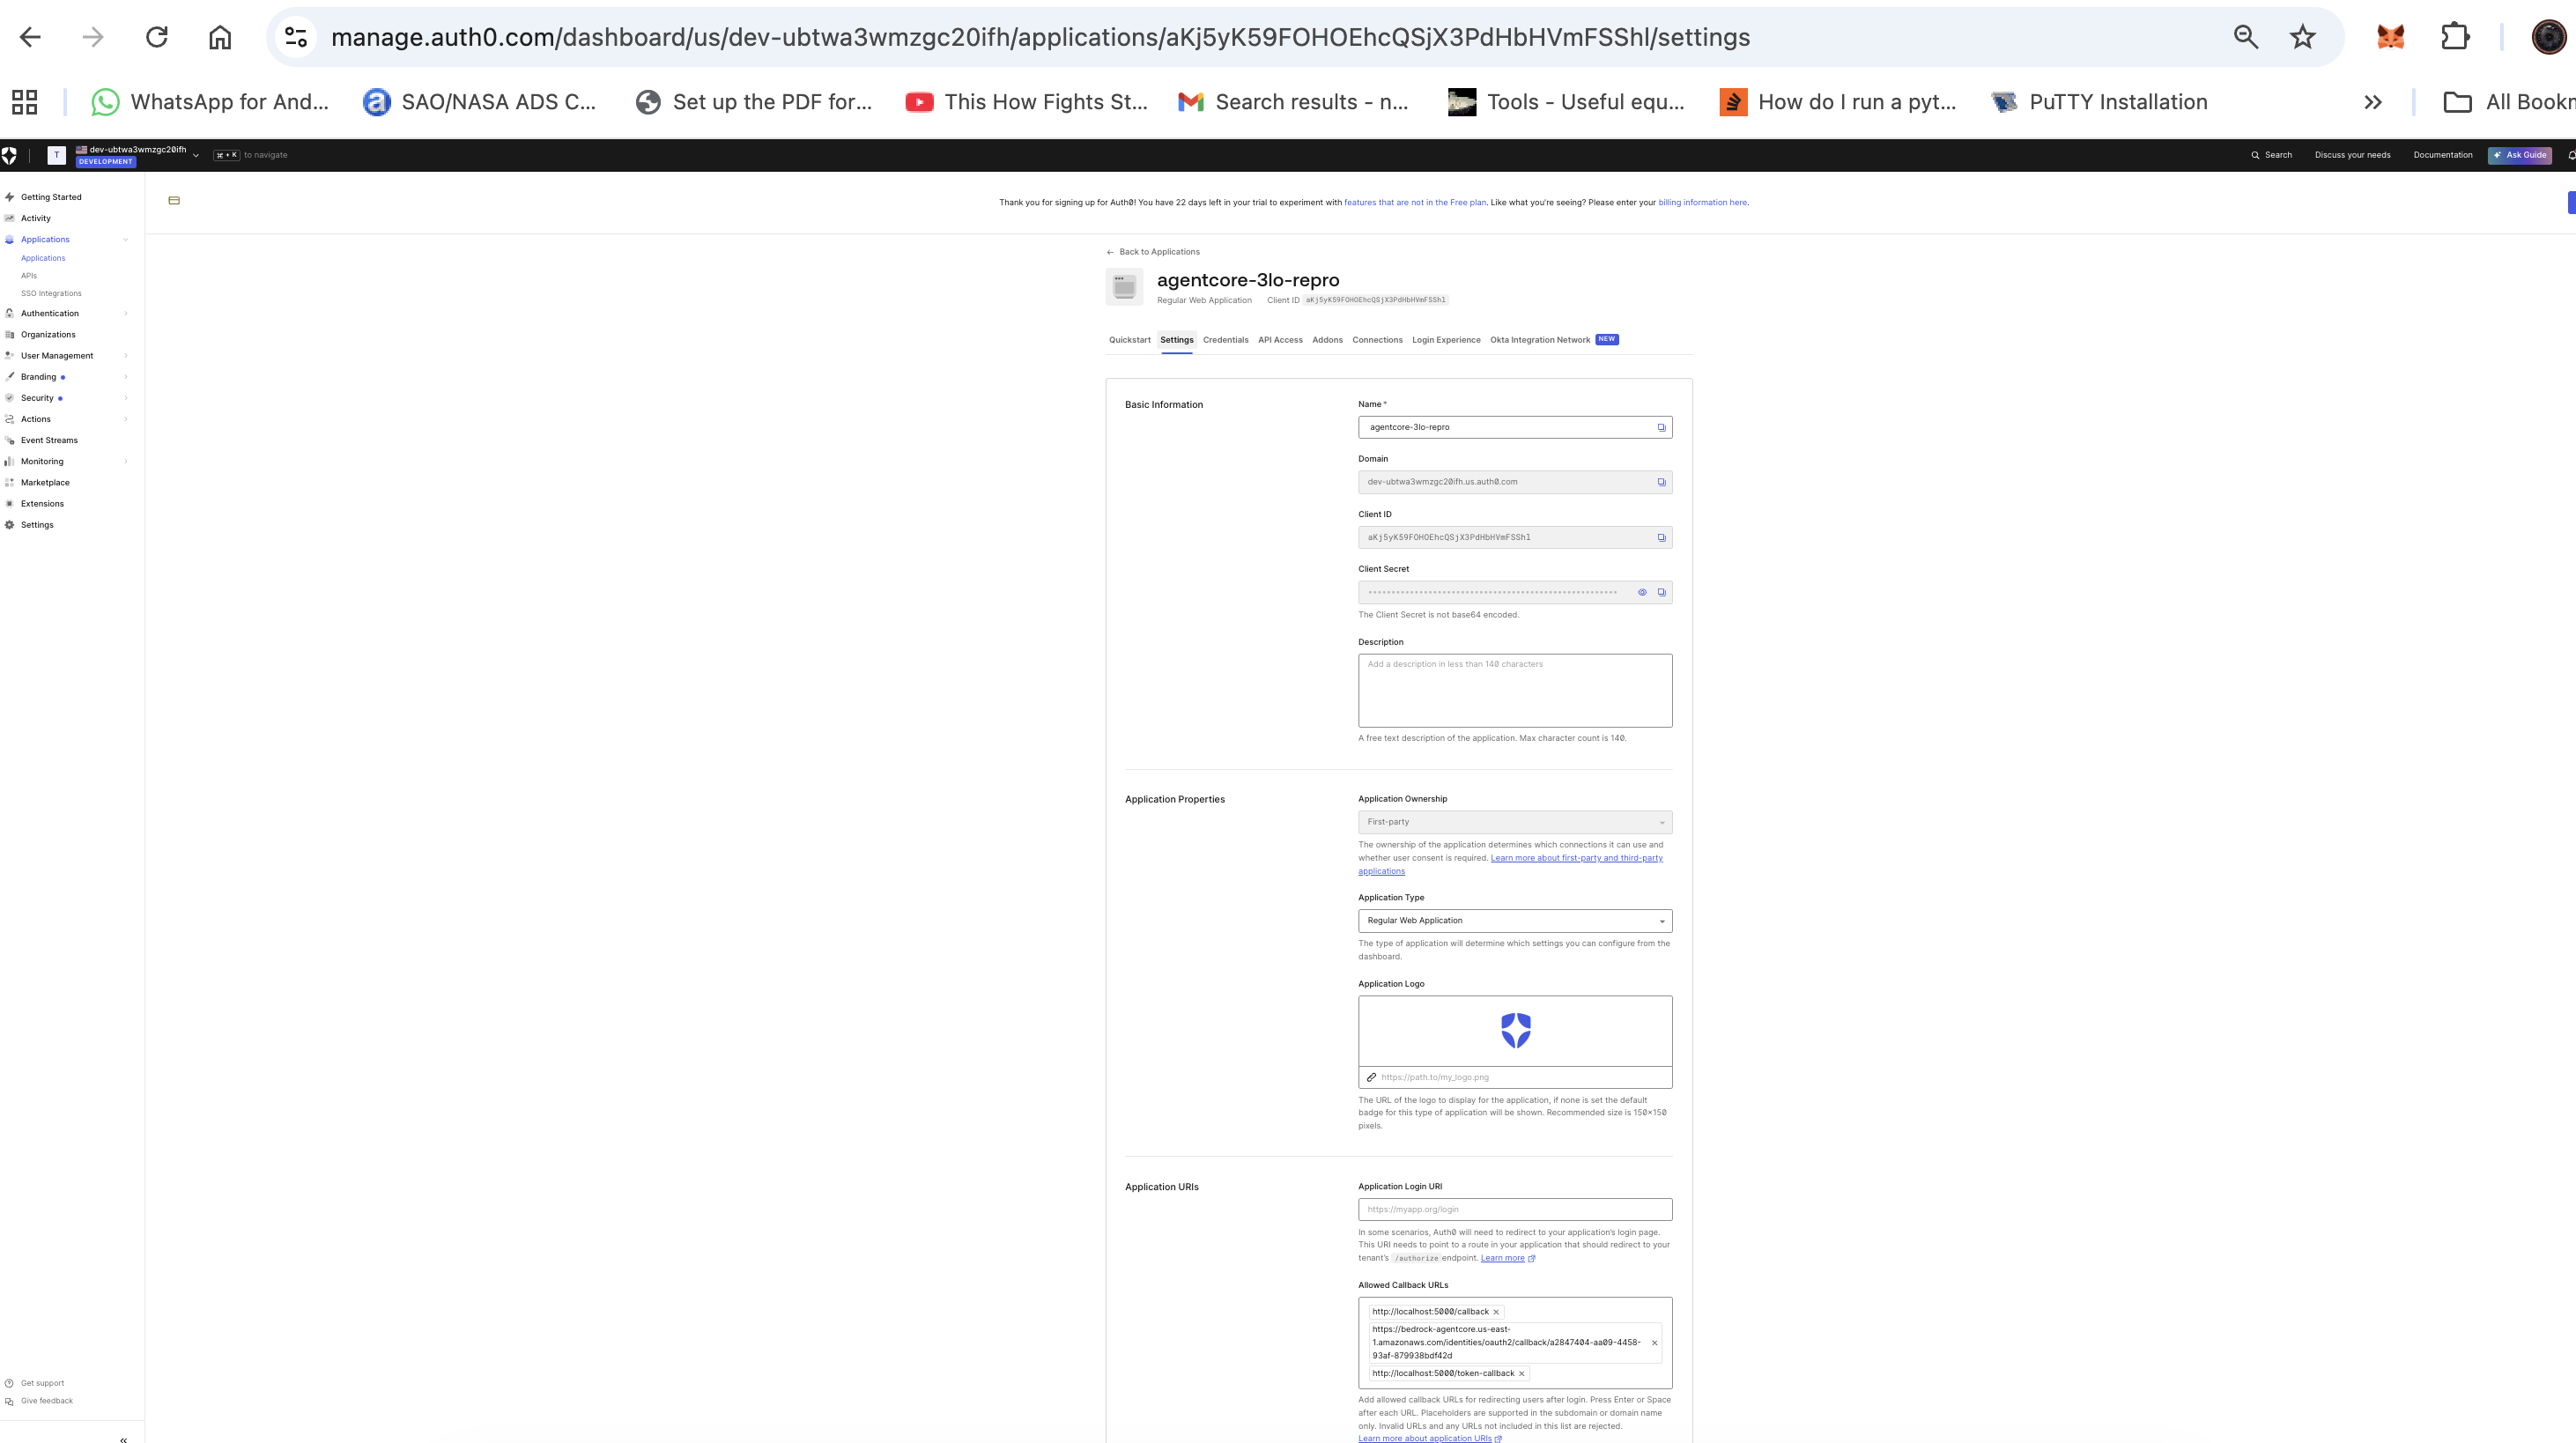
agentcore-3lo-repro, Type: Regular Web Application - Settings:
- Allowed Callback URLs:
http://localhost:5000/callback, http://localhost:5000/token-callback - Allowed Logout URLs:
http://localhost:5000/
- Allowed Callback URLs:
You will add the AgentCore callback URL to this list in Step 4.
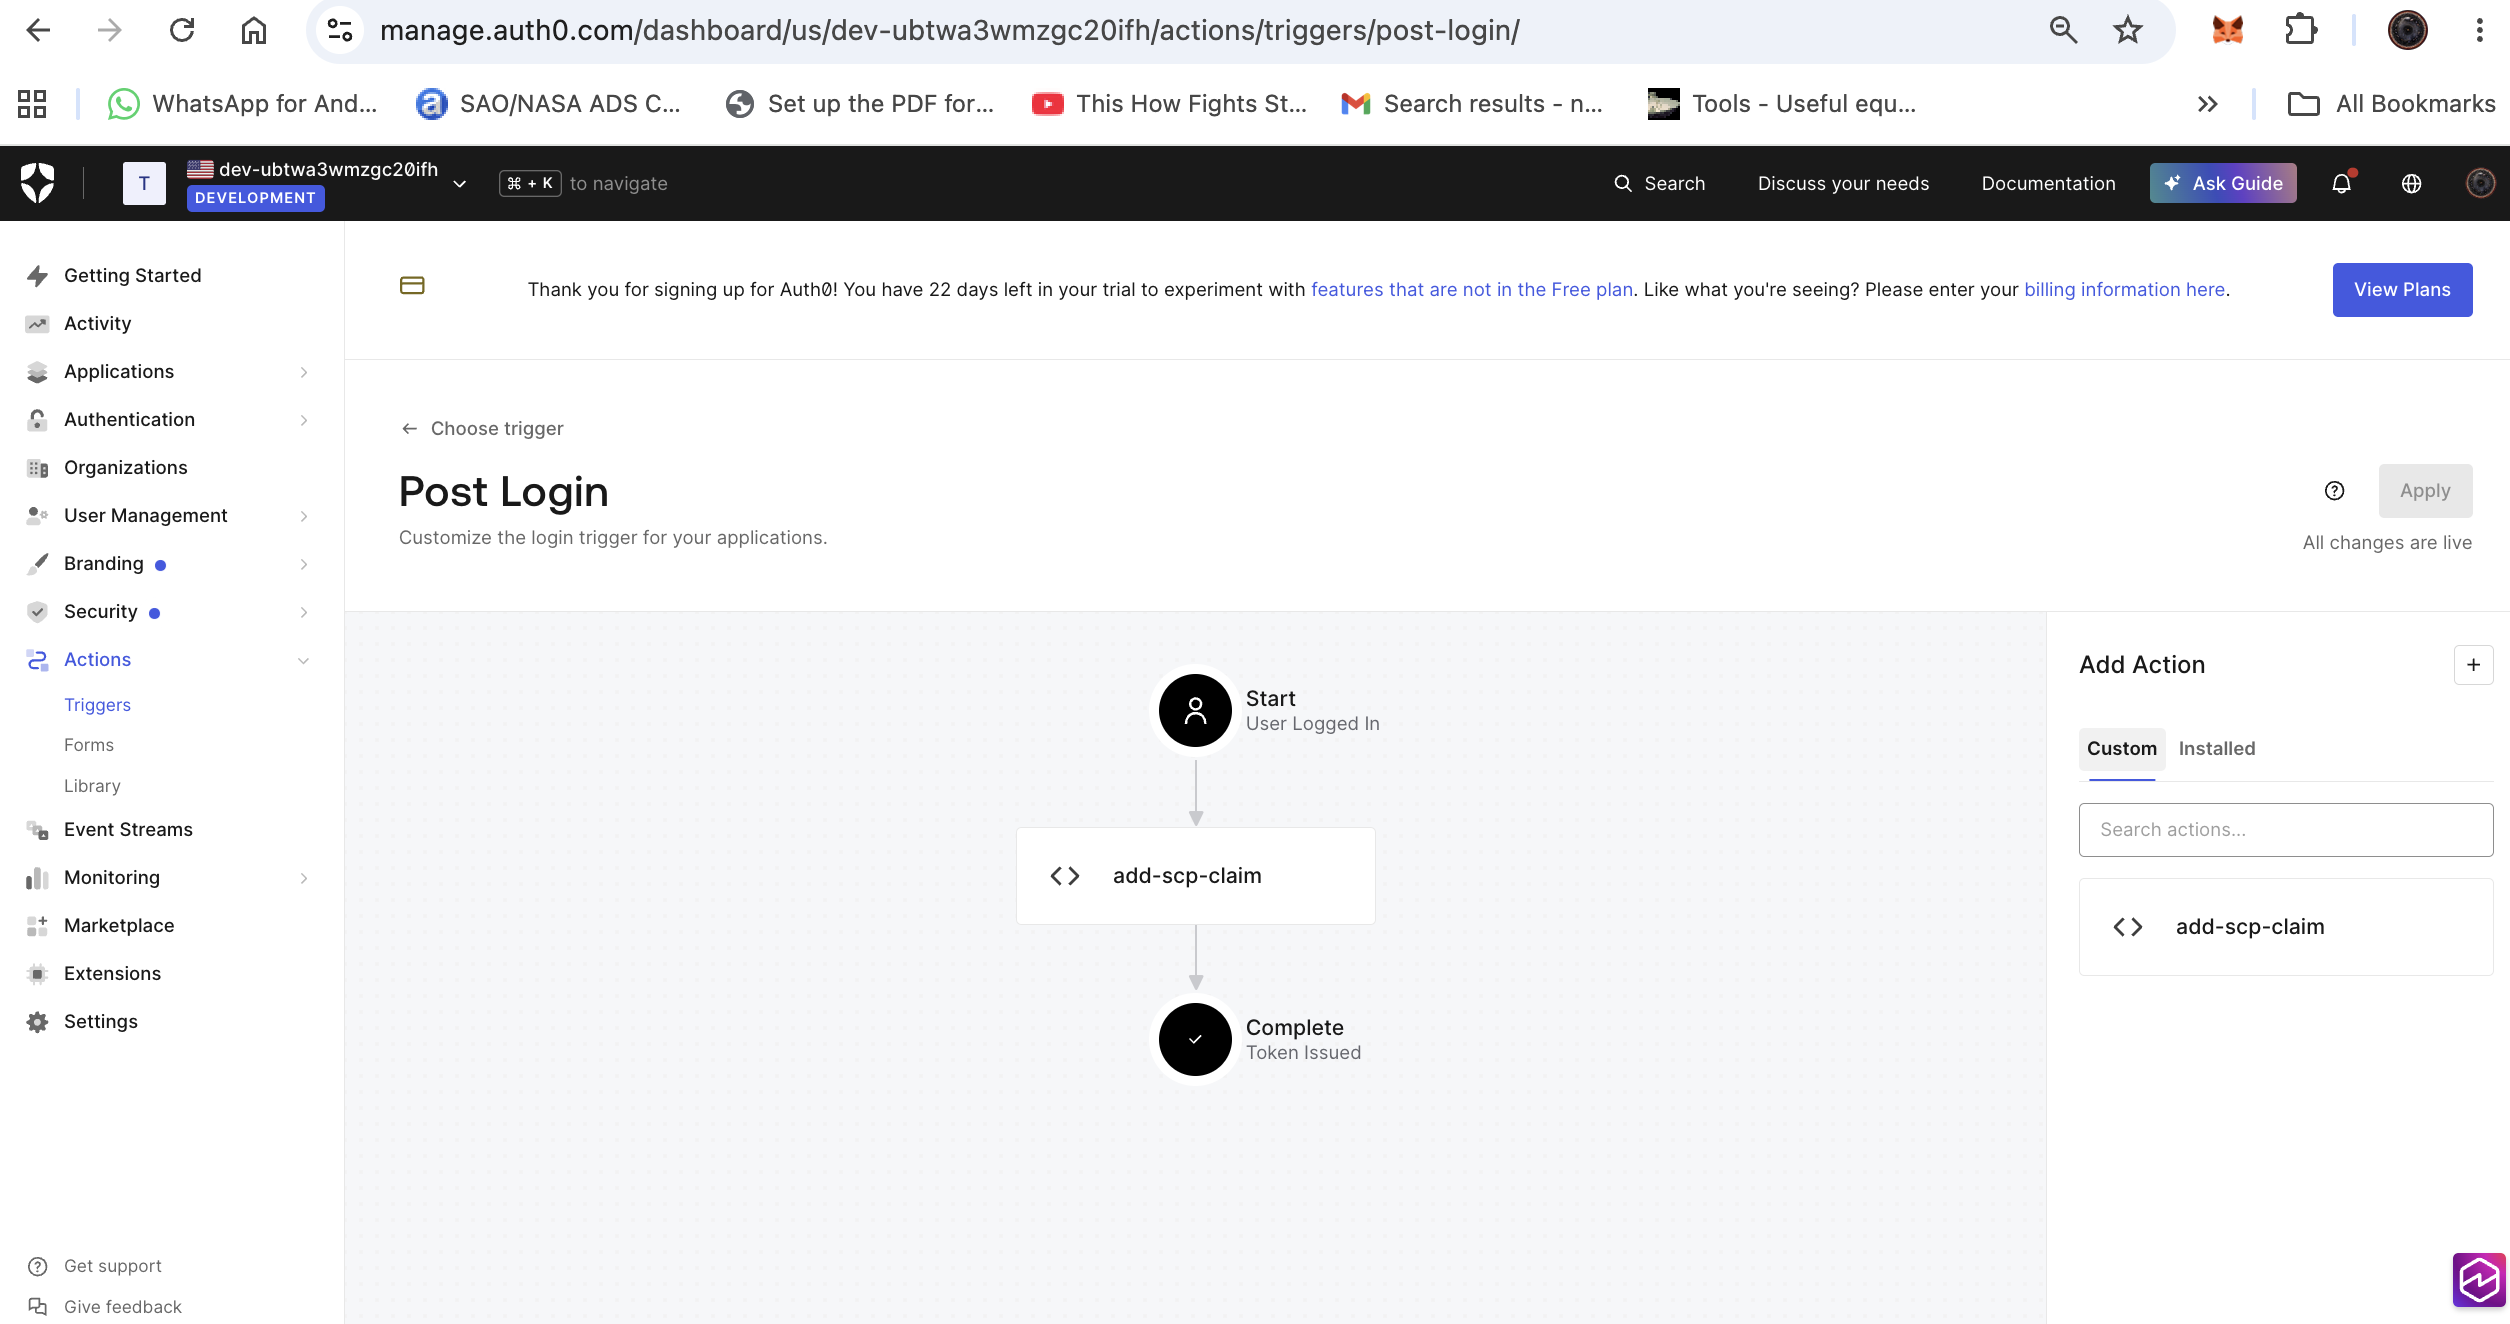
Deploy a Post Login Action
- Auth0 Dashboard > Actions > Library > Build Custom
- Name:
add-scp-claim, Trigger: Login / Post Login
exports.onExecutePostLogin = async (event, api) => {
  const scopes = event.transaction.requested_scopes || [];
  if (!scopes.includes('openid')) {
    scopes.push('openid');
  }
  api.accessToken.setCustomClaim('scp', scopes);
};
- Deploy, then add to the Login flow (Actions > Flows > Login)
Step 2: AWS IAM Role
Create an execution role for the Gateway with trust policy for bedrock-agentcore.amazonaws.com:
{
  "Version": "2012-10-17",
  "Statement": [
    {"Effect": "Allow", "Action": "bedrock-agentcore:*", "Resource": "*"},
    {"Effect": "Allow", "Action": "lambda:InvokeFunction", "Resource": "*"},
    {"Effect": "Allow", "Action": "secretsmanager:GetSecretValue",
     "Resource": "arn:aws:secretsmanager:<region>:<account>:secret:bedrock-agentcore-identity*"}
  ]
}
Step 3: Create AgentCore Gateway
Important: Use only
allowedAudience. Do NOT useallowedClientswith Auth0 — Auth0 places client_id in theazpclaim, notclient_id, causinginsufficient_scopeerrors.
aws bedrock-agentcore-control create-gateway \
  --name "auth0-3lo-example" \
  --role-arn "arn:aws:iam::<account>:role/<role-name>" \
  --protocol-type MCP \
  --protocol-configuration '{"mcp":{"supportedVersions":["2025-11-25"]}}' \
  --authorizer-type CUSTOM_JWT \
  --authorizer-configuration '{
    "customJWTAuthorizer": {
      "discoveryUrl": "https://<tenant>.us.auth0.com/.well-known/openid-configuration",
      "allowedAudience": ["https://agentcore-gateway-api"]
    }
  }' \
  --region us-east-1
Wait for status: READY.
Step 4: Create OAuth2 Credential Provider
aws bedrock-agentcore-control create-oauth2-credential-provider \
  --name "auth0-3lo-example" \
  --credential-provider-vendor "CustomOauth2" \
  --oauth2-provider-config-input '{
    "customOauth2ProviderConfig": {
      "oauthDiscovery": {
        "authorizationServerMetadata": {
          "issuer": "https://<tenant>.us.auth0.com/",
          "authorizationEndpoint": "https://<tenant>.us.auth0.com/authorize",
          "tokenEndpoint": "https://<tenant>.us.auth0.com/oauth/token",
          "responseTypes": ["code"]
        }
      },
      "clientId": "<your-client-id>",
      "clientSecret": "<your-client-secret>",
      "clientAuthenticationMethod": "CLIENT_SECRET_POST"
    }
  }' \
  --region us-east-1
The response includes a callbackUrl. Add this URL to your Auth0 application's Allowed Callback URLs.
Step 5: Register Workload Identity Return URL
aws bedrock-agentcore-control update-workload-identity \
  --name "<gateway-id>" \
  --allowed-resource-oauth2-return-urls '["http://localhost:5000/agentcore-callback"]' \
  --region us-east-1
Step 6: Create Lambda MCP Server
Deploy the included Lambda function (see lambda/ directory):
cd lambda && zip -r ../lambda.zip . && cd ..

aws lambda create-function \
  --function-name auth0-3lo-mcp-server \
  --runtime python3.12 \
  --handler lambda_function.lambda_handler \
  --role arn:aws:iam::<account>:role/<lambda-role> \
  --zip-file fileb://lambda.zip \
  --region us-east-1

aws lambda create-function-url-config \
  --function-name auth0-3lo-mcp-server \
  --auth-type NONE \
  --region us-east-1

aws lambda add-permission \
  --function-name auth0-3lo-mcp-server \
  --statement-id FunctionURLAllowPublicAccess \
  --action lambda:InvokeFunctionUrl \
  --principal "*" \
  --function-url-auth-type NONE \
  --region us-east-1
Step 7: Create Gateway Target
aws bedrock-agentcore-control create-gateway-target \
  --gateway-identifier "<gateway-id>" \
  --name "auth0-3lo-lambda-mcp" \
  --target-configuration '{
    "mcp": {
      "mcpServer": {
        "endpoint": "<lambda-function-url>",
        "mcpToolSchema": {
          "inlinePayload": "{\"tools\":[{\"name\":\"whoami\",\"description\":\"Returns user info\",\"inputSchema\":{\"type\":\"object\",\"properties\":{},\"required\":[]}},{\"name\":\"echo\",\"description\":\"Echoes input\",\"inputSchema\":{\"type\":\"object\",\"properties\":{\"message\":{\"type\":\"string\"}},\"required\":[\"message\"]}}]}"
        }
      }
    }
  }' \
  --credential-provider-configurations '[{
    "credentialProviderType": "OAUTH",
    "credentialProvider": {
      "oauthCredentialProvider": {
        "providerArn": "arn:aws:bedrock-agentcore:us-east-1:<account>:token-vault/default/oauth2credentialprovider/auth0-3lo-example",
        "scopes": ["openid", "profile", "email"],
        "grantType": "AUTHORIZATION_CODE",
        "defaultReturnUrl": "http://localhost:5000/agentcore-callback",
        "customParameters": {
          "audience": "https://agentcore-gateway-api"
        }
      }
    }
  }]' \
  --region us-east-1
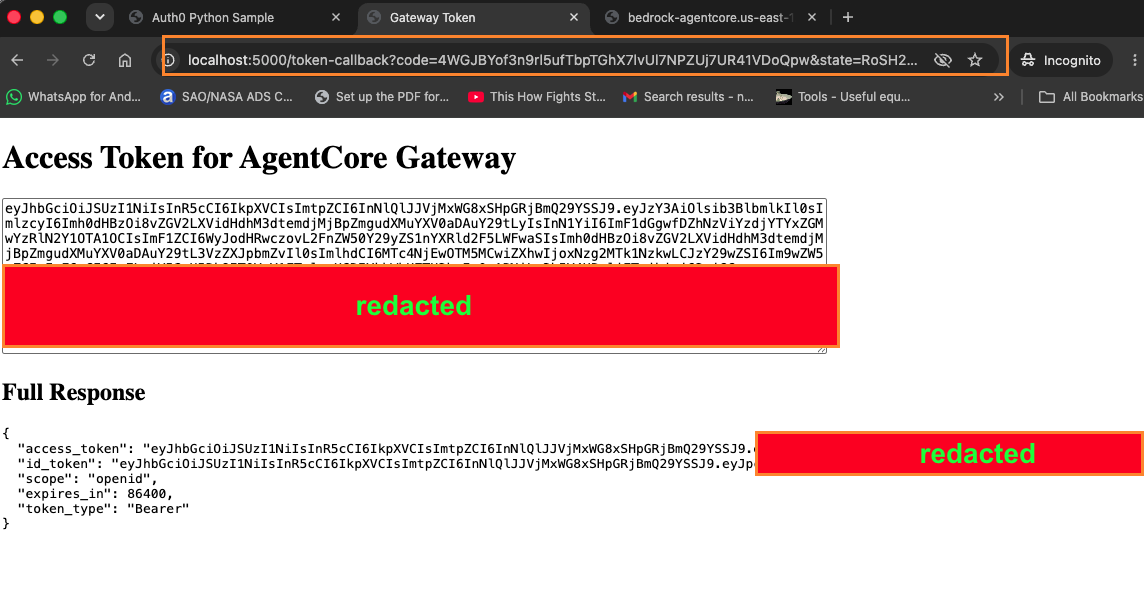
Step 8: Get an Access Token
- Start Flask:
python app.py - Open http://localhost:5000/token in your browser
- Log in to Auth0
- Copy the access token displayed
Step 9: Test the Flow
TOKEN="<your-access-token>"
GATEWAY="<gateway-id>"

# 1. List tools (confirms inbound auth)
curl -s -X POST "https://${GATEWAY}.gateway.bedrock-agentcore.us-east-1.amazonaws.com/mcp" \
  -H "Content-Type: application/json" \
  -H "Authorization: Bearer ${TOKEN}" \
  -H "MCP-Protocol-Version: 2025-11-25" \
  -d '{"jsonrpc":"2.0","id":"1","method":"tools/list","params":{}}'

# 2. Call a tool (triggers -32042 elicitation)
curl -s -X POST "https://${GATEWAY}.gateway.bedrock-agentcore.us-east-1.amazonaws.com/mcp" \
  -H "Content-Type: application/json" \
  -H "Authorization: Bearer ${TOKEN}" \
  -H "MCP-Protocol-Version: 2025-11-25" \
  -d '{"jsonrpc":"2.0","id":"1","method":"tools/call","params":{"name":"auth0-3lo-lambda-mcp___echo","arguments":{"message":"hello"}}}'

# 3. Open the URL from the -32042 response IMMEDIATELY (60s TTL)
#    Complete consent in browser
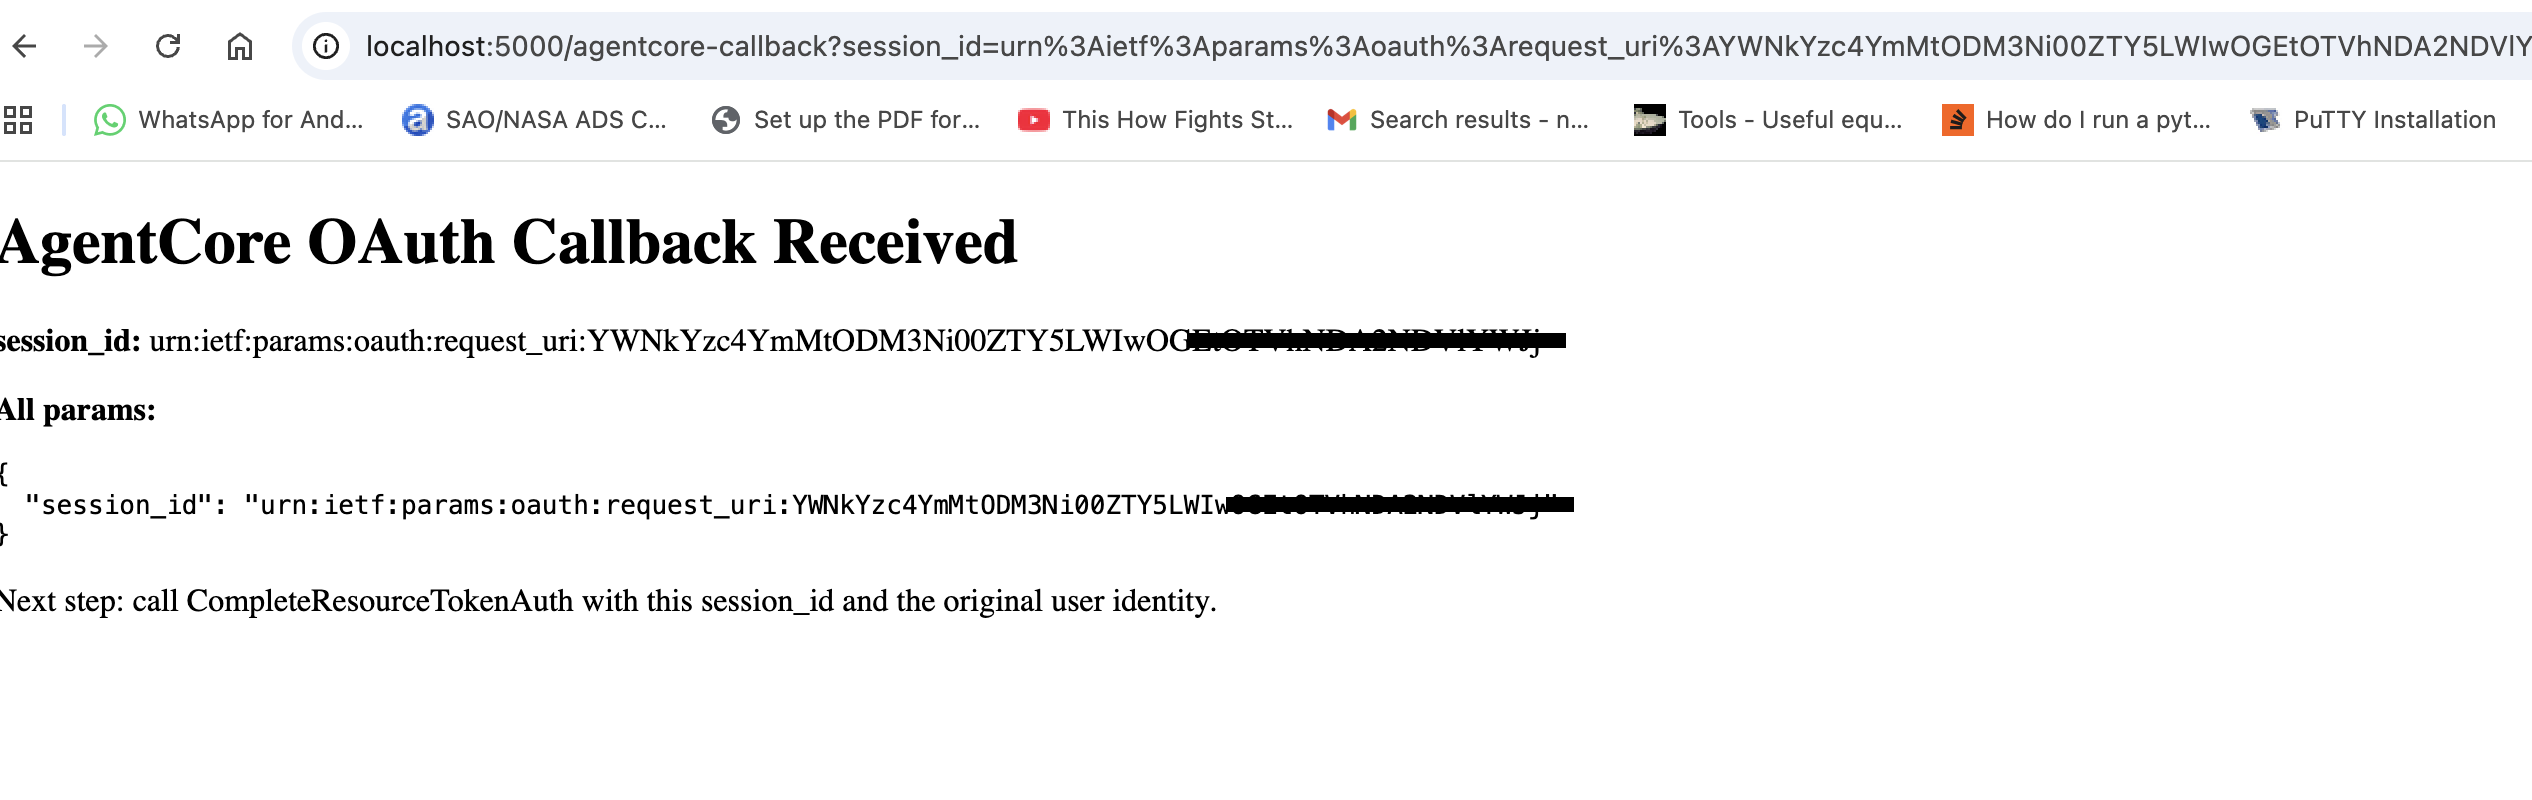
#    Browser lands on localhost:5000/agentcore-callback?session_id=...

# 4. Complete token binding
SESSION_ID="<session_id_from_callback>"
aws bedrock-agentcore complete-resource-token-auth \
  --user-identifier "{\"userToken\":\"${TOKEN}\"}" \
  --session-uri "${SESSION_ID}" \
  --region us-east-1

# 5. Retry the tool call (should succeed now)
curl -s -X POST "https://${GATEWAY}.gateway.bedrock-agentcore.us-east-1.amazonaws.com/mcp" \
  -H "Content-Type: application/json" \
  -H "Authorization: Bearer ${TOKEN}" \
  -H "MCP-Protocol-Version: 2025-11-25" \
  -d '{"jsonrpc":"2.0","id":"1","method":"tools/call","params":{"name":"auth0-3lo-lambda-mcp___echo","arguments":{"message":"hello from 3LO end-to-end"}}}'
Expected final response:
{
  "jsonrpc": "2.0",
  "id": "1",
  "result": {
    "content": [{"type": "text", "text": "Echo: hello from 3LO end-to-end"}]
  }
}
Key Learnings
| Issue | Root Cause | Fix |
|---|---|---|
insufficient_scope on all requests |
allowedClients in gateway config; Auth0 uses azp not client_id |
Use only allowedAudience |
authorizationCode must not be null |
Auth0 skips consent for first-party apps without permissions | Add API permission + disable consent skip |
Authorization error when sending message |
Lambda Function URL missing resource policy | aws lambda add-permission with lambda:InvokeFunctionUrl |
Invalid request on consent URL |
request_uri TTL expired (~60 seconds) | Open URL immediately after generation |
| Token never persists | Nothing calls CompleteResourceTokenAuth |
Implement callback handler (this repo) |
Auth0 Configuration Checklist
- API created with custom identifier (audience)
- At least one permission defined on the API
- "Allow Skipping User Consent" is OFF
- Post Login Action deployed (adds
scpclaim) - Application callback URLs include AgentCore callback URL
- Application type: Regular Web Application
- Token Endpoint Auth Method: client_secret_post
File Structure
.
├── README.md
├── requirements.txt
├── .env.example
├── .gitignore
├── app.py                          # Flask app (token endpoint + callback handler)
├── callback_handler.py             # Standalone callback handler example
├── lambda/
│   └── lambda_function.py          # Lambda MCP server (echo + whoami tools)
└── screenshots/
    ├── 3lo-sequence-diagram.png
    ├── 02-auth0-app-settings-callbacks.png
    ├── 04-auth0-api-settings-consent.png
    ├── 05-auth0-api-permissions.png
    ├── 08-agentcore-callback-received.png
    └── 09-auth0-login-flow-action.png
Cleanup
aws bedrock-agentcore-control delete-gateway-target \
  --gateway-identifier "<gateway-id>" --target-id "<target-id>" --region us-east-1

aws bedrock-agentcore-control delete-gateway \
  --gateway-identifier "<gateway-id>" --region us-east-1

aws bedrock-agentcore-control delete-oauth2-credential-provider \
  --name "auth0-3lo-example" --region us-east-1

aws lambda delete-function --function-name auth0-3lo-mcp-server --region us-east-1
Documentation
- Session binding (CompleteResourceTokenAuth)
- Gateway outbound auth
- Auth0 integration
- CompleteResourceTokenAuth API
- AWS blog: Authorization code flow
License
MIT
Installing Auth0 3lo Server
This server has no published package — it is built from source. Open the repository and follow its README.
▸ github.com/Neloh/agentcore-gateway-3lo-auth0FAQ
Is Auth0 3lo Server MCP free?
Yes, Auth0 3lo Server MCP is free — one-click install via Unyly at no cost.
Does Auth0 3lo Server need an API key?
No, Auth0 3lo Server runs without API keys or environment variables.
Is Auth0 3lo Server hosted or self-hosted?
A hosted option is available: Unyly runs the server in the cloud, no local setup required.
How do I install Auth0 3lo Server in Claude Desktop, Claude Code or Cursor?
Open Auth0 3lo Server on unyly.org, pick your client tab (Claude Desktop, Claude Code, Cursor) and press Install — the config is generated automatically, no JSON editing.
Related MCPs
GitHub
PRs, issues, code search, CI status
 by GitHub
Filesystem
Secure file operations with configurable access controls.
Memory
Knowledge graph-based persistent memory system.
Template MCP Server
A CLI tool to create a new Model Context Protocol server project with TypeScript support, dual transport options, and an extensible structure
 by mcpdotdirect
Amap Maps Mcp Server
MCP server for using the AMap Maps API
 by duxiaohui
Supabase
Database, auth and storage
 by Supabase
Everything
Reference / test server with prompts, resources, and tools.
Git
Tools to read, search, and manipulate Git repositories.
Sequential Thinking
Dynamic and reflective problem-solving through thought sequences.
Time
Time and timezone conversion capabilities.
Compare Auth0 3lo Server with
Not sure what to pick?
Find your stack in 60 seconds
Author?
Embed badge for your README
Browse similar
All development MCPs