
Autogen Sse Stdio
FreeNot checkedThis repository demonstrates how to use AutoGen to integrate local and remote MCP (Model Context Protocol) servers. It showcases a local math tool (math_server.

About
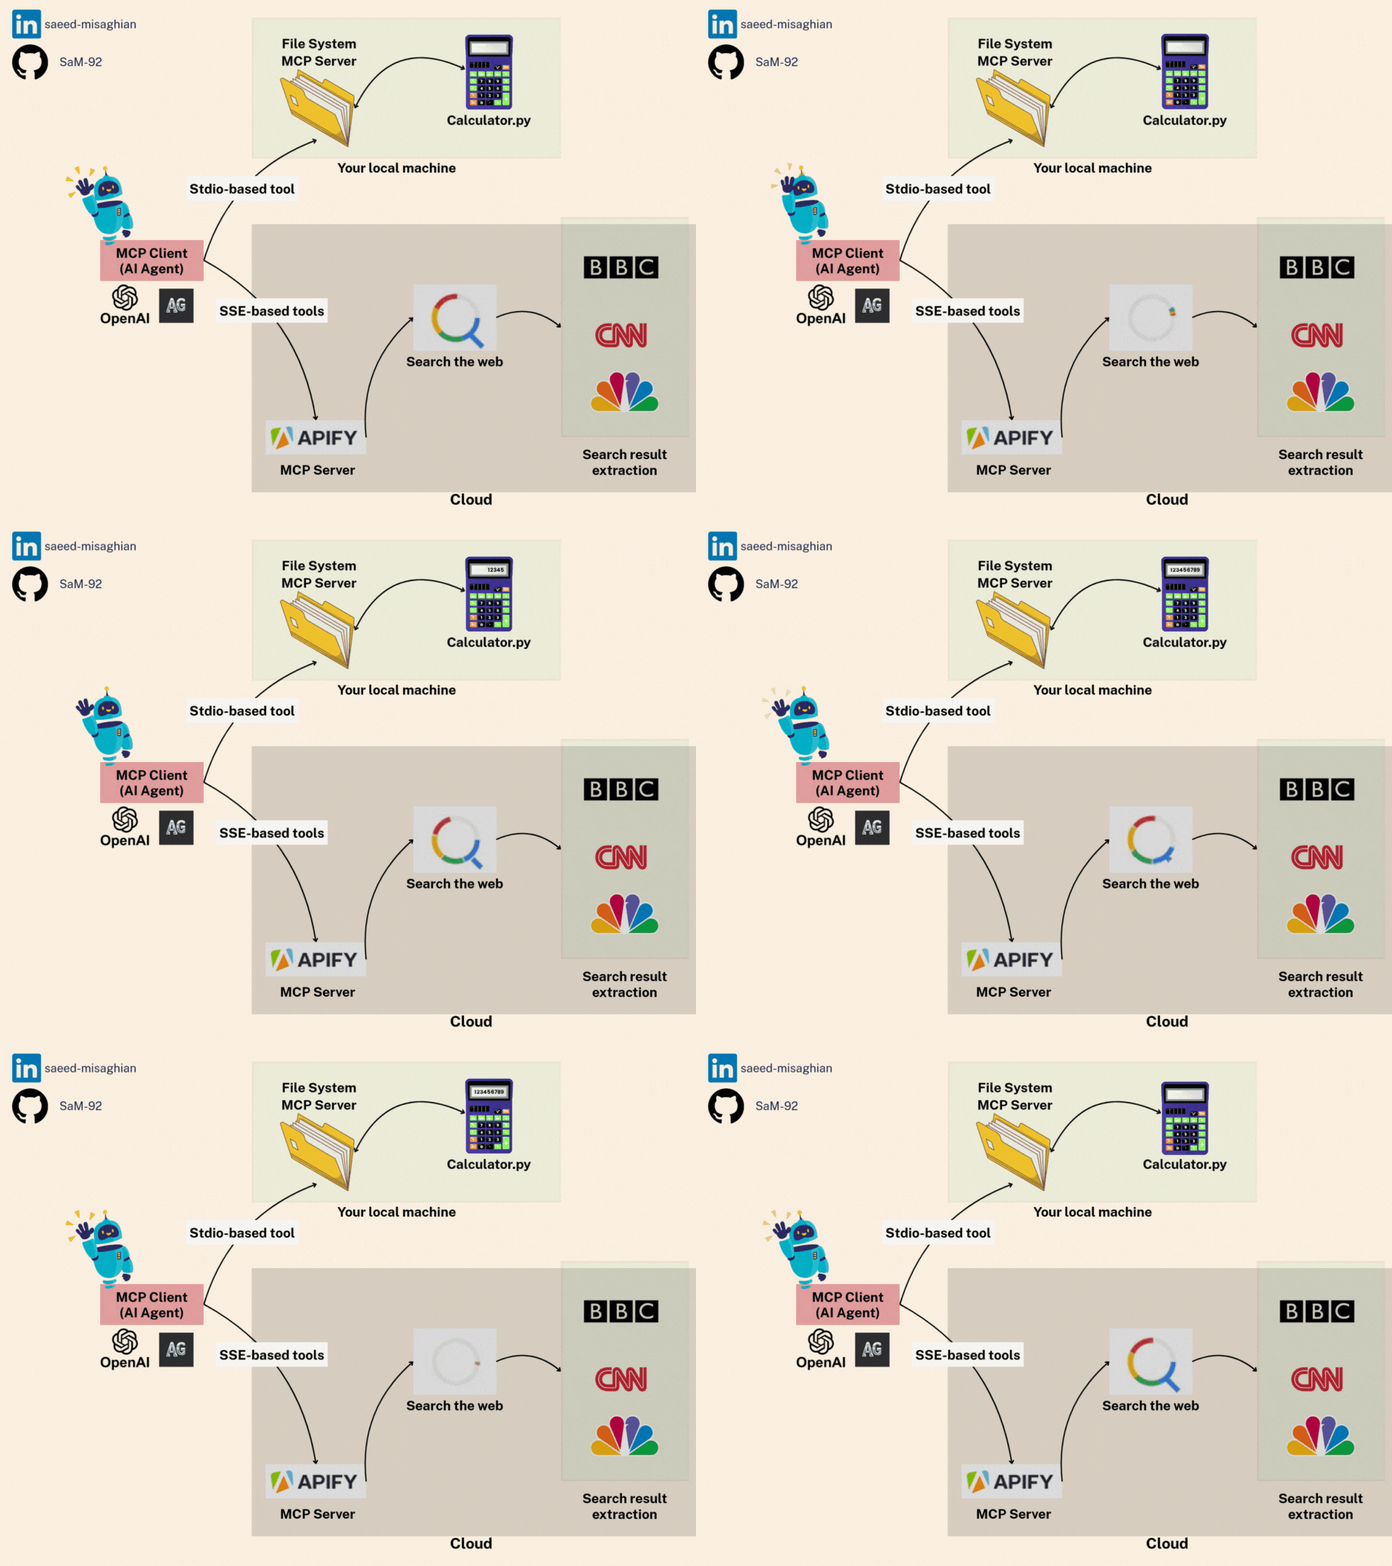
This repository demonstrates how to use AutoGen to integrate local and remote MCP (Model Context Protocol) servers. It showcases a local math tool (math_server.py) using Stdio and a remote Apify tool (RAG Web Browser Actor) via SSE for tasks like arithmetic and web browsing.
README
This repository provides a practical demonstration of integrating tools with AI agents using the Model Context Protocol (MCP) within the AutoGen framework.
Key Features Demonstrated:
- Dual MCP Integration: Shows how to connect an AutoGen agent to:
- A local tool server (
math_server.py) using Stdio transport. - A remote tool server (Apify's RAG Web Browser Actor) using Server-Sent Events (SSE) transport.
- A local tool server (
- Local Tool Example: A simple calculator (
add,multiply) running locally viamath_server.py. - Remote Tool Example: Leveraging Apify's RAG Web Browser Actor via their MCP Server for web searching and content retrieval.
- AutoGen Agent: An
AssistantAgentconfigured to utilize both sets of tools to answer user queries.
Goal: To illustrate the flexibility of MCP in enabling AI agents to access diverse tools, whether hosted locally or remotely, through standardized communication protocols (Stdio and SSE).
Scenario: The example agent answers two distinct questions:
- A math problem (
(3 + 5) x 12?), expected to use the localmath_server.py. - A request for recent news ("Summarise the latest news of Iran and US negotiations..."), expected to use the remote Apify web browsing tool.
📚 Libraries & Frameworks Used
- AutoGen: AI agent framework (autogen_agentchat, autogen_core, autogen_ext)
- MCP: Model Context Protocol for tool integration
- Python-dotenv: For environment variable management
- OpenAI API: For LLM capabilities
- Apify API: For web browsing capabilities
🛠️ Setup
Follow these steps carefully to set up your environment:
Prerequisites:
- Ensure you have Python 3.12 installed.
- Install
uvif not already installed:pip install uv
Navigate to Project Directory:
cd mcp_autogen_sse_stdioCreate and Activate Virtual Environment:
# Create virtual environment using uv
uv venv --python 3.12

# Activate the virtual environment
source .venv/bin/activate  # On macOS/Linux
# OR
.\.venv\Scripts\activate  # On Windows
Install Dependencies:
# Install project dependencies
uv pip install -e .
Troubleshooting Note: If you encounter any issues with the MCP CLI installation, you can manually install it:
uv add "mcp[cli]"Configure Environment Variables:
- Create a
.envfile in themcp_autogen_sse_stdiodirectory. - Add your API keys:
OPENAI_API_KEY=your_openai_api_key_here APIFY_API_KEY=your_apify_api_key_here - Get your Apify API key from Apify MCP Server page
- Create a
🚀 Running the Project
Make sure you're in the parent directory (one level up from the project directory):
cd ..Run the main script using
uv:uv run mcp_autogen_sse_stdio/main.py
This will run the demo that:
- Summarizes news about Iran-US negotiations using the Apify tool
- Solves a simple math problem:
(3 + 5) x 12using the local math tool
🔌 Understanding MCP (Model Context Protocol)
MCP is a protocol that standardizes communication between AI models and tools. This example demonstrates two ways to use MCP:
1. Local Tools (StdioServerParams)
- Uses standard input/output for communication
- Tools run locally on your machine
- Example: Our
math_server.pyprovides simple math operations
2. Remote Tools (SseServerParams)
- Uses Server-Sent Events (SSE) for communication
- Tools run on remote servers (like Apify)
- Example: Web browsing capabilities via Apify's rag-web-browser
📝 Code Walkthrough
Our main.py demonstrates:
Environment Setup:
- Loads API keys and validates them
Tool Configuration:
- Sets up local math tools using StdioServerParams
- Connects to Apify's web browser using SseServerParams (API from https://apify.com/apify/actors-mcp-server)
Agent Creation:
- Creates an AutoGen assistant with both tool sets
- Uses GPT-4 as the base model
Task Execution:
- Runs two demo tasks showing both tools in action
- Web browsing for news summarization
- Math calculations for arithmetic problem
🔄 Communication Flow
User → AutoGen Agent → MCP Tools → Results → User
This example shows how easily different tool types can be integrated into one agent using MCP!
Installing Autogen Sse Stdio
This server has no published package — it is built from source. Open the repository and follow its README.
▸ github.com/SaM-92/mcp_autogen_sse_stdioFAQ
Is Autogen Sse Stdio MCP free?
Yes, Autogen Sse Stdio MCP is free — one-click install via Unyly at no cost.
Does Autogen Sse Stdio need an API key?
No, Autogen Sse Stdio runs without API keys or environment variables.
Is Autogen Sse Stdio hosted or self-hosted?
Self-hosted: the server runs locally on your machine via the install command above.
How do I install Autogen Sse Stdio in Claude Desktop, Claude Code or Cursor?
Open Autogen Sse Stdio on unyly.org, pick your client tab (Claude Desktop, Claude Code, Cursor) and press Install — the config is generated automatically, no JSON editing.
Related MCPs
Playwright
Browser automation, scraping, screenshots
 by Microsoft
Puppeteer
Browser automation and web scraping.
 by modelcontextprotocol
opentabs-dev/opentabs
Plugin-based MCP server + Chrome extension that gives AI agents access to web applications through the user's authenticated browser session. 100+ plugins with a
 by opentabs-dev
robhunter/agentdeals
1,500+ developer infrastructure deals, free tiers, and startup programs across 54 categories. Search deals, compare vendors, plan stacks, and track pricing chan
 by robhunter
Compare Autogen Sse Stdio with
Not sure what to pick?
Find your stack in 60 seconds
Author?
Embed badge for your README
Browse similar
All browse MCPs