

About
AI Coding Agent, Agentic Harness, Semantic Code Search Engine
README
AI-Powered Coding Agent + Semantic Code Search Engine
ctxai is a comprehensive AI coding assistant that combines semantic code search with intelligent agent capabilities. It transforms your codebase into searchable embeddings for context-aware code retrieval while providing an interactive AI agent that can understand, analyze, and modify your code.
Features:
- 🤖 AI Coding Agent: Interactive chat with multi-provider LLM support (OpenRouter, GitHub Copilot, Ollama, Anthropic, OpenAI)
- 🔍 Semantic Search: Natural language queries across your entire codebase
- 🏗️ Architect-Editor Pattern: 40-60% cost savings with intelligent two-model approach
- 🔐 OAuth Authentication: Secure one-click login for OpenRouter and GitHub Copilot
- 🛠️ Rich Tool Support: File operations, bash execution, git integration, and more
- 📊 MCP Server: Integrate with Claude Desktop and other MCP-compatible tools
- 🎯 Local & Cloud: Use free local models (Ollama) or powerful cloud models
TLDR: Intelligent semantic search + AI coding agent that understands your codebase
Quick Start
🚀 AI Coding Agent (Recommended)
# 1. Install ctxai with all features
pip install ctxai[all]
# Or using uv (faster): uv pip install ctxai[all]

# 2. Authenticate with a provider (easiest: OpenRouter)
ctxai login openrouter
# One-click OAuth in browser - no manual API key needed!

# 3. Start coding with AI
ctxai chat
# Interactive agent with access to 100+ models

# Or execute one-shot tasks
ctxai code "Create a Python function to validate email addresses"
🔍 Semantic Code Search
# 1. Install ctxai (basic)
pip install ctxai

# 2. Index your codebase (uses local embeddings - no API key needed!)
ctxai index /path/to/your/project "my-project"

# 3. Query your codebase using natural language
ctxai query my-project "Find authentication functions"

# 4. (Optional) Start the web dashboard
pip install ctxai[dashboard]
ctxai dashboard  # Open http://localhost:3000
⚠️ Windows Users
Set encoding to UTF-8 to avoid emoji display issues:
# PowerShell
$env:PYTHONIOENCODING="utf-8"

# CMD
set PYTHONIOENCODING=utf-8

# Or add to your system environment variables permanently
Features
🤖 AI Coding Agent
- Interactive Chat: REPL interface for conversational coding assistance
- Multi-Provider Support: OpenRouter (100+ models), GitHub Copilot, Ollama (local), Anthropic, OpenAI
- OAuth Authentication: Secure one-click login for OpenRouter and GitHub Copilot
- Architect-Editor Pattern: Use two models for 40-60% cost savings (e.g., o1-mini for planning + Claude Sonnet for implementation)
- Rich Tool Support: File operations, bash execution, git tools, code search
- Repository Context: Automatic repository mapping for better code understanding
- Flexible Presets: default, premium, budget, cheap, local, mixed configurations
🔍 Semantic Code Search
- Smart Indexing: Tree-sitter based parsing for semantic code understanding
- Natural Language Queries: Find code by describing what you want, not just keywords
- Multiple Embedding Providers: Local (default, no API key), OpenAI, HuggingFace
- Fast & Accurate: Intelligent chunking preserves code context and meaning
- Local-First: Works offline with local embeddings (all-MiniLM-L6-v2)
- Configurable Limits: Control project size, file count, and indexing behavior
🛠️ Developer Experience
- CLI & MCP Server: Use from command line or integrate with Claude Desktop
- Web Dashboard: Interactive UI for browsing indexes and querying code
- GitHub Copilot Integration: Query via @ctxai in Copilot Chat
- Safety Features: Bash command filtering, file size limits, sandboxing
- Extensible: Plugin architecture for custom tools and providers
Provider Comparison
| Provider | Cost | Setup | Models | Best For |
|---|---|---|---|---|
| OpenRouter | Pay-as-you-go | OAuth (1-click) | 100+ (Claude, GPT-4o, o1, DeepSeek, etc.) | Recommended: Best flexibility + cost |
| GitHub Copilot | $10-19/mo | OAuth (device code) | GPT-4, Claude, o1 | If you have subscription |
| Ollama | Free | Install + pull models | CodeLlama, DeepSeek-Coder, Qwen, etc. | Privacy, offline, no cost |
| Anthropic | Pay-as-you-go | API key | Claude models | Direct Claude access |
| OpenAI | Pay-as-you-go | API key | GPT models | Direct GPT access |
Recommendation for most users: Start with OpenRouter (easiest OAuth setup, access to 100+ models, flexible pricing)
Usage
Prerequisites
No API key needed for default local embeddings!
For OpenAI embeddings (optional, better quality):
export OPENAI_API_KEY=your-api-key-here
Or configure in .ctxai/config.json:
{
  "embedding": {
    "provider": "openai",
    "api_key": "your-api-key-here"
  }
}
Indexing Your Codebase
Index your project to enable semantic search:
# Basic usage
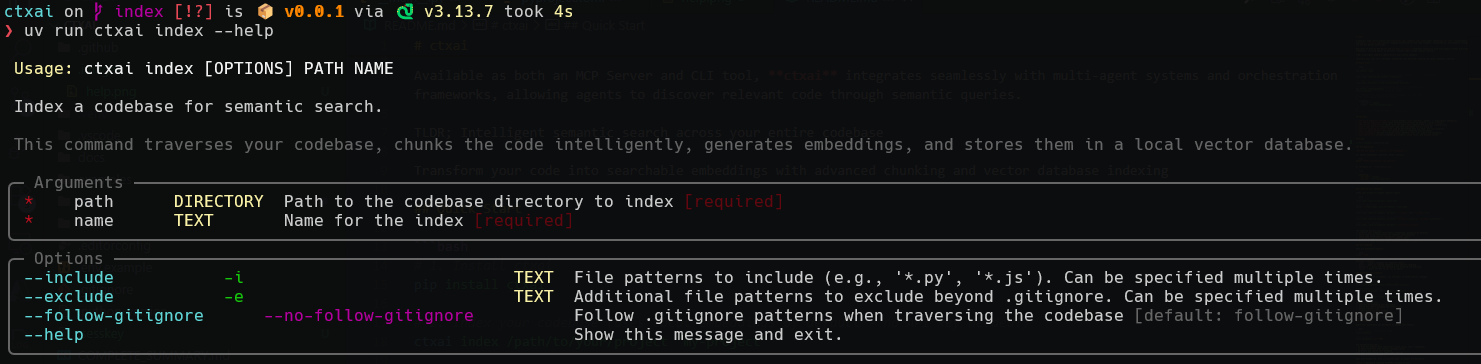
ctxai index /path/to/codebase "index_name"

# With Python module
python -m ctxai index /path/to/codebase "index_name"

# Include only specific file patterns
ctxai index /path/to/codebase "my-index" --include "*.py" --include "*.js"

# Exclude additional patterns beyond .gitignore
ctxai index /path/to/codebase "my-index" --exclude "*.test.js" --exclude "migrations/*"

# Don't follow .gitignore
ctxai index /path/to/codebase "my-index" --no-follow-gitignore
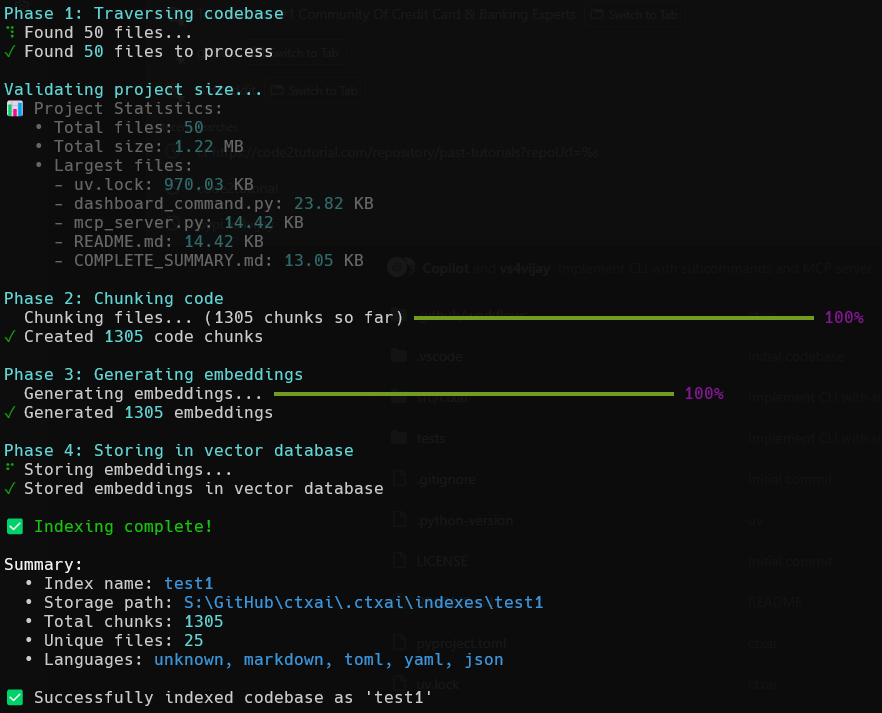
The indexing process will:
- Traverse your codebase recursively (respecting .gitignore by default)
- Parse code using tree-sitter for semantic understanding
- Chunk code intelligently (functions, classes, etc.)
- Generate embeddings using OpenAI's embedding API
- Store in a local ChromaDB vector database (
.ctxaidirectory)
CLI Commands
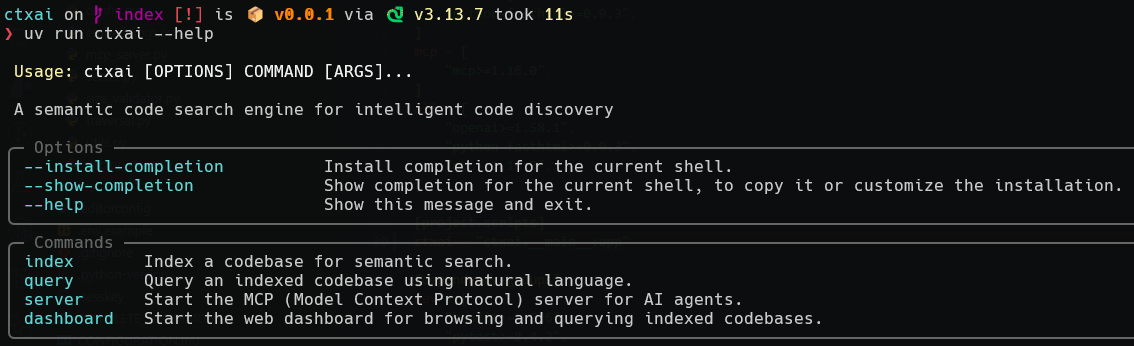
View all available commands:
ctxai --help
Available Commands:
AI Agent:
chat- Start interactive chat mode with AI coding agentcode- Execute a one-shot coding tasklogin- Authenticate with an LLM provider using OAuthlogout- Remove stored credentials for a provider
Code Search:
index- Index a codebase for semantic searchquery- Query an indexed codebase using natural languagedashboard- Start the web dashboard for browsing and querying
Configuration:
config- Manage ctxai configuration settingsserver- Start the MCP server for AI agents
Querying Your Codebase
Once you've indexed a codebase, you can query it using natural language:
# Basic query
ctxai query my-project "Find authentication functions"

# Limit number of results
ctxai query my-project "How to connect to database" --n-results 3

# Show only metadata (no code content)
ctxai query my-project "Find error handling code" --no-content
The query command will:
- Generate an embedding for your query
- Search the vector database for similar code
- Display results with:
- File paths and line numbers
- Chunk types (function, class, etc.)
- Similarity scores
- Syntax-highlighted code previews
AI Coding Agent
Start an interactive coding session with AI:
# OpenRouter with Claude (recommended)
ctxai chat --provider openrouter --model anthropic/claude-3.5-sonnet

# GitHub Copilot (if you have subscription)
ctxai chat --provider github-copilot --model gpt-4

# Local Ollama (free!)
ctxai chat --provider ollama --model codellama:13b

# Architect/Editor pattern (40-60% cost savings!)
ctxai chat --architect-editor --preset default
Architect-Editor Presets:
| Preset | Architect | Editor | Cost | Description |
|---|---|---|---|---|
default |
o1-mini | Claude Sonnet | $$ | Best quality + cost balance |
premium |
o1 | Claude Opus | $$$$$ | Best quality, high cost |
budget |
GPT-4o | GPT-4o-mini | $ | Good quality, lower cost |
cheap |
DeepSeek R1 | DeepSeek Chat | ¢ | Cheapest cloud option |
local |
CodeLlama 34B | CodeLlama 13B | Free | Fully local (requires good hardware) |
mixed |
o1-mini | CodeLlama 13B | $ | Cloud planning + local implementation |
One-Shot Tasks:
# Execute a coding task
ctxai code "Create a FastAPI endpoint for user authentication"

# With verbose output
ctxai code "Add error handling to main.py" --verbose
OAuth Authentication:
Secure one-click authentication (no manual API key needed):
# OpenRouter (100+ models)
ctxai login openrouter
# Opens browser for OAuth flow

# GitHub Copilot (device code flow)
ctxai login github-copilot
# Follow instructions to enter code at github.com/login/device

# Check provider status
ctxai chat  # Shows provider availability
Web Dashboard
Start the interactive web dashboard to manage your indexes:
# Start dashboard (default port 3000)
ctxai dashboard

# Use custom port
ctxai dashboard --port 8080
The dashboard provides:
- 📊 View all indexes with statistics (chunk count, size, timestamps)
- 🔍 Query interface with natural language search
- 📄 Browse all chunks with metadata
- ⚙️ View configuration and CTXAI_HOME settings
- 🎨 Beautiful, dark-themed UI
Open your browser to http://localhost:3000 to access the dashboard.
Note: Dashboard requires FastHTML. Install it with:
pip install ctxai[dashboard]
# Or install all optional dependencies
pip install ctxai[all]
MCP Server for AI Agents
Start the MCP server to expose ctxai functionality to AI agents like Claude:
# Start MCP server
ctxai server

# With custom project path
ctxai server --project-path /path/to/project
The MCP server provides tools for LLMs to:
- 📋 List available indexes
- 📊 Index new codebases
- 🔍 Query code with natural language
- 📈 Get index statistics
Claude Desktop Configuration:
Add to your Claude Desktop config file:
{
  "mcpServers": {
    "ctxai": {
      "command": "ctxai",
      "args": ["server"]
    }
  }
}
Then you can ask Claude:
- "List all available code indexes"
- "Index my project at /path/to/project"
- "Search the project index for authentication code"
Note: MCP server requires the MCP package. Install it with:
pip install ctxai[mcp]
# Or install all optional dependencies
pip install ctxai[all]
See docs/MCP_SERVER.md for complete documentation.
Configuration
ctxai stores configuration in .ctxai/config.json. By default, this is in your project directory, but you can customize the location using the CTXAI_HOME environment variable.
CTXAI_HOME Environment Variable
Control where ctxai stores its configuration and indexes:
# Use a global .ctxai directory (shared across all projects)
export CTXAI_HOME=~/.ctxai

# Or use a custom location
export CTXAI_HOME=/path/to/my/.ctxai

# Default (no env var): uses project_directory/.ctxai
Benefits of CTXAI_HOME:
- 🌍 Share configuration across multiple projects
- 📦 Centralize all indexes in one location
- 🔧 Easier backup and management
- 🚀 Consistent settings everywhere
Priority:
CTXAI_HOMEenvironment variable (if set)- Project directory
.ctxai(default)
Embedding Providers
Local (Default - No API Key Required)
{
  "embedding": {
    "provider": "local",
    "model": "all-MiniLM-L6-v2"
  }
}
OpenAI (Better Quality)
{
  "embedding": {
    "provider": "openai",
    "model": "text-embedding-3-small",
    "api_key": "sk-..."
  }
}
HuggingFace
{
  "embedding": {
    "provider": "huggingface",
    "model": "sentence-transformers/all-MiniLM-L6-v2",
    "api_key": "hf_..."
  }
}
Project Size Limits
Prevent indexing overly large projects:
{
  "indexing": {
    "max_files": 10000,
    "max_total_size_mb": 500,
    "max_file_size_mb": 5,
    "chunk_size": 1000,
    "chunk_overlap": 100
  }
}
These limits help:
- Prevent accidentally indexing huge projects
- Control embedding costs (for cloud providers)
- Ensure reasonable performance
MCP Server Configuration
Configure the MCP server by creating an mcp.json file:
{
  "inputs": [],
  "servers": {
    "ctxai": {
      "command": "python",
      "args": ["-m", "ctxai.server", "--index", "index_name"]
    }
  }
}
Querying with GitHub Copilot
Use natural language queries through GitHub Copilot's Agent mode:
@ctxai find code for updating profile images
Installation
Pre-requisites:
- Python 3.10+ (tested on Python 3.13)
- No API key required for default setup (uses local embeddings)
# Basic installation (includes local embeddings)
pip install ctxai

# With OpenAI support
pip install ctxai[openai]

# With HuggingFace support
pip install ctxai[huggingface]

# With all providers
pip install ctxai[all]

# OR using uv
uv pip install ctxai

# OR run directly with uvx
uvx ctxai
First Time Setup
On first run, ctxai creates a .ctxai/config.json file with default settings:
{
  "version": "1.0",
  "embedding": {
    "provider": "local",
    "model": null,
    "api_key": null,
    "batch_size": 100,
    "max_tokens": null
  },
  "indexing": {
    "max_files": 10000,
    "max_total_size_mb": 500,
    "max_file_size_mb": 5,
    "chunk_size": 1000,
    "chunk_overlap": 100
  }
}
You can edit this file to customize embedding providers and project limits.
Running
# Run with uv
uv run ctxai index /path/to/codebase "index-name"

# Or install and run directly
pip install ctxai
ctxai --help
Architecture
Semantic Search Pipeline
ctxai uses a multi-stage pipeline to transform your codebase into searchable vectors:
- Traversal: Recursively walks through your codebase, respecting
.gitignorepatterns and custom include/exclude rules - Parsing: Uses tree-sitter to parse code and understand its structure (functions, classes, methods, etc.)
- Chunking: Intelligently splits code into semantic chunks while preserving context and meaning
- Embedding: Generates vector embeddings (local or cloud providers)
- Storage: Stores embeddings in a local ChromaDB vector database (in
.ctxaidirectory)
AI Agent Architecture
The agent follows a modular, tool-based architecture:
- Core Agent: Manages conversation flow, tool execution, and context
- LLM Providers: Pluggable providers for different LLM services (OpenRouter, Anthropic, OpenAI, Ollama, GitHub Copilot)
- Tool Registry: Dynamic tool registration and execution with parameter validation
- Context Management: Tracks conversation history, file changes, and repository state
- Architect-Editor Pattern: Separates planning (architect) from implementation (editor) for cost optimization
Key Components
Search Components:
traversal.py- File system traversal with gitignore supportchunking.py- Tree-sitter based intelligent code chunkingembeddings.py- Multi-provider embedding generationvector_store.py- ChromaDB vector database management
Agent Components:
agent/core.py- Main agent loop and orchestrationagent/llm/factory.py- LLM provider factory with 5 providersagent/tools/registry.py- Tool registration and executionagent/architect_editor.py- Two-model pattern implementationauth/oauth_pkce.py- OAuth authentication flows
Storage
Indexed codebases are stored locally in the .ctxai/indexes/<index-name> directory within your project. This directory contains:
- ChromaDB vector database
- Chunk metadata and embeddings
- Index configuration
Development
Setup Development Environment
# Clone the repository
git clone https://github.com/vs4vijay/ctxai.git
cd ctxai

# Install dependencies with uv
uv sync

# Or with pip
pip install -e ".[dev]"
Running Tests
# Run all tests
uv run pytest

# Run specific test file
uv run pytest tests/test_indexing.py

# Run with coverage
uv run pytest --cov=ctxai

# Current test status: ✅ 13/13 passing
Code Quality
# Check for issues
uv run ruff check src/

# Auto-fix issues
uv run ruff check src/ --fix

# Format code
uv run ruff format src/

# Check formatting without modifying
uv run ruff format --check src/

# Bump version
uv version --bump patch
Project Structure
ctxai/
├── src/ctxai/
│   ├── __init__.py
│   ├── __main__.py
│   ├── app.py                   # Typer CLI app
│   ├── config.py                # Configuration management
│   ├── chunking.py              # Code chunking logic
│   ├── embeddings.py            # Embedding generation
│   ├── traversal.py             # File system traversal
│   ├── vector_store.py          # Vector DB management
│   ├── server.py                # MCP server
│   ├── agent/                   # AI Agent
│   │   ├── core.py              # Agent core logic
│   │   ├── architect_editor.py  # Architect-editor pattern
│   │   ├── config.py            # Agent configuration
│   │   ├── context.py           # Context management
│   │   ├── planning.py          # Planning strategies
│   │   ├── repomap.py           # Repository mapping
│   │   ├── llm/                 # LLM providers
│   │   │   ├── base.py
│   │   │   ├── factory.py
│   │   │   ├── openrouter_provider.py
│   │   │   ├── github_copilot_provider.py
│   │   │   ├── ollama_provider.py
│   │   │   ├── anthropic_provider.py
│   │   │   └── openai_provider.py
│   │   └── tools/               # Agent tools
│   │       ├── base.py
│   │       ├── registry.py
│   │       ├── file_ops.py
│   │       ├── bash_tool.py
│   │       ├── code_search.py
│   │       └── git_tools.py
│   ├── auth/                    # OAuth authentication
│   │   ├── oauth_pkce.py        # OpenRouter OAuth
│   │   ├── github_copilot.py    # GitHub Copilot OAuth
│   │   └── keystore.py          # Secure credential storage
│   └── commands/
│       ├── index_command.py
│       ├── query_command.py
│       ├── chat_command.py
│       ├── dashboard_command.py
│       ├── server_command.py
│       └── config_command.py
├── tests/
│   ├── test_indexing.py
│   ├── test_query_command.py
│   ├── test_mcp_server.py
│   └── test_server.py
├── pyproject.toml
└── README.md
Releasing
- Bump version in pyproject.toml and push to main
- create a new release with tags pattern
vx.y.ze.g. v0.0.1 - It would create a release on github and start a github action which would publish on pypi
Troubleshooting
Windows Encoding Issues
If you see UnicodeEncodeError: 'charmap' codec can't encode character errors:
Solution: Set UTF-8 encoding before running ctxai
# PowerShell (temporary)
$env:PYTHONIOENCODING="utf-8"
ctxai index /path/to/project "my-index"

# CMD (temporary)
set PYTHONIOENCODING=utf-8
ctxai index /path/to/project "my-index"

# Permanent fix: Add to System Environment Variables
# 1. Windows Search -> "Environment Variables"
# 2. Add new variable: PYTHONIOENCODING = utf-8
# 3. Restart terminal
Provider Setup
Check Provider Status:
# See which providers are configured
ctxai chat
# Shows status: ✅ configured or ❌ not configured
OpenRouter Setup:
# Option 1: OAuth (easiest)
ctxai login openrouter

# Option 2: Manual API key
export OPENROUTER_API_KEY=your-key-here
# Get key at: https://openrouter.ai/keys
GitHub Copilot Setup:
ctxai login github-copilot
# Follow device code flow instructions
Ollama Setup:
# Install Ollama from https://ollama.ai
ollama serve  # Start server
ollama pull codellama:13b  # Pull a model
ctxai chat --provider ollama --model codellama:13b
Embedding Provider Issues
Local embeddings (default)
- First run downloads the model (~80MB) - this is normal
- No internet required after first download
- Slower than cloud APIs but free and private
OpenAI API Key Error
If you configured OpenAI but get an API key error:
export OPENAI_API_KEY=your-api-key-here  # Linux/Mac
set OPENAI_API_KEY=your-api-key-here     # Windows CMD
$env:OPENAI_API_KEY="your-api-key-here"  # Windows PowerShell
Or add to .ctxai/config.json:
{
  "embedding": {
    "provider": "openai",
    "api_key": "sk-..."
  }
}
Switching Providers
Edit .ctxai/config.json to change providers:
{
  "embedding": {
    "provider": "local"  // or "openai", "huggingface"
  }
}
Project Size Errors
If you get "project too large" errors:
Use include patterns to filter files:
ctxai index ./project "index" --include "*.py" --include "*.js"Increase limits in
.ctxai/config.json:{ "indexing": { "max_files": 20000, "max_total_size_mb": 1000 } }Exclude large directories:
ctxai index ./project "index" --exclude "node_modules/*" --exclude "dist/*"
No Files Found to Index
If the indexing process finds no files:
- Check your include/exclude patterns
- Verify the path is correct
- Use
--no-follow-gitignoreif files are being ignored - Check that files are not binary
Tree-sitter Parse Errors
If you see warnings about parsing errors:
- These are usually non-critical
- The tool will fall back to simple text chunking
- Only affects the semantic understanding, not the search capability
Memory Issues with Large Codebases
For very large codebases:
- Index in smaller batches using include patterns
- Reduce
max_chunk_sizein the chunker - Monitor the
.ctxaidirectory size
Contributing
We welcome all contributions to the project! Before submitting your pull request, please ensure you have run the tests and linters locally. This helps us maintain the quality of the project and makes the review process faster for everyone.
# Run tests
uv run pytest

# Run linter and auto-fix
uv run ruff check src/ --fix

# Format code
uv run ruff format src/
All contributions should adhere to the project's code of conduct. Let's work together to create a welcoming and inclusive environment for everyone.
License
MIT License - See LICENSE file for details.
Acknowledgments
- Tree-sitter for semantic code parsing
- Sentence Transformers for local embeddings
- ChromaDB for vector storage
- Anthropic, OpenAI, and other LLM providers
Installing Ctxai
This server has no published package — it is built from source. Open the repository and follow its README.
▸ github.com/vs4vijay/ctxaiFAQ
Is Ctxai MCP free?
Yes, Ctxai MCP is free — one-click install via Unyly at no cost.
Does Ctxai need an API key?
No, Ctxai runs without API keys or environment variables.
Is Ctxai hosted or self-hosted?
Self-hosted: the server runs locally on your machine via the install command above.
How do I install Ctxai in Claude Desktop, Claude Code or Cursor?
Open Ctxai on unyly.org, pick your client tab (Claude Desktop, Claude Code, Cursor) and press Install — the config is generated automatically, no JSON editing.
Related MCPs
GitHub
PRs, issues, code search, CI status
 by GitHub
Filesystem
Secure file operations with configurable access controls.
Memory
Knowledge graph-based persistent memory system.
Template MCP Server
A CLI tool to create a new Model Context Protocol server project with TypeScript support, dual transport options, and an extensible structure
 by mcpdotdirect
Compare Ctxai with
Not sure what to pick?
Find your stack in 60 seconds
Author?
Embed badge for your README
Browse similar
All development MCPs