
Apps Template Server
FreeNot checkedA starter template for building MCP apps with React widgets, featuring tool execution, UI capability negotiation, and host integration.

About
A starter template for building MCP apps with React widgets, featuring tool execution, UI capability negotiation, and host integration.
README
A well-architected starter template demonstrating best practices for building MCP Apps using the Model Context Protocol (MCP) with React widgets. It leverages TypeScript, Tailwind CSS v4, Pino logging, Storybook, and Vitest for a robust development experience.
Features
- MCP Server - Node.js server with
McpServerand MCP Apps helpers - Echo Tool - Example tool with Zod validation and UI binding
- React Widgets - Interactive Echo component with MCP Apps
AppAPI demo - Display Modes - Inline, picture-in-picture, and fullscreen with runtime toggling via
requestDisplayMode() - App API Demo -
callServerTool,openLink,sendMessage,updateModelContextshowcased in the Echo widget - UI Capability Negotiation - Server detects host capabilities and falls back to text-only for non-UI clients
- Inline Widget Assets - Self-contained HTML mode for hosts that sandbox iframes (e.g. Claude.ai)
- Container Dimensions - Responsive widget sizing using host-provided
containerDimensions - Mock App - Drop-in
createMockApp()helper for testing and Storybook without a live MCP connection - Pino Logging - Structured logging with pretty printing in development
- TypeScript - Strict mode with ES2023 target
- Tailwind CSS v4 - Modern styling with dark mode support
- Storybook - Component development with a11y addon
- Testing - Vitest for server and widgets with accessibility checks
- Build Optimizations - Parallel builds, content hashing, compression
- Docker - Multi-stage builds with health checks
- Production Ready - Session management, graceful shutdown, error handling
Architecture
graph TD
    A[MCP Host] -->|HTTPStreamable| B[MCP Server<br/>Node.js + Express]
    B -->|_meta.ui.resourceUri| C[App View<br/>React in iframe]

    B -.-> B1[Echo Tool]
    B -.-> B2[Resource Registration]
    B -.-> B3[text/html;profile=mcp-app<br/>MIME type]

    C -.-> C1[Receives App.ontoolresult]
    C -.-> C2[callServerTool, openLink,<br/>sendMessage, updateModelContext]
    C -.-> C3[Theme, displayMode, safeArea,<br/>containerDimensions]

    style A fill:#e1f5ff
    style B fill:#fff4e6
    style C fill:#f3e5f5
Quick Start
Setup time: ~5 minutes (first time)
Prerequisites
- Node.js 24+ (required for ES2023 support and native type stripping)
- Verify:
node -v(should show v24.0.0 or higher)
- Verify:
- npm 11+ (ships with Node 24)
- Verify:
npm -v(should show v10.0.0 or higher)
- Verify:
Supported platforms: macOS, Linux, Windows (via WSL2)
Installation & Setup
git clone https://github.com/pomerium/chatgpt-app-typescript-template your-chatgpt-app
cd your-chatgpt-app
npm install
npm run dev
This starts both the MCP server and widget dev server:
- MCP Server:
http://localhost:8080 - Widget Assets:
http://localhost:4444
Note: The MCP server is a backend service. To test it, follow the host connection steps below (ChatGPT example) or use
npm run inspectfor local testing.
You should see output indicating both servers are running successfully:
❯ npm run dev

> [email protected] dev
> concurrently "npm run dev:server" "npm run dev:widgets"

[1]
[1] > [email protected] dev:widgets
[1] > npm run dev --workspace=widgets
[1]
[0]
[0] > [email protected] dev:server
[0] > npm run dev --workspace=server
[0]
[1]
[1] > [email protected] dev
[1] > vite
[1]
[0]
[0] > [email protected] dev
[0] > tsx watch src/server.ts
[0]
[1]
[1] Found 1 widget(s):
[1]   - echo
[1]
[1]
[1]   VITE v6.4.1  ready in 151 ms
[1]
[1]   ➜  Local:   http://localhost:4444/
[1]   ➜  Network: use --host to expose
[0] [12:45:12] INFO: Starting MCP App Template server
[0]     port: 8080
[0]     nodeEnv: "development"
[0]     logLevel: "info"
[0]     assetsDir: "/Users/nicktaylor/dev/oss/chatgpt-app-typescript-template/assets"
[0] [12:45:12] INFO: Server started successfully
[0]     port: 8080
[0]     mcpEndpoint: "http://localhost:8080/mcp"
[0]     healthEndpoint: "http://localhost:8080/health"
Connect to a Host (ChatGPT example)
To test your app in ChatGPT, you need to expose your local server publicly. The fastest way is using Pomerium's SSH tunnel:
1. Create a public tunnel (in a new terminal, keep npm run dev running):
ssh -R 0 pom.run
First-time setup:
You'll see a sign-in URL in your terminal:
Please sign in with hosted to continue
https://data-plane-us-central1-1.dataplane.pomerium.com/.pomerium/sign_in?user_code=some-code
Click the link and sign up
Authorize via the Pomerium OAuth flow
Your terminal will display connection details:
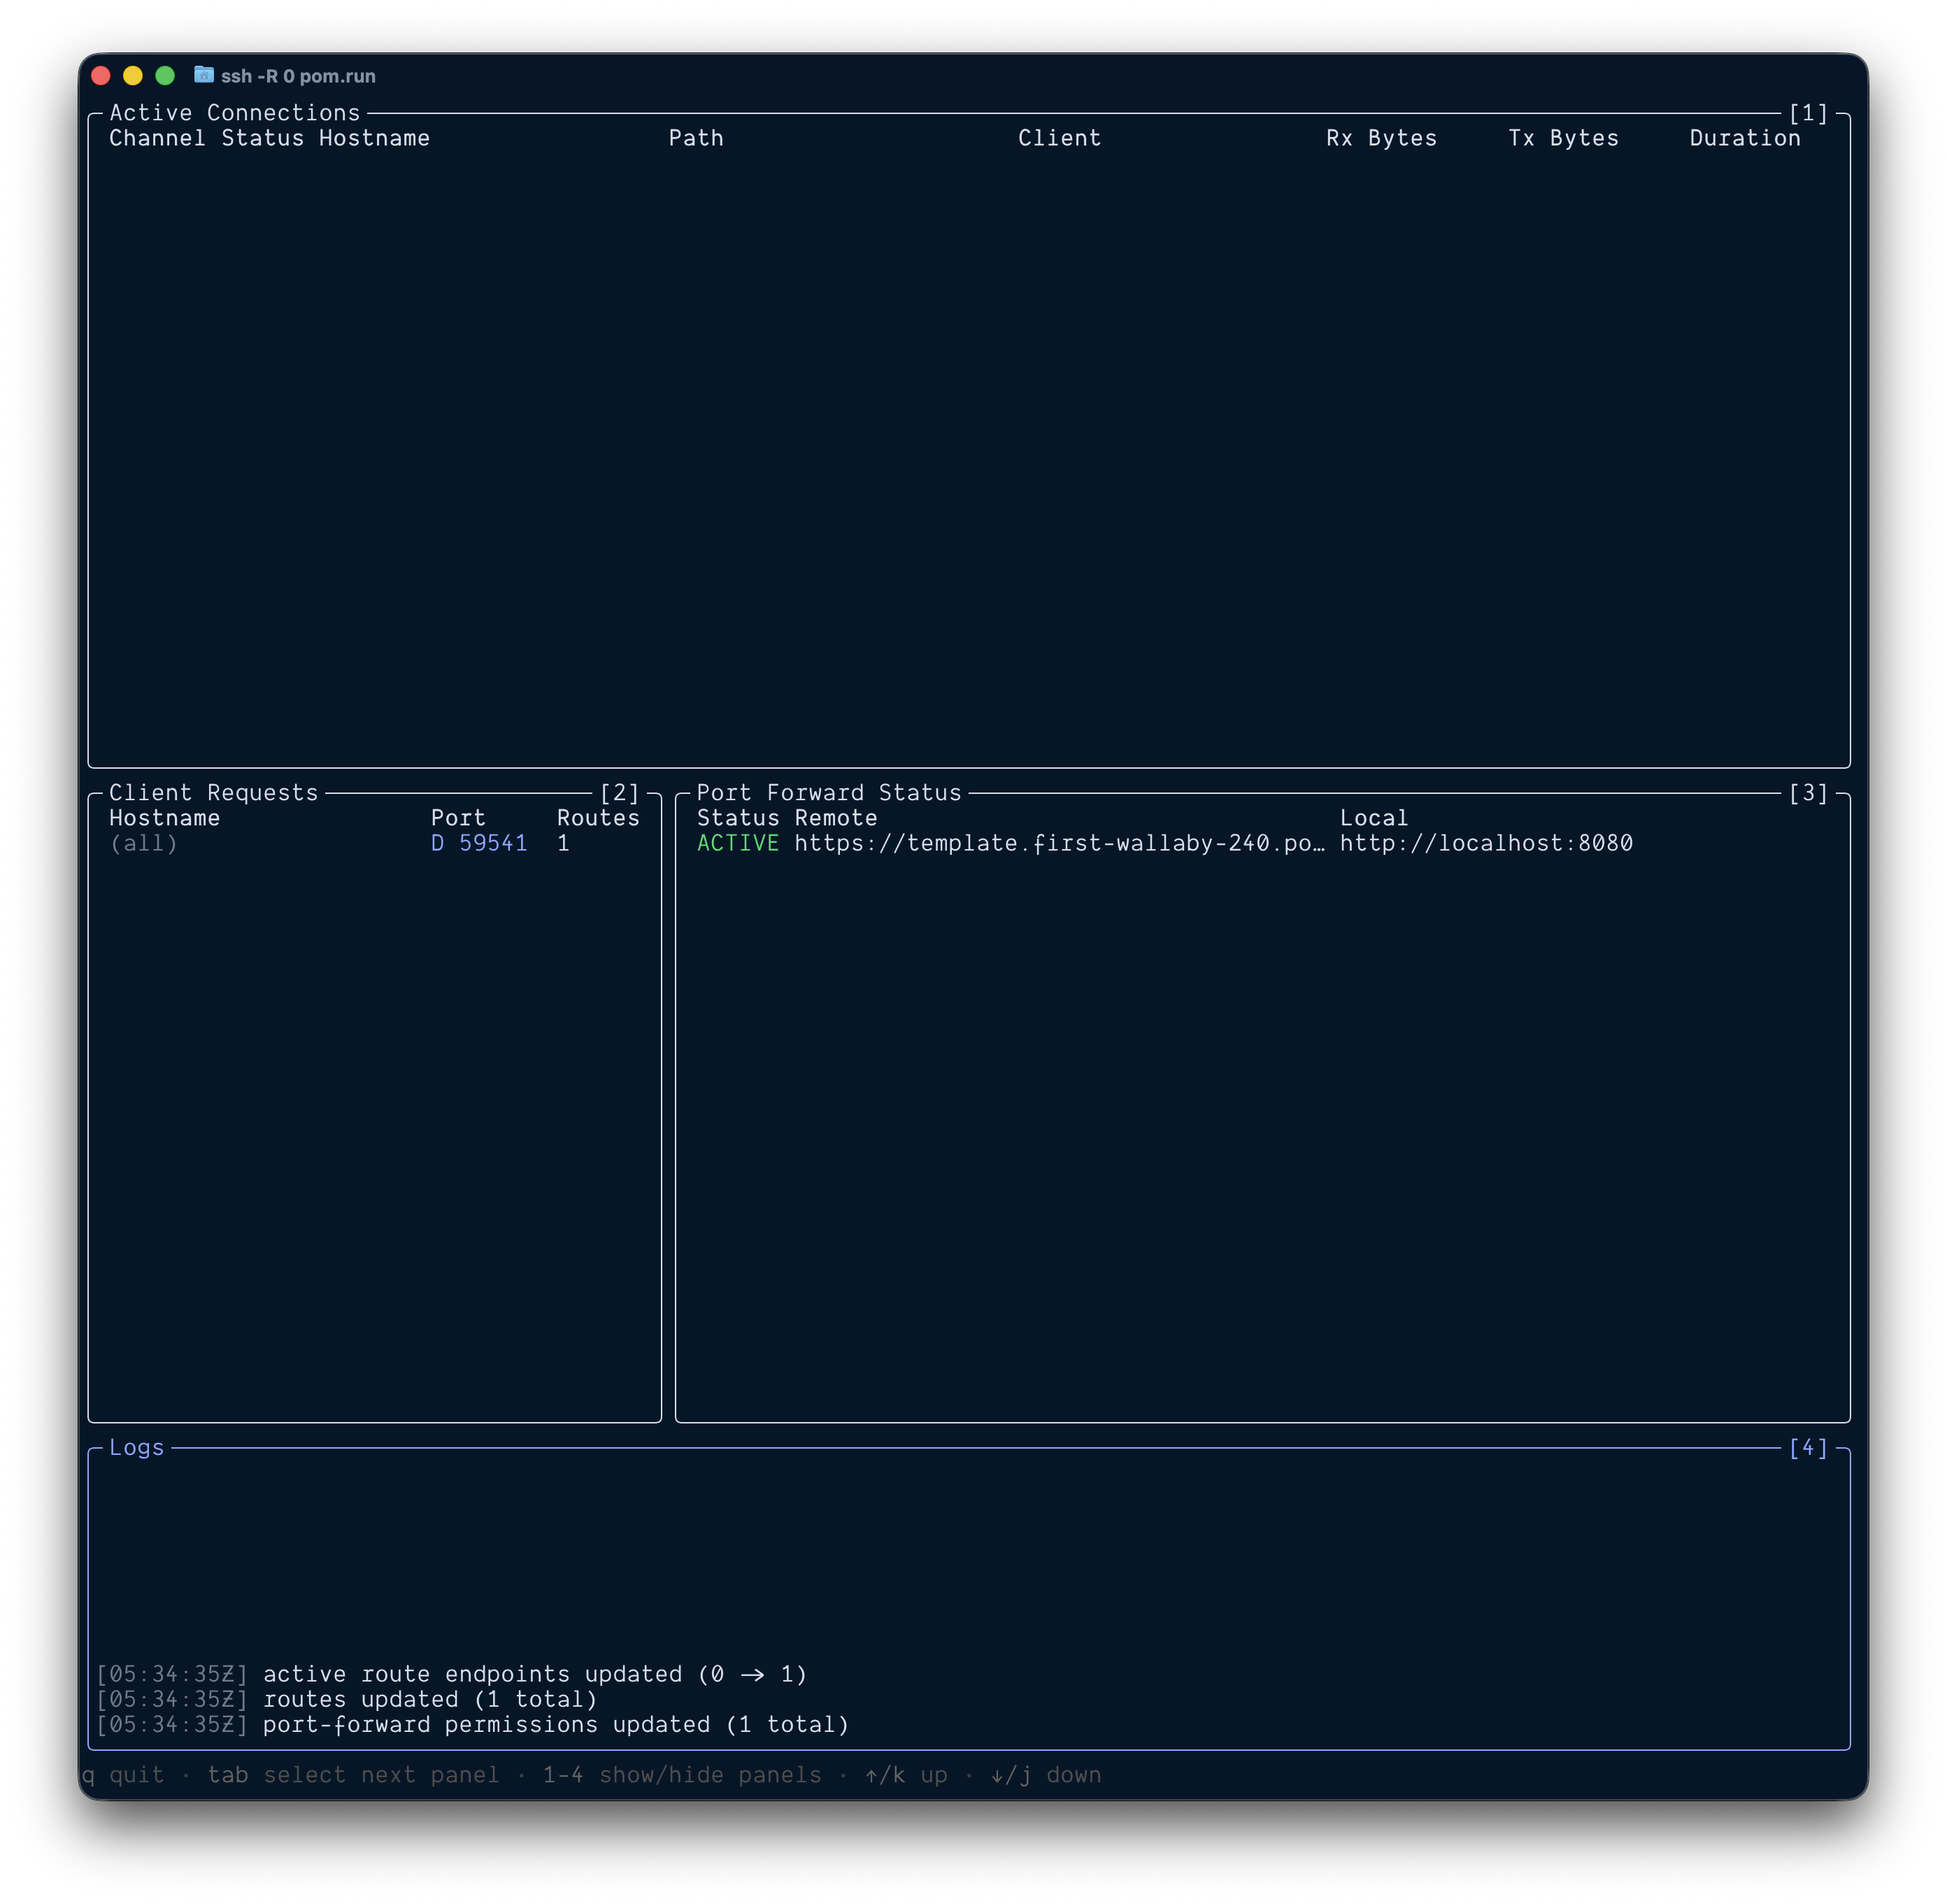
2. Find your public URL:
Look for the Port Forward Status section showing:
- Status:
ACTIVE(tunnel is running) - Remote:
https://template.first-wallaby-240.pom.run(your unique URL) - Local:
http://localhost:8080(your local server)
3. Add to ChatGPT:
- Enable MCP apps dev mode in your ChatGPT settings
- Go to: Settings → Connectors → Add Connector
- Enter your Remote URL +
/mcp, e.g.https://template.first-wallaby-240.pom.run/mcp - Save the connector
4. Test it:
- Start a new chat in ChatGPT
- Add your app to the chat
- Send:
echo today is a great day - You should see the message displayed in an interactive widget
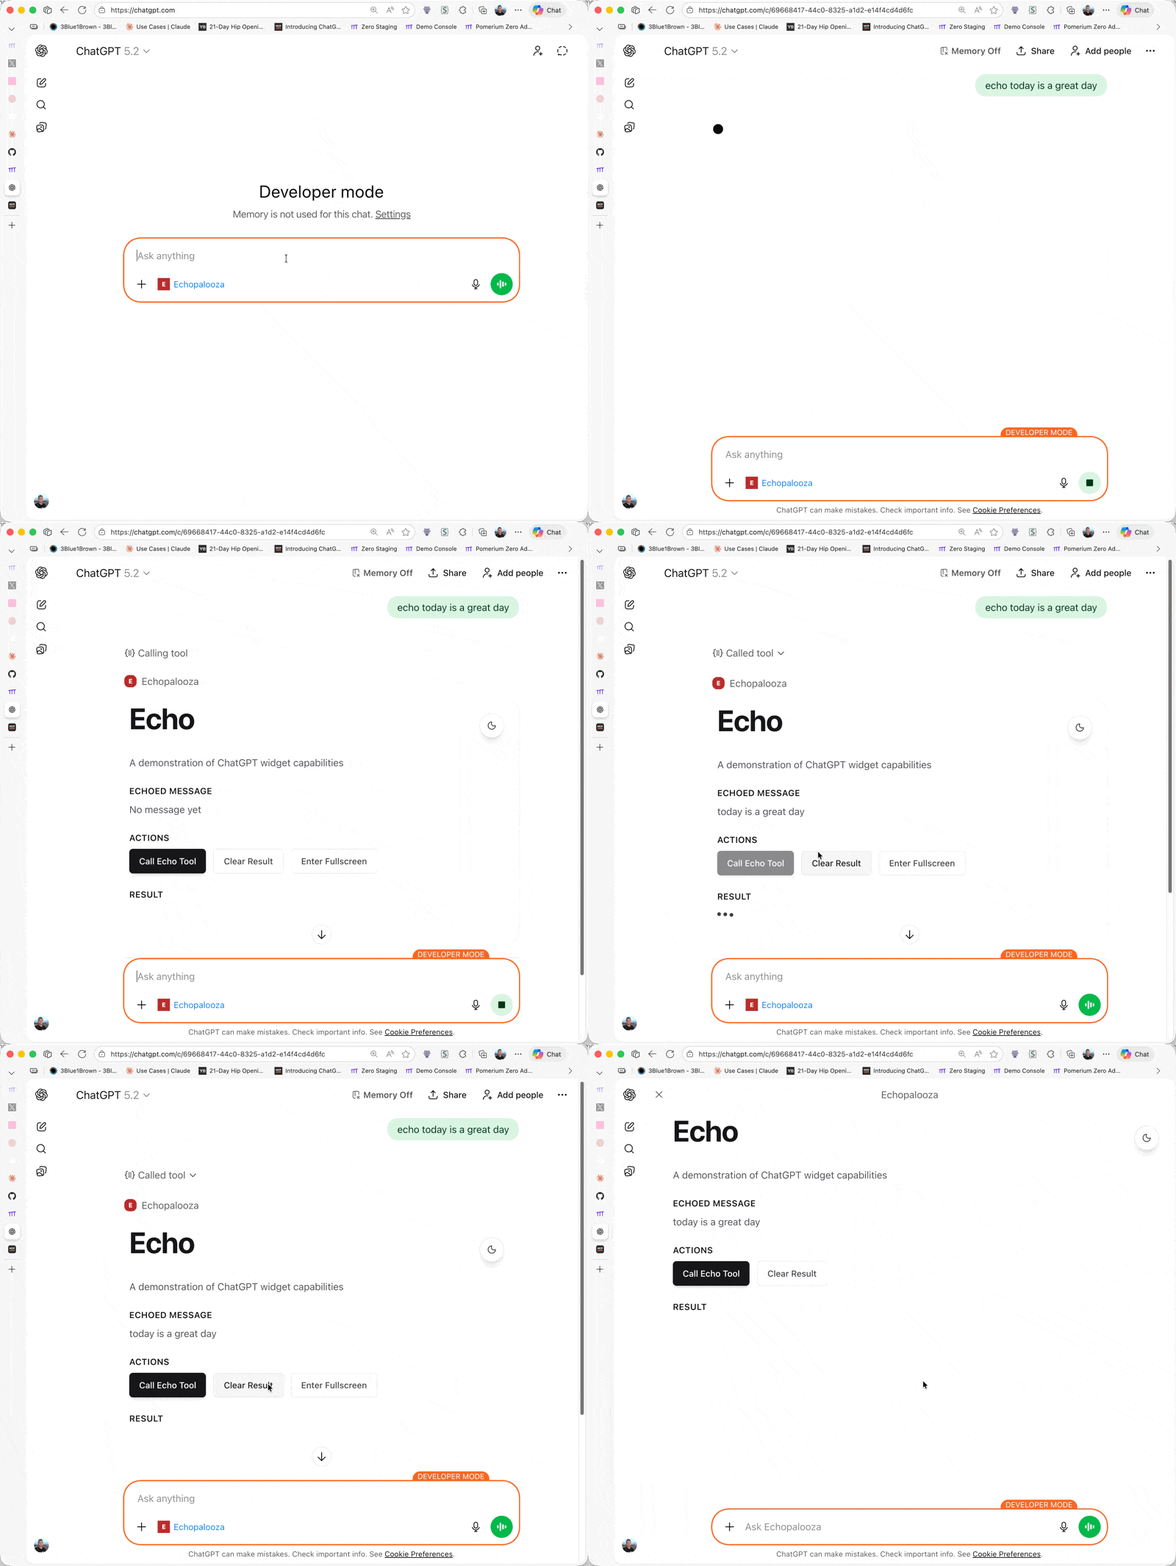
The tunnel stays active as long as the SSH session is running.
Other hosts: Claude Desktop, VS Code, Goose, and other MCP Apps hosts follow the same pattern—add a connector to your /mcp endpoint and refresh after changes.
Success! What's Next?
Now that your app is working, you can:
- Customize the echo tool - Modify the example tool or add your own logic
- Create a new widget - Build custom UI components for your tools
- Test locally - Use
npm run inspectfor debugging without a host - Deploy to production - Take your app live when ready
Available Commands
Development
# Start everything (server + widgets in watch mode)
npm run dev

# Inlined assets mode for testing in Claude.ai or sharing remotely via ssh -R 0 pom.run
npm run dev:inline

# Start only MCP server (watch mode)
npm run dev:server

# Start only widget dev server
npm run dev:widgets

# Test with MCP Inspector
npm run inspect
Building
# Full production build (widgets + server)
npm run build

# Build only widgets
npm run build:widgets

# Build only server
npm run build:server
Testing
# Run all tests
npm test

# Run server tests only
npm run test:server

# Run widget tests only
npm run test:widgets

# Run tests with coverage
npm run test:coverage
Code Quality
# Lint all TypeScript files
npm run lint

# Format code with Prettier
npm run format

# Check formatting without modifying
npm run format:check

# Type check all workspaces
npm run type-check
Storybook
# Run Storybook dev server
npm run storybook

# Build Storybook for production
npm run build:storybook
Testing Your App
1. Local Testing with MCP Inspector
npm run inspect
This opens a browser interface to:
- List available tools
- Test tool invocations
- Inspect responses and metadata
- Verify widget resources load correctly
2. Connect from ChatGPT
For complete ChatGPT connection instructions, see the Quick Start: Connect to a Host section above.
Already connected? After making code changes:
- Settings → Connectors → Your App → Refresh
- This reloads tool definitions and metadata
Production Setup:
When deploying to production:
- Deploy your server to a public URL (see Production Deployment)
- In ChatGPT: Settings → Connectors → Add Connector
- Enter your server URL:
https://your-domain.com/mcp - Test the
echotool in ChatGPT
Project Structure
chatgpt-app-template/
├── server/                  # MCP server
│   ├── src/
│   │   ├── server.ts       # Main server with echo tool
│   │   ├── types.ts        # Type definitions
│   │   └── utils/
│   │       └── session.ts  # Session management
│   ├── tests/
│   │   └── echo-tool.test.ts
│   └── package.json        # Server dependencies
│
├── widgets/                 # React widgets
│   ├── src/
│   │   ├── widgets/
│   │   │   └── echo.tsx           # Widget entry (includes mounting code)
│   │   ├── echo/
│   │   │   ├── Echo.tsx           # Shared components
│   │   │   ├── Echo.stories.tsx
│   │   │   └── styles.css
│   │   ├── components/
│   │   │   └── ui/              # ShadCN components
│   │   ├── mocks/
│   │   │   └── mock-app.ts       # MCP Apps mock for tests/stories
│   │   └── types/
│   │       └── mcp-app.ts        # MCP Apps types for UI wiring
│   ├── .storybook/         # Storybook config
│   └── package.json        # Widget dependencies
│
├── assets/                  # Asset build artifacts
│   ├── echo.html
│   ├── echo-[hash].js
│   └── echo-[hash].css
│
├── docker/
│   ├── Dockerfile          # Multi-stage build
│   └── docker-compose.yml
│
└── package.json            # Root workspace
Adding New Tools
1. Define Tool Schema
// server/src/types.ts
export const MyToolInputSchema = z.object({
  input: z.string().min(1, 'Input is required'),
});
2. Register Tool (with UI)
registerAppTool(
  server,
  'my_tool',
  {
    title: 'My Tool',
    description: 'Does something cool',
    inputSchema: {
      type: 'object',
      properties: {
        input: { type: 'string', description: 'Tool input' },
      },
      required: ['input'],
    },
    _meta: {
      ui: { resourceUri: 'ui://my-widget' },
    },
  },
  async (args) => {
    const input = MyToolInputSchema.parse(args).input;
    return {
      content: [{ type: 'text', text: 'Result' }],
      structuredContent: { result: input },
    };
  }
);
3. Create Widget
Create widgets/src/widgets/my-widget.tsx:
// widgets/src/widgets/my-widget.tsx
import { StrictMode } from 'react';
import { createRoot } from 'react-dom/client';
import { App } from '@modelcontextprotocol/ext-apps';
import { useEffect, useState } from 'react';

function MyWidget() {
  const [toolOutput, setToolOutput] = useState(null);
  const [theme, setTheme] = useState('light');

  useEffect(() => {
    const app = new App({ name: 'MyWidget', version: '1.0.0' });
    app.ontoolresult = (result) => setToolOutput(result.structuredContent ?? null);
    app.onhostcontextchanged = (context) => setTheme(context?.theme ?? 'light');
    app.connect();
  }, []);

  return (
    <div className={theme === 'dark' ? 'dark' : ''}>
      <h1>My Widget</h1>
      <pre>{JSON.stringify(toolOutput, null, 2)}</pre>
    </div>
  );
}

// Mounting code - required at the bottom of each widget file
const rootElement = document.getElementById('my-widget-root');
if (rootElement) {
  createRoot(rootElement).render(
    <StrictMode>
      <MyWidget />
    </StrictMode>
  );
}
4. Register Widget Resource
registerAppResource(
  server,
  'ui://my-widget',
  'ui://my-widget',
  { mimeType: RESOURCE_MIME_TYPE },
  async () => ({
    contents: [
      {
        uri: 'ui://my-widget',
        mimeType: RESOURCE_MIME_TYPE,
        text: await readWidgetHtml('my-widget'),
      },
    ],
  })
);
5. Build
npm run build:widgets
npm run dev:server
The build script auto-discovers widgets in widgets/src/widgets/*.{tsx,jsx} and bundles them with their mounting code
Widget Development
Widget Pattern
Widgets include both the component and mounting code:
1. Create widget entry point in widgets/src/widgets/[name].tsx:
import { StrictMode } from 'react';
import { createRoot } from 'react-dom/client';
import { useEffect, useState } from 'react';
import { App } from '@modelcontextprotocol/ext-apps';

function MyWidget() {
  const [toolOutput, setToolOutput] = useState(null);

  useEffect(() => {
    const app = new App({ name: 'MyWidget', version: '1.0.0' });
    app.ontoolresult = (result) => setToolOutput(result.structuredContent ?? null);
    app.connect();
  }, []);
  return <div>Widget content</div>;
}

// Mounting code - required
const rootElement = document.getElementById('my-widget-root');
if (rootElement) {
  createRoot(rootElement).render(
    <StrictMode>
      <MyWidget />
    </StrictMode>
  );
}
2. Build discovers and bundles widget:
npm run build:widgets
3. Widget available as ui://my-widget
The build system:
- Auto-discovers all files in
widgets/src/widgets/*.{tsx,jsx} - Bundles the component and mounting code together
- Creates content-hashed bundles and HTML templates
MCP Apps App API Reference
Tool Results & Host Context
const app = new App({ name: 'Echo', version: '1.0.0' });
app.ontoolresult = (result) => {
  console.log(result.structuredContent);
};
app.onhostcontextchanged = (context) => {
  console.log(context?.theme, context?.displayMode);
};
await app.connect();
Display Modes
Widgets can run in three display modes provided by the host:
inline— Rendered within the chat message flow (default)pip— Picture-in-picture floating windowfullscreen— Full-screen overlay
The current mode is available via hostContext.displayMode. Widgets can request a mode change at runtime:
// Toggle between inline and fullscreen
const result = await app.requestDisplayMode({ mode: 'fullscreen' });
console.log(result.mode); // the mode the host actually switched to
The host decides whether to honor the request — always use the returned result.mode as the source of truth.
Container Dimensions
Hosts provide containerDimensions in the host context so widgets can size themselves responsively:
app.onhostcontextchanged = (context) => {
  const { maxHeight, maxWidth } = context?.containerDimensions ?? {};
  // Use maxHeight/maxWidth to constrain your layout
};
This replaces viewport-based sizing and ensures widgets respect the host's available space (especially important in inline mode).
Runtime APIs
// Call other tools from the widget
const result = await app.callServerTool({
  name: 'tool_name',
  arguments: { arg: 'value' },
});

// Open an external link via the host
await app.openLink({ url: 'https://example.com' });

// Send a message to the host chat
await app.sendMessage({
  role: 'user',
  content: [{ type: 'text', text: 'Hello from the widget!' }],
});

// Push widget state to the model context for future turns
await app.updateModelContext({
  content: [{ type: 'text', text: 'Current widget state summary' }],
  structuredContent: { key: 'value' },
});

// Toggle display mode
await app.requestDisplayMode({ mode: 'fullscreen' });
UI Capability Negotiation
The server inspects the client's capabilities during session initialization and adapts its responses:
- UI-capable hosts (ChatGPT, VS Code, etc.) — Tools include
_meta.ui.resourceUriand returnstructuredContentfor the widget to render - Text-only hosts (terminal clients, basic MCP consumers) — Tools omit UI metadata and return plain text responses
This happens automatically via getUiCapability() from @modelcontextprotocol/ext-apps/server. No widget changes are needed — the server handles the fallback.
Inline Widget Assets
Some hosts (e.g. Claude.ai) require fully self-contained HTML — external <script> and <link> tags won't load inside their sandboxed iframes. Inline mode is also useful when sharing your work remotely via ssh -R 0 pom.run.
npm run dev:inline
This produces self-contained HTML by:
- JS/CSS — inlined as
<script>/<style>blocks - Local images — inlined as data URIs via Vite's
assetsInlineLimit - Fonts — loaded via Google Fonts (the required domains
fonts.googleapis.comandfonts.gstatic.comare automatically added toresourceDomainsin the CSP)
The widget build runs in watch mode so file changes are automatically rebuilt.
When is inline mode needed? Only when using
ssh -R 0 pom.runto tunnel your local server. If you self-host tunneling, you can create a public route in Pomerium for widgets or host them elsewhere (Vercel, Netlify, etc.) — just add those domains toresourceDomainsin the CSP metadata.Inline mode is not needed in production — once deployed to a public URL, hosts fetch widget assets directly via normal URLs.
Loading External Resources (Images, APIs, etc.)
MCP Apps hosts render widgets inside sandboxed iframes with a strict Content Security Policy (CSP). By default, remote images and other external resources will be blocked — even if the HTTP request succeeds (returns 200), the browser won't render the response inside the iframe.
To allow external domains, declare them in the resource's _meta.ui.csp.resourceDomains:
return {
  contents: [
    {
      uri: resourceUri,
      mimeType: RESOURCE_MIME_TYPE,
      text: html,
      _meta: {
        ui: {
          csp: {
            resourceDomains: ['https://cdn.example.com', 'https://api.example.com'],
            connectDomains: ['https://api.example.com'], // for fetch/XHR
          },
        },
      },
    },
  ],
};
The host merges these domains into the iframe's CSP, allowing the widget to load images, fonts, and other resources from the specified origins.
Key points:
- Remote images require
resourceDomains— without it,<img src="https://...">will silently fail in most hosts - Data URIs always work — images imported via Vite (
import img from './photo.png') are inlined as data URIs whenassetsInlineLimitis set (see Inline Widget Assets) - Each domain must be explicitly listed — wildcards are not supported; include all domains your widget needs (e.g. both
https://picsum.photosandhttps://fastly.picsum.photosif the first redirects to the second) connectDomains— use this forfetch()/XMLHttpRequestcalls to external APIs
Mock App for Testing & Storybook
The createMockApp() helper (widgets/src/mocks/mock-app.ts) provides a drop-in replacement for the real App instance, making it easy to test widgets and develop them in Storybook without a live MCP connection:
import { createMockApp } from '../mocks/mock-app';

const mockApp = createMockApp({
  toolOutput: { echoedMessage: 'Hello', timestamp: '2025-01-01T00:00:00Z' },
  hostContext: { theme: 'dark', displayMode: 'inline' },
});

// Pass to your widget
<Echo app={mockApp} />

// Simulate new tool results or context changes
mockApp.emitToolResult({ echoedMessage: 'Updated', timestamp: '...' });
mockApp.setHostContext({ theme: 'light', displayMode: 'fullscreen' });
Example: Full Widget with Safe Area
// widgets/src/widgets/my-widget.tsx
import { StrictMode, useEffect, useState } from 'react';
import { createRoot } from 'react-dom/client';
import { App } from '@modelcontextprotocol/ext-apps';

function MyWidget() {
  const [toolOutput, setToolOutput] = useState(null);
  const [theme, setTheme] = useState('light');
  const [safeAreaInsets, setSafeAreaInsets] = useState({
    top: 0,
    bottom: 0,
  });

  useEffect(() => {
    const app = new App({ name: 'MyWidget', version: '1.0.0' });
    app.ontoolresult = (result) => setToolOutput(result.structuredContent ?? null);
    app.onhostcontextchanged = (context) => {
      setTheme(context?.theme ?? 'light');
      setSafeAreaInsets({
        top: context?.safeAreaInsets?.top ?? 0,
        bottom: context?.safeAreaInsets?.bottom ?? 0,
      });
    };
    app.connect();
  }, []);

  const containerStyle = {
    paddingTop: safeAreaInsets.top,
    paddingBottom: safeAreaInsets.bottom,
  };

  return (
    <div style={containerStyle} className={theme === 'dark' ? 'dark' : ''}>
      <h1>My Widget</h1>
      <p>Tool output: {JSON.stringify(toolOutput)}</p>
    </div>
  );
}

// Mounting code - required at the bottom of each widget file
const rootElement = document.getElementById('my-widget-root');
if (rootElement) {
  createRoot(rootElement).render(
    <StrictMode>
      <MyWidget />
    </StrictMode>
  );
}
Configuration
Environment Variables
Create .env file (see .env.example):
# Server
NODE_ENV=development
PORT=8080
LOG_LEVEL=info          # fatal, error, warn, info, debug, trace

# Session Management
SESSION_MAX_AGE=3600000 # 1 hour in milliseconds

# CORS (development)
CORS_ORIGIN=*

# Asset Base URL (for CDN)
# BASE_URL=https://cdn.example.com/assets

# Local dev only: inline JS/CSS + images, fonts via Google Fonts (npm run dev:inline)
# INLINE_DEV_MODE=true
Critical Configuration Notes
text/html;profile=mcp-app MIME Type
Required for MCP Apps hosts to load UI:
return {
  contents: [
    {
      uri: 'ui://my-widget',
      mimeType: 'text/html;profile=mcp-app', // ← CRITICAL
      text: html,
    },
  ],
};
Bundle Size Limits
- Widget bundles: Warn at 500kb (configured in Vite)
- Widget state: Keep under 4,000 tokens for performance
API Reference
MCP Server Endpoints
| Endpoint | Method | Description |
|---|---|---|
/health |
GET | Health check (returns status, version, session count) |
/mcp |
GET | SSE connection endpoint for MCP clients |
/mcp/messages?sessionId=<id> |
POST | Message handling for MCP protocol |
Echo Tool Schema
{
  "name": "echo",
  "description": "Echoes back the user's message in an interactive widget",
  "inputSchema": {
    "type": "object",
    "properties": {
      "message": {
        "type": "string",
        "description": "The message to echo back"
      }
    },
    "required": ["message"]
  }
}
Tool Response Format
{
  content: [{ type: 'text', text: 'Human-readable message' }],
  structuredContent: {
    // JSON data passed to the app via App.ontoolresult
    echoedMessage: 'Hello',
    timestamp: '2025-01-...'
  },
  // UI binding is defined in tool _meta.ui.resourceUri
}
Testing & Quality Assurance
Running Tests
# Run all tests (server + widgets)
npm test

# Run specific workspace tests
npm run test:server
npm run test:widgets

# Run with coverage report
npm run test:coverage
Test Structure
Server Tests (server/tests/):
- Input validation with Zod
- Tool response structure
- Session management
- Error handling
Widget Tests (widgets/tests/):
- Component rendering
- User interactions
- Accessibility (a11y) compliance
- MCP Apps App API mocking
MCP Inspector Workflow
# 1. Start server
npm run dev:server

# 2. Build widgets
npm run build:widgets

# 3. Test with Inspector
npm run inspect

# 4. Verify:
#    - Tools list correctly
#    - Tool invocations work
#    - Widget HTML loads
#    - structuredContent is correct
Production Deployment
Building for Production
The production build process compiles widgets with optimizations and prepares the server:
# Full production build
npm run build
This runs:
npm run build:widgets- Builds optimized widget bundles with content hashingnpm run build:server- Compiles TypeScript server code
Build outputs:
assets/- Optimized widget bundles (JS/CSS with content hashes)server/dist/- Compiled server code
Manual Deployment
# 1. Install dependencies
npm install

# 2. Build for production
npm run build

# 3. Start production server
NODE_ENV=production npm start
The server will:
- Serve MCP on
http://localhost:8080/mcp - Load pre-built widgets from
assets/ - Use structured logging (JSON format)
- Run with production optimizations
Docker Deployment
# Build image
docker build -f docker/Dockerfile -t chatgpt-app:latest .

# Run with docker-compose
docker-compose -f docker/docker-compose.yml up -d

# Check logs
docker-compose -f docker/docker-compose.yml logs -f

# Health check
curl http://localhost:8080/health
Production Checklist
Environment Variables:
- Set
NODE_ENV=production - Configure
CORS_ORIGINto your domain (not*) - Set
LOG_LEVEL=warnorerrorfor production - Configure
SESSION_MAX_AGEbased on your use case - Set
BASE_URLif using a CDN for widget assets
Deployment Requirements:
- MCP Server: Must be behind a Pomerium route, which handles OAuth authentication and lets you set policies to control who can access the server and which tools they can use
- Widget assets: Must be served from a publicly accessible URL — either from the same server, a CDN (
BASE_URL), or a static host like Netlify/Vercel - Ensure
assets/directory is deployed with the server (or served separately viaBASE_URL) - Set up SSL/TLS certificates (most MCP hosts require HTTPS)
Monitoring:
- Monitor
/healthendpoint for server status - Set up logging aggregation (Pino outputs JSON in production)
- Configure alerts for errors and performance issues
Troubleshooting
Widget Not Loading
Symptom: Widget doesn't appear in a host
Solutions:
- Verify
text/html;profile=mcp-appMIME type in resource registration - Check assets directory exists:
ls assets/ - Rebuild widgets:
npm run build:widgets - Restart server and refresh connector in the host
Tool Not Listed
Symptom: Tool doesn't appear in a host
Solutions:
- Check server logs for errors
- Test with MCP Inspector:
npm run inspect - Refresh connector: Settings → Connectors → Refresh
- Verify tool schema is valid JSON Schema
Session Issues
Symptom: "Session not found" errors
Solutions:
- Check
SESSION_MAX_AGEsetting - Review session cleanup logs
- Ensure SSE connection is maintained
- Check CORS configuration
Build Failures
Symptom: npm run build:widgets fails
Solutions:
- Clear node_modules:
rm -rf node_modules && npm install - Check for TypeScript errors:
npm run type-check - Verify all dependencies installed
- Check Node.js version:
node -v(should be 24+)
Port Already in Use
Symptom: Error: listen EADDRINUSE: address already in use :::8080
Solutions:
- Change port in
.env:PORT=3001 - Kill existing process:
lsof -ti:8080 | xargs kill
Architecture Decisions
Why McpServer + MCP Apps Helpers?
The template uses McpServer from @modelcontextprotocol/sdk/server/mcp.js together with @modelcontextprotocol/ext-apps/server helpers because:
registerAppToolandregisterAppResourcehandle MCP Apps metadata wiring consistently- Tool UI binding is declared with
_meta.ui.resourceUriin one place - The pattern is portable across MCP Apps hosts (ChatGPT, VS Code, Claude, Goose)
Why Node.js 24 + ES2023?
- Native type stripping support
- Immutable array methods (
.toSorted(),.toReversed()) - Better performance and modern JavaScript features
Why Tailwind CSS v4?
- Modern, performant, and well-documented
- Great dark mode support out of the box
- Smaller bundle sizes with new engine
Why Pino for Logging?
- Fast, structured logging for production
- Pretty printing in development
- Easy integration with monitoring tools
Contributing
Contributions welcome! Please:
- Follow existing code style (ESLint + Prettier)
- Add tests for new features
- Update documentation
- Ensure TypeScript strict mode compliance
License
MIT
Built with:
Installing Apps Template Server
This server has no published package — it is built from source. Open the repository and follow its README.
▸ github.com/pomerium/chatgpt-app-typescript-templateFAQ
Is Apps Template Server MCP free?
Yes, Apps Template Server MCP is free — one-click install via Unyly at no cost.
Does Apps Template Server need an API key?
No, Apps Template Server runs without API keys or environment variables.
Is Apps Template Server hosted or self-hosted?
Self-hosted: the server runs locally on your machine via the install command above.
How do I install Apps Template Server in Claude Desktop, Claude Code or Cursor?
Open Apps Template Server on unyly.org, pick your client tab (Claude Desktop, Claude Code, Cursor) and press Install — the config is generated automatically, no JSON editing.
Related MCPs
LibreOffice Tools
Enables AI agents to read, write, and edit Office documents via LibreOffice with token-efficient design. Supports multiple formats including DOCX, XLSX, PPTX, a
 by passerbyflutter
dannote/figma-use
Full Figma control: create shapes, text, components, set styles, auto-layout, variables, export. 80+ tools.
 by dannote
Logo.dev
Search and retrieve company logos by brand or domain. Customize size, format, and theme to match your design needs. Accelerate design, prototyping, and content
 by NOVA-3951
PIX4Dmatic
Enables GUI automation for controlling PIX4Dmatic on Windows through MCP. Supports launching, focusing, capturing screenshots, sending hotkeys, clicking UI elem
 by jangjo123
Compare Apps Template Server with
Not sure what to pick?
Find your stack in 60 seconds
Author?
Embed badge for your README
Browse similar
All design MCPs