
Server With Authentication
FreeNot checkedImplements a secure MCP server with API Key and JWT authentication, providing tools like echo, login, secure_action, and admin_action. Includes MCP Inspector in

About
Implements a secure MCP server with API Key and JWT authentication, providing tools like echo, login, secure_action, and admin_action. Includes MCP Inspector integration for testing and debugging.
README
This project implements a Model Context Protocol (MCP) server with two authentication mechanisms: API Key Authentication and JWT (JSON Web Token) Authentication. It provides a robust framework for handling authenticated requests with comprehensive error handling and logging, suitable for production environments. The server supports tools like echo, login, secure_action, and admin_action, with authentication enforced where required.
📚 Table of Contents
🎯 Purpose
The purpose of this project is to demonstrate secure MCP server implementations with two distinct authentication methods:
- 🔑 API Key Authentication: Validates requests using predefined API keys.
- 🛡️ JWT Authentication: Uses JSON Web Tokens for user authentication and permission-based access control.
This project is designed for developers who need a secure, scalable, and extensible MCP server with robust debugging and logging capabilities.
✨ Features
🔑 API Key Authentication:
- Validates requests using a set of predefined API keys.
- Supports key extraction from arguments, metadata, or environment variables.
- Simple
echotool for demonstration.
🛡️ JWT Authentication:
- Supports user authentication via username/password to generate JWT tokens.
- Enforces permission-based access control (
read,write,admin). - Includes tools:
login,echo,secure_action, andadmin_action. - Configurable token expiry (default: 24 hours).
- Token extraction from arguments, metadata, or environment variables.
⚠️ Robust Error Handling:
- Custom
McpErrorfor consistent error responses. - Detailed logging of errors and server events.
- Custom
📝 Logging:
- Configurable logging to both console and rotating log files.
- Log rotation based on file size (5MB, with 5 backups).
- Automatic cleanup of old log files based on age.
🔍 MCP Inspector Integration:
- Compatible with MCP Inspector for testing and debugging.
- Supports debugging via
--debugflag.
🗂️ Project Structure
/
├── src/
│   ├── config/
│   │   ├── __init__.py
│   │   ├── app_settings.py                     # Configuration for environment variables and settings
│   │   └── logging_config.py                   # Logging setup with file rotation
│   ├── mcp-server-with-stdio-api-key-auth.py   # API Key Authentication server
│   ├── mcp-server-with-stdio-auth2-auth.py     # To Do
│   └── mcp-server-with-stdio-jwt-key-auth.py   # JWT Authentication server
├── pyproject.toml                              # Project documentation
└── README.md                                   # Python dependencies
✅ Prerequisites
- Python: Version 3.13 or higher
- uv: Used for managing Python virtual environments
- Node.js: Required for running MCP Inspector
- NPM: Required to run MCP Inspector
- Operating System: Windows, macOS, or Linux
⚙️ Installation
📥 Clone the Repository:
git clone https://github.com/ahmad-act/MCP-Server-with-Authentication-and-Testing-with-Inspector.git
cd MCP-Server-with-Authentication-and-Testing-with-Inspector
🪄 Set Up a Virtual Environment (recommended):
uv venv
source venv/bin/activate  # On Windows: venv\Scripts\activate
📦 Install Dependencies:
uv sync
🧩 Packages
The following Python packages are required:
mcp[cli]>=1.10.1
PyJWT>=2.8.0
python-dotenv>=1.0.0
👉 Install them using:
uv add mcp[cli] PyJWT python-dotenv
🚦 Usage
1️⃣ MCP Server with Stdio and API Key (mcp-server-with-stdio-api-key-auth.py)
▶️ Run the MCP Server:
⚠️ You do not need to manually run the MCP server for stdio transport. MCP Inspector runs the MCP Server for stdio transport.
▶️ Run the MCP Inspector:
The stdio server is typically launched by the MCP Inspector, not manually. Run the Inspector with the following command, add -e environment variable and adjusting the --directory path to your src/ directory:
npx @modelcontextprotocol/inspector uv -e MCP_API_KEY=sk-1234567890abcdef --directory '<your-src-directory>/src' run mcp-server-with-stdio-api-key-auth.py --debug
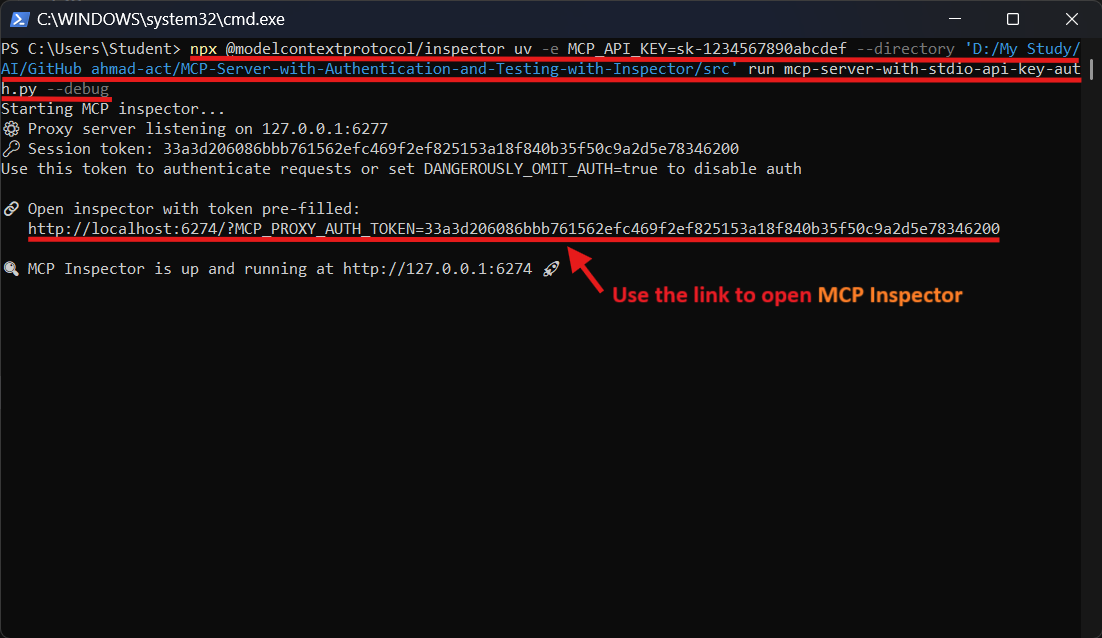
🌐 Open the MCP Inspector:
Open the link http://localhost:6274/?MCP_PROXY_AUTH_TOKEN=XXXXXXXXXXXXXXXXXX with its token in your browser:
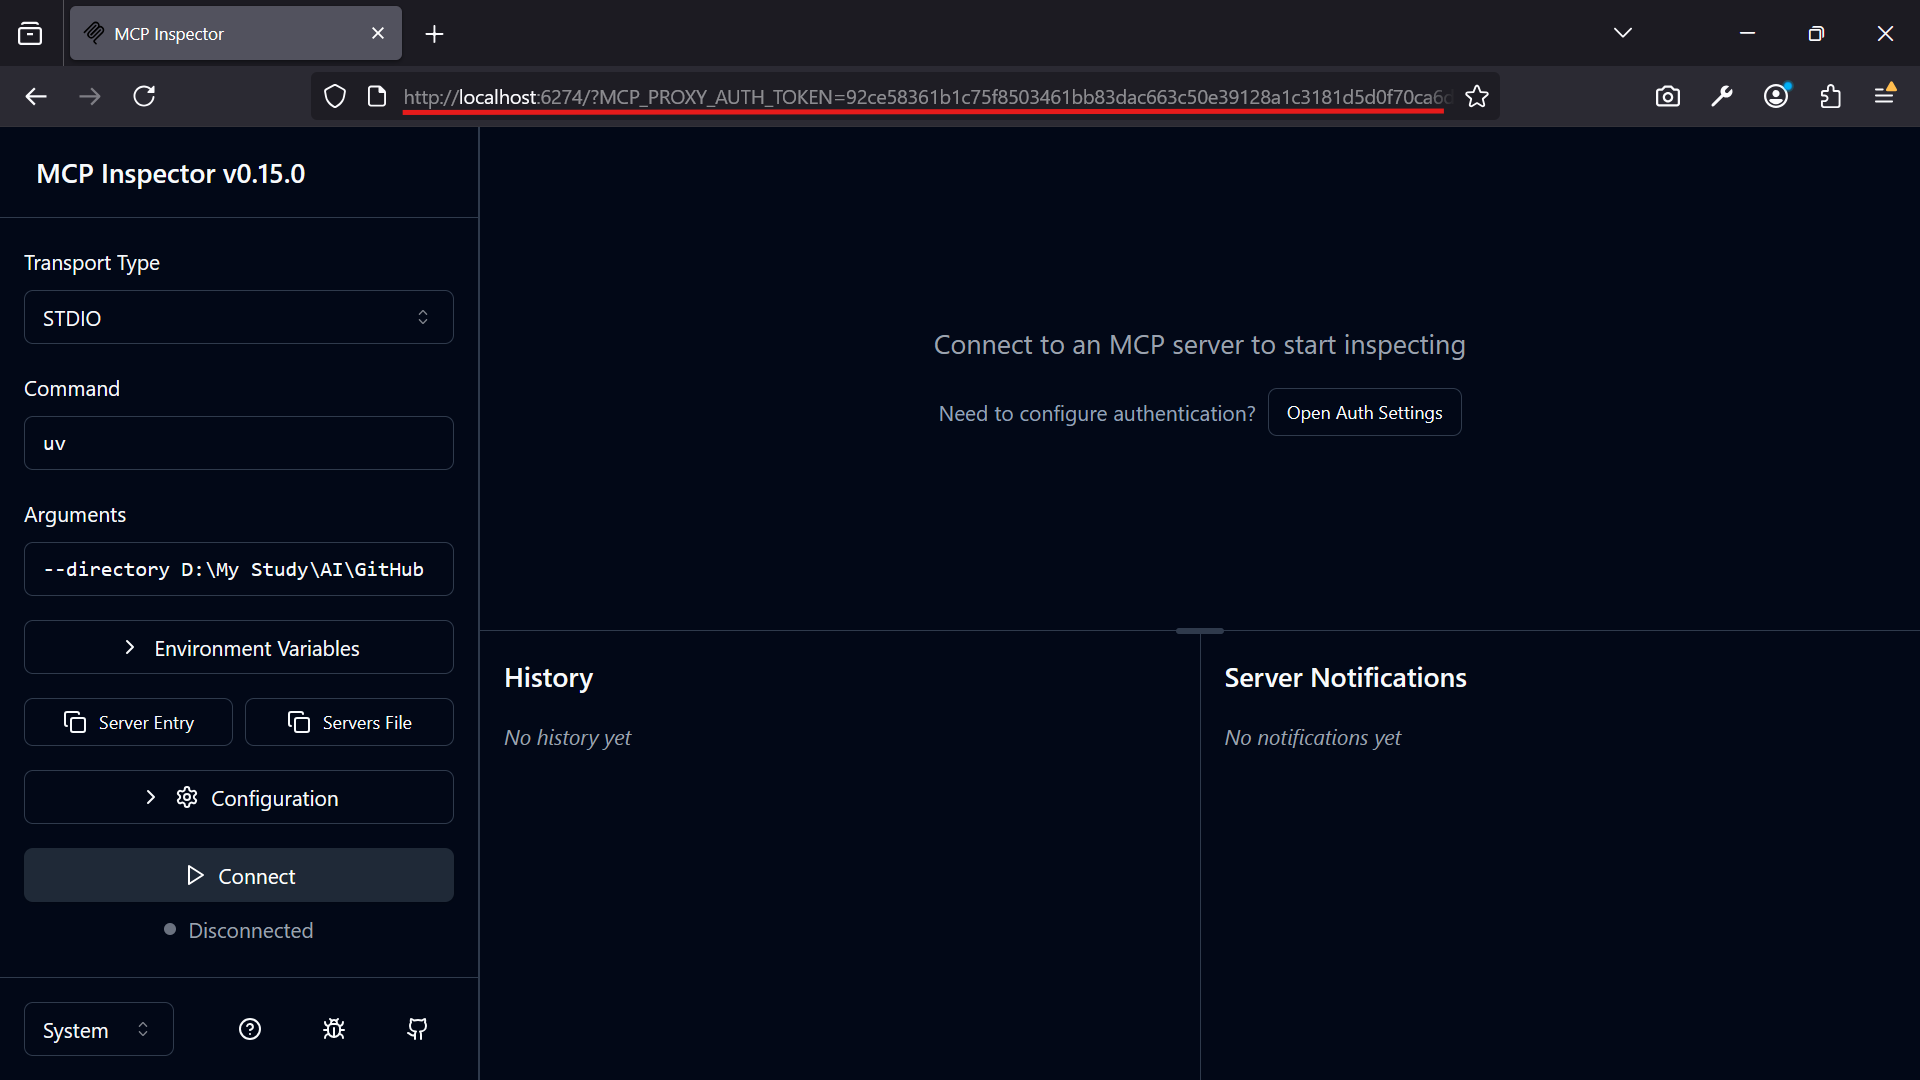
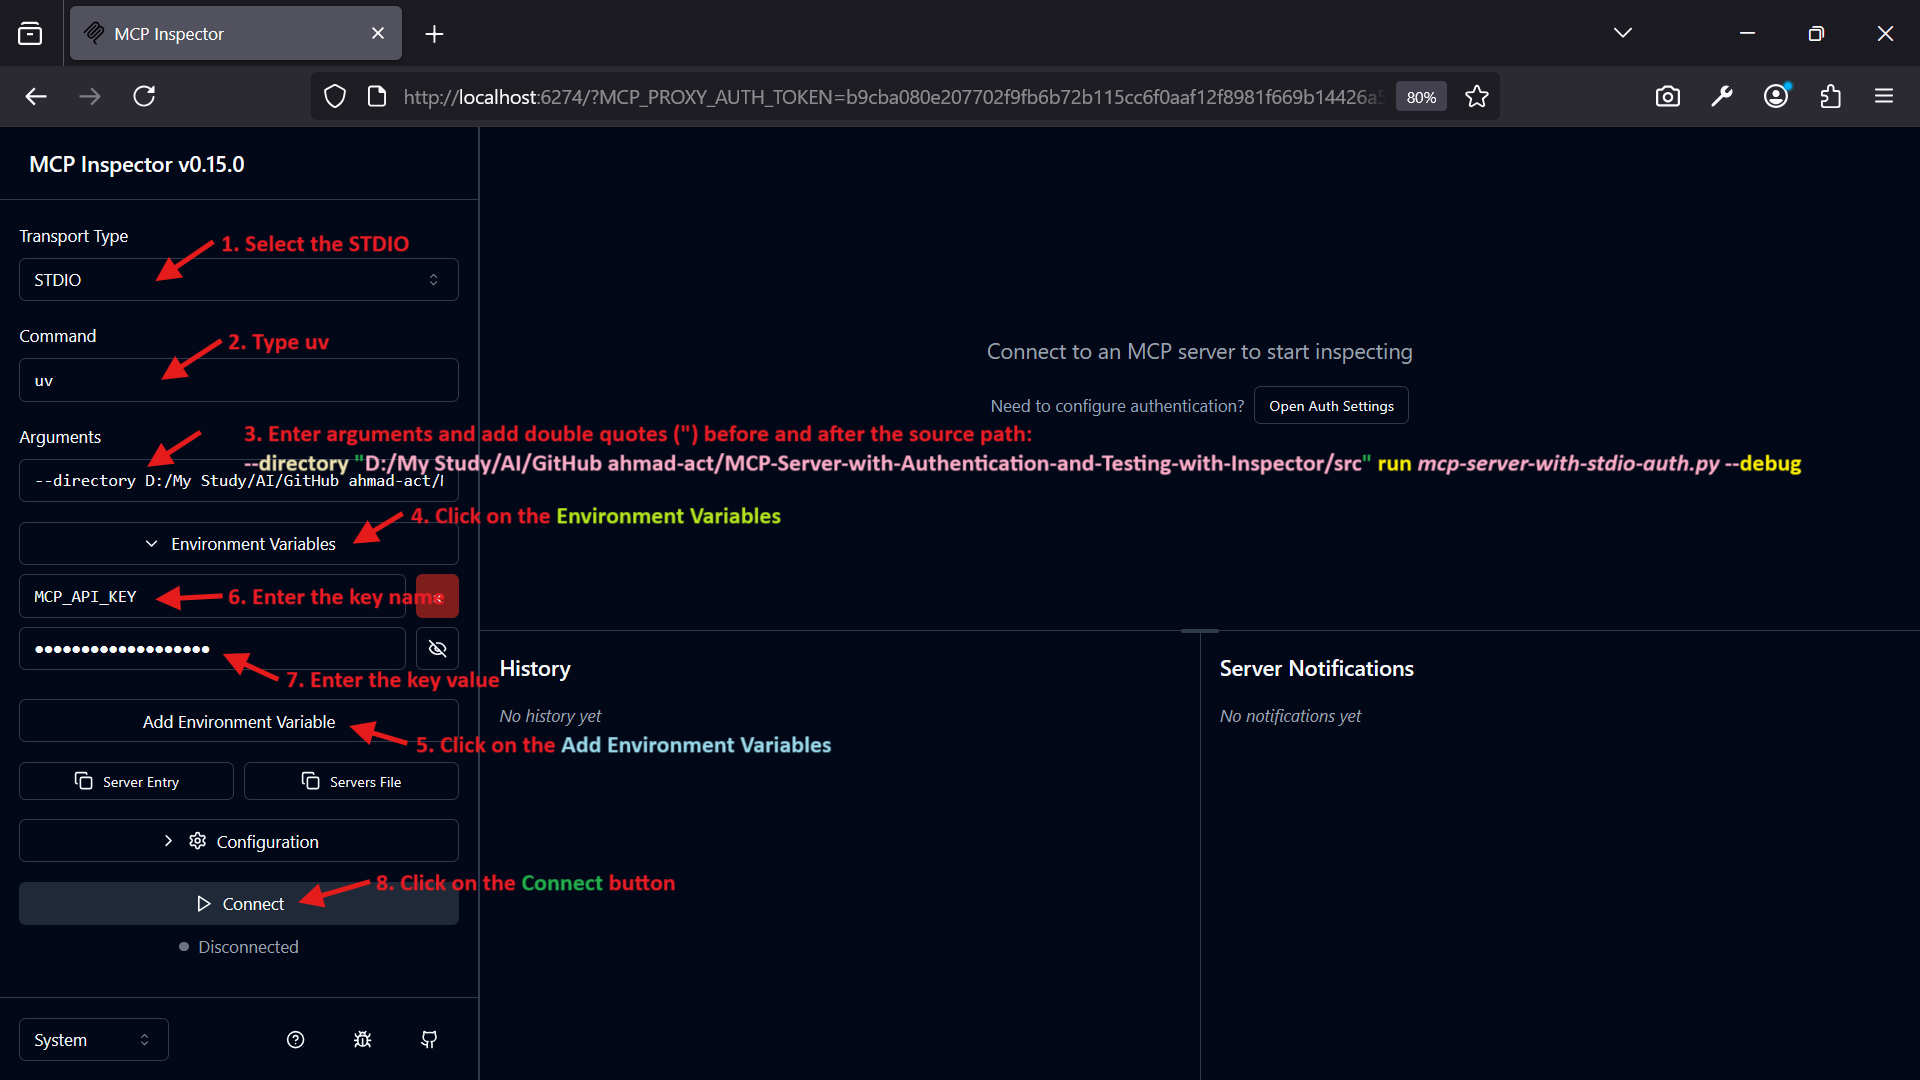
🧪 Using the MCP Inspector
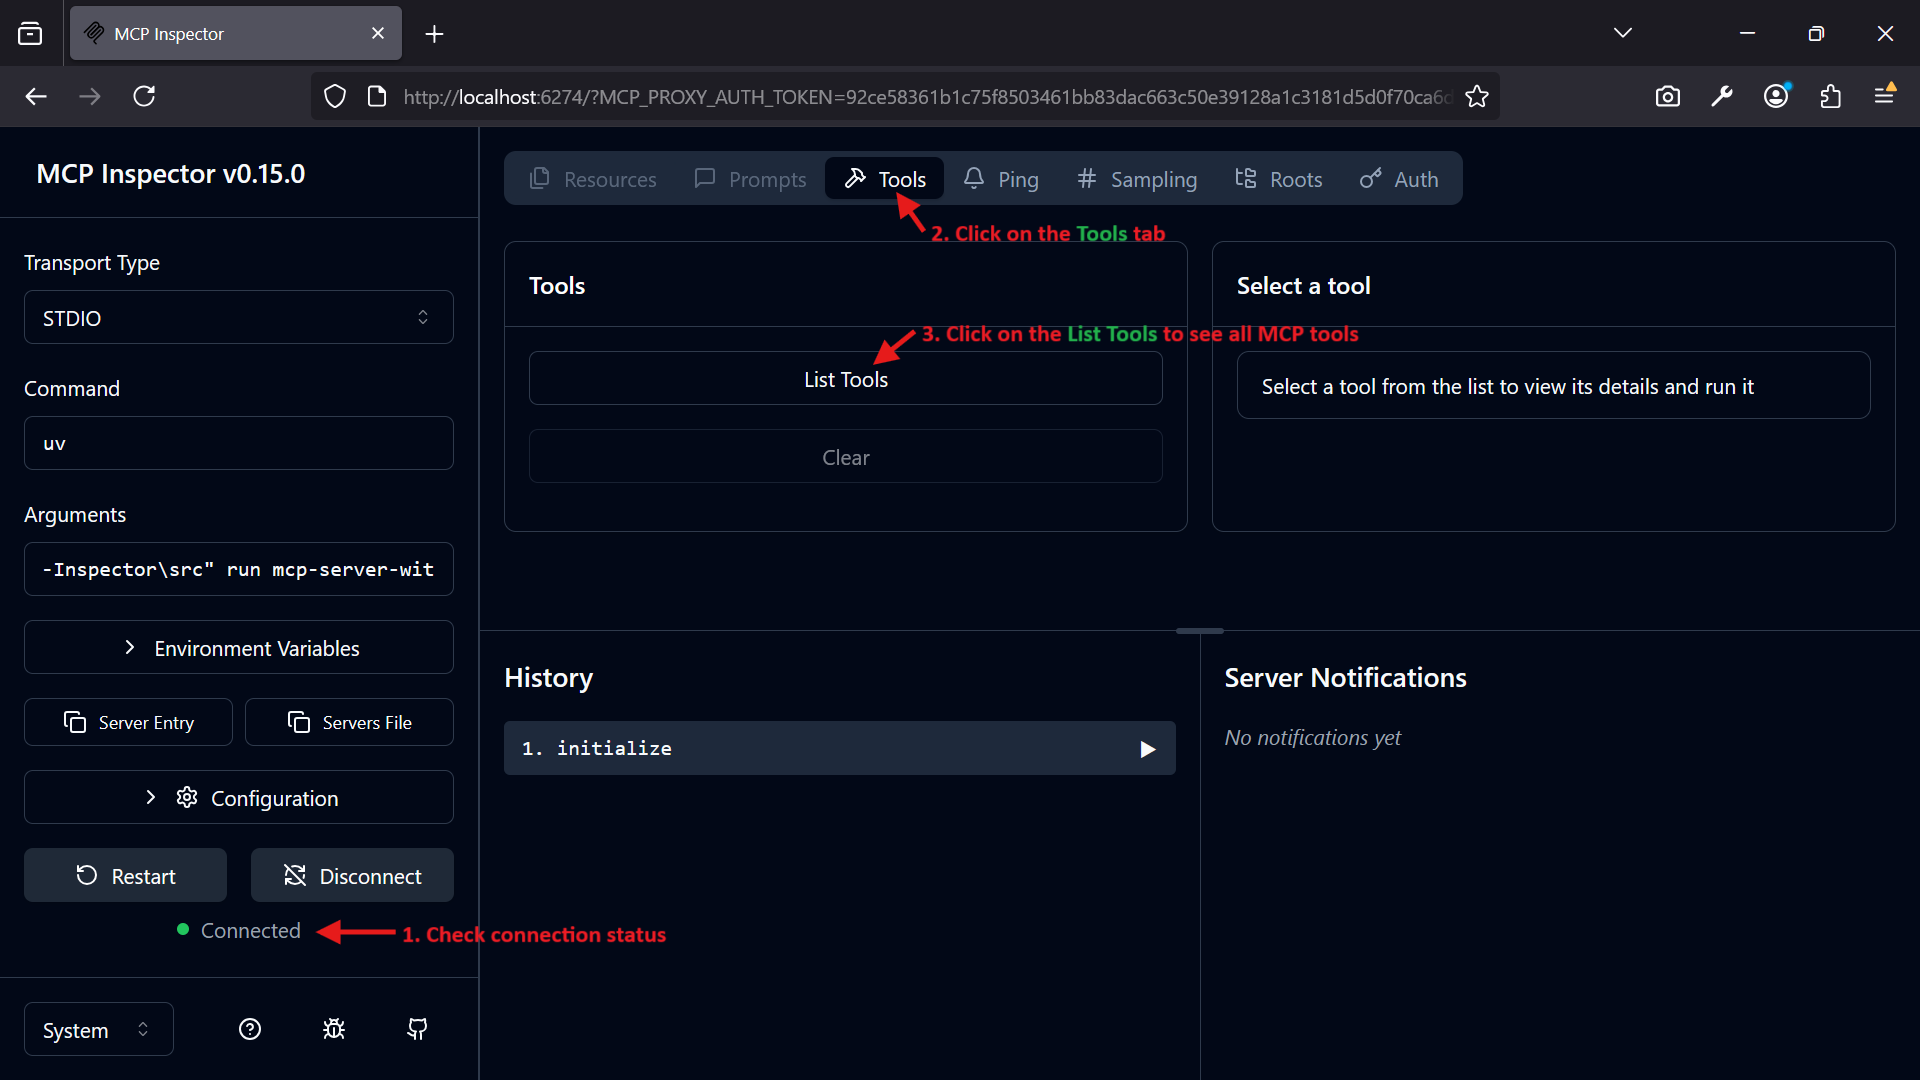
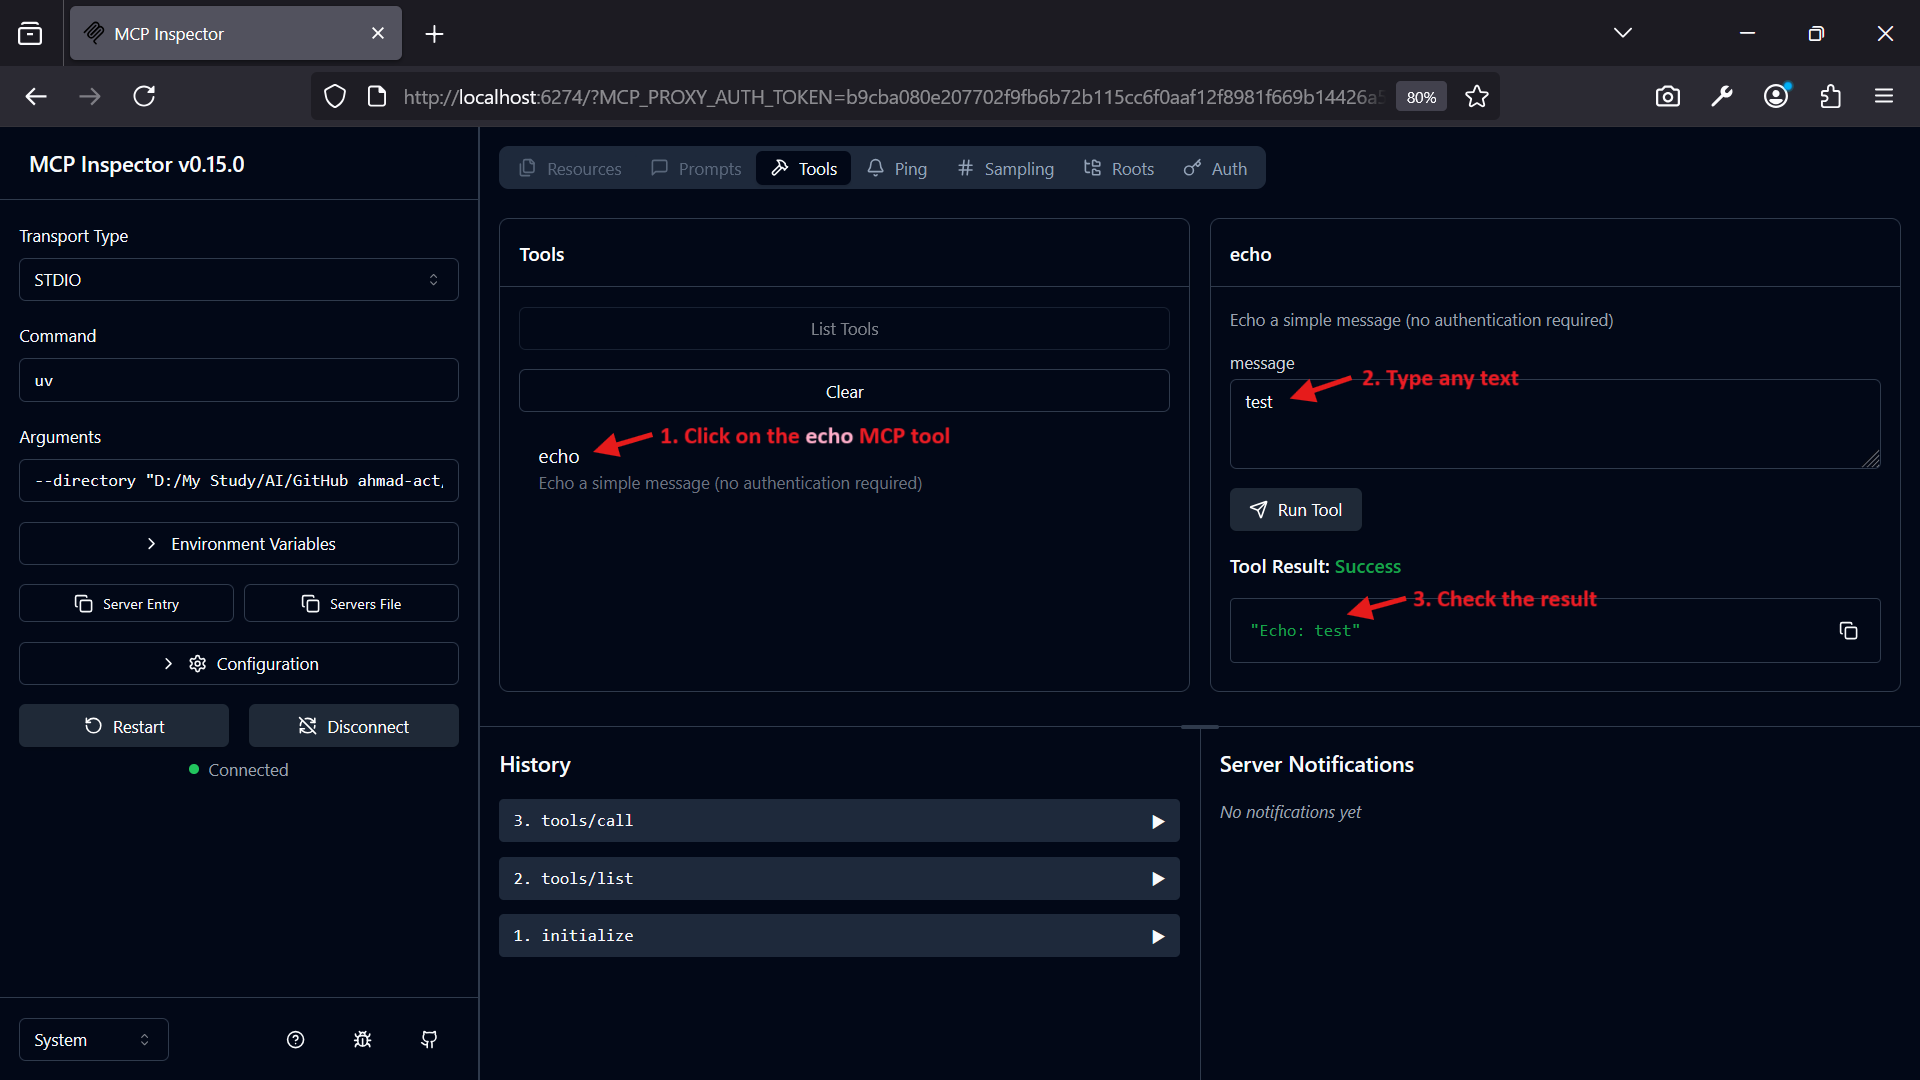
After running the above command, the Inspector will start and automatically connect to the
stdio-based server.In the Inspector UI (
http://127.0.0.1:6274), inspect the available tools (e.g.,echo).Test the
echotool:- Input:
{
  "method": "call_tool",
  "params": {
    "name": "echo",
    "arguments": {
      "message": "test",
      "_api_key": "sk-1234567890abcdef"
    }
  }
}
Expected Response:
{
  "result": [
    {
      "type": "text",
      "text": "Echo: test"
    }
  ]
}
2️⃣ MCP Server with Stdio and API Key (mcp-server-with-stdio-jwt-key-auth.py)
▶️ Run the MCP Server:
⚠️ You do not need to manually run the MCP server for stdio transport. MCP Inspector will launch the server automatically.
▶️ Run the MCP Inspector:
The stdio server is typically launched by the MCP Inspector, not manually. Run the Inspector with the following command, adjusting the --directory path to your src/ directory:
npx @modelcontextprotocol/inspector uv --directory '<your-src-directory>\src' run mcp-server-with-stdio-jwt-key-auth.py --debug
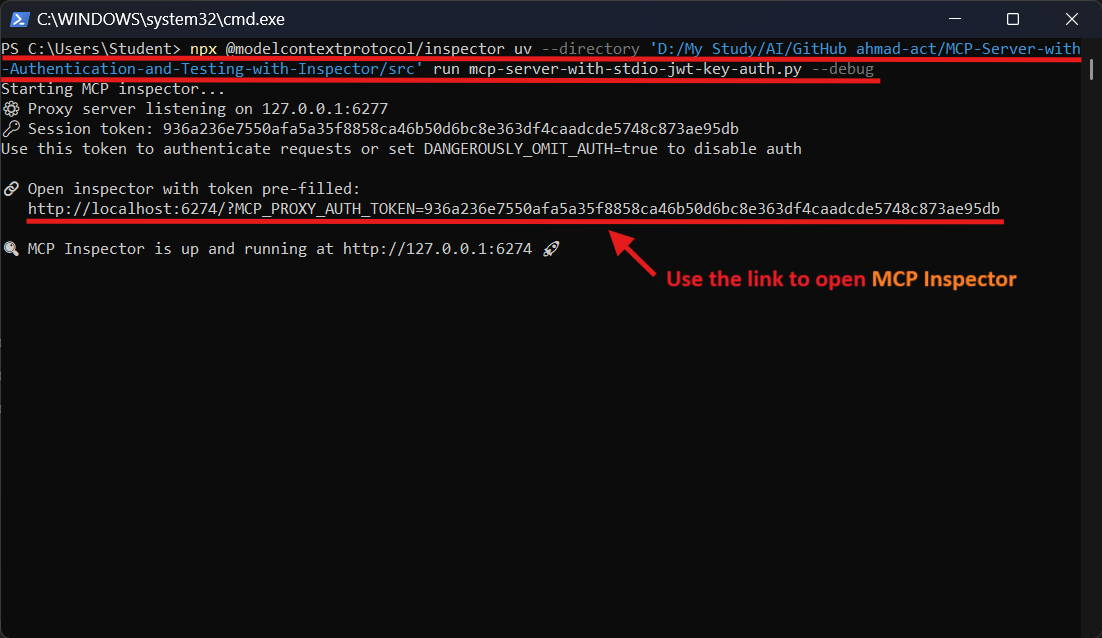
🌐 Open the MCP Inspector:
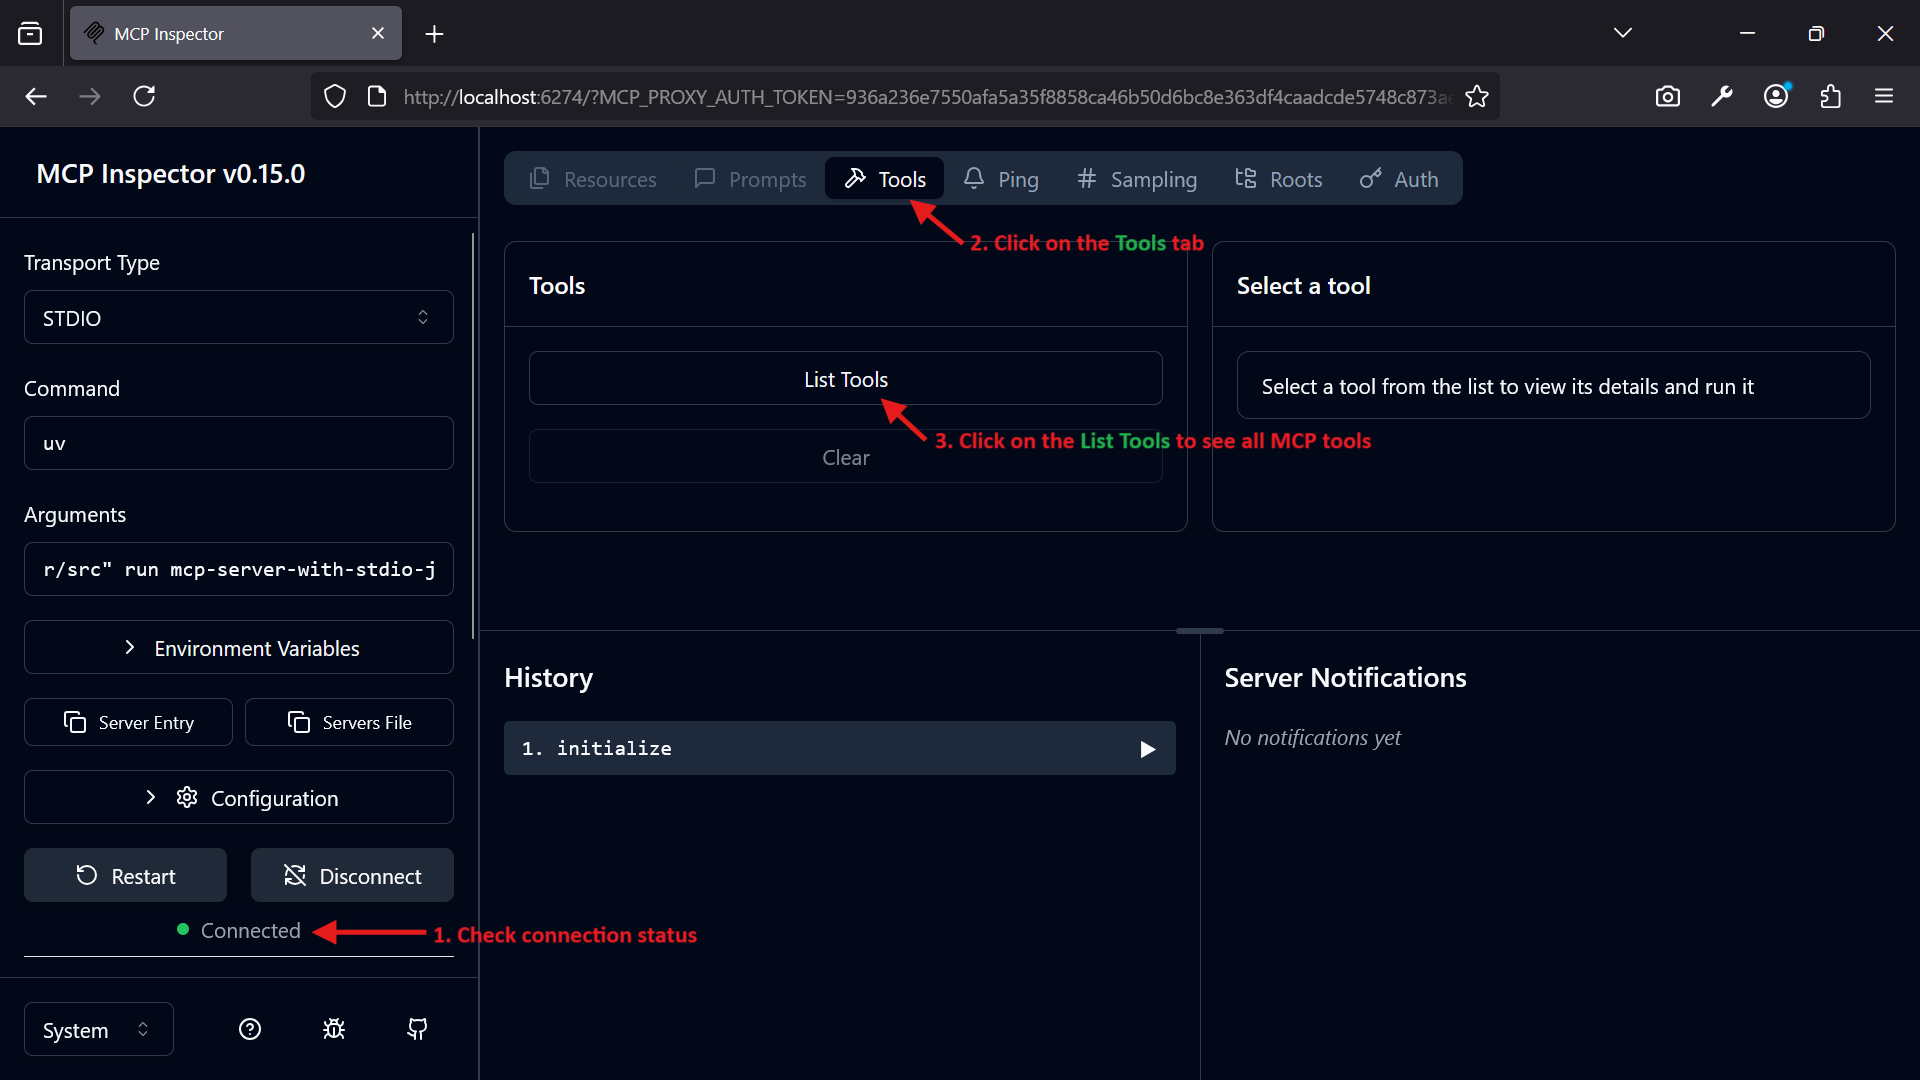
Open the link http://localhost:6274/?MCP_PROXY_AUTH_TOKEN=XXXXXXXXXXXXXXXXXX with its token in your browser:
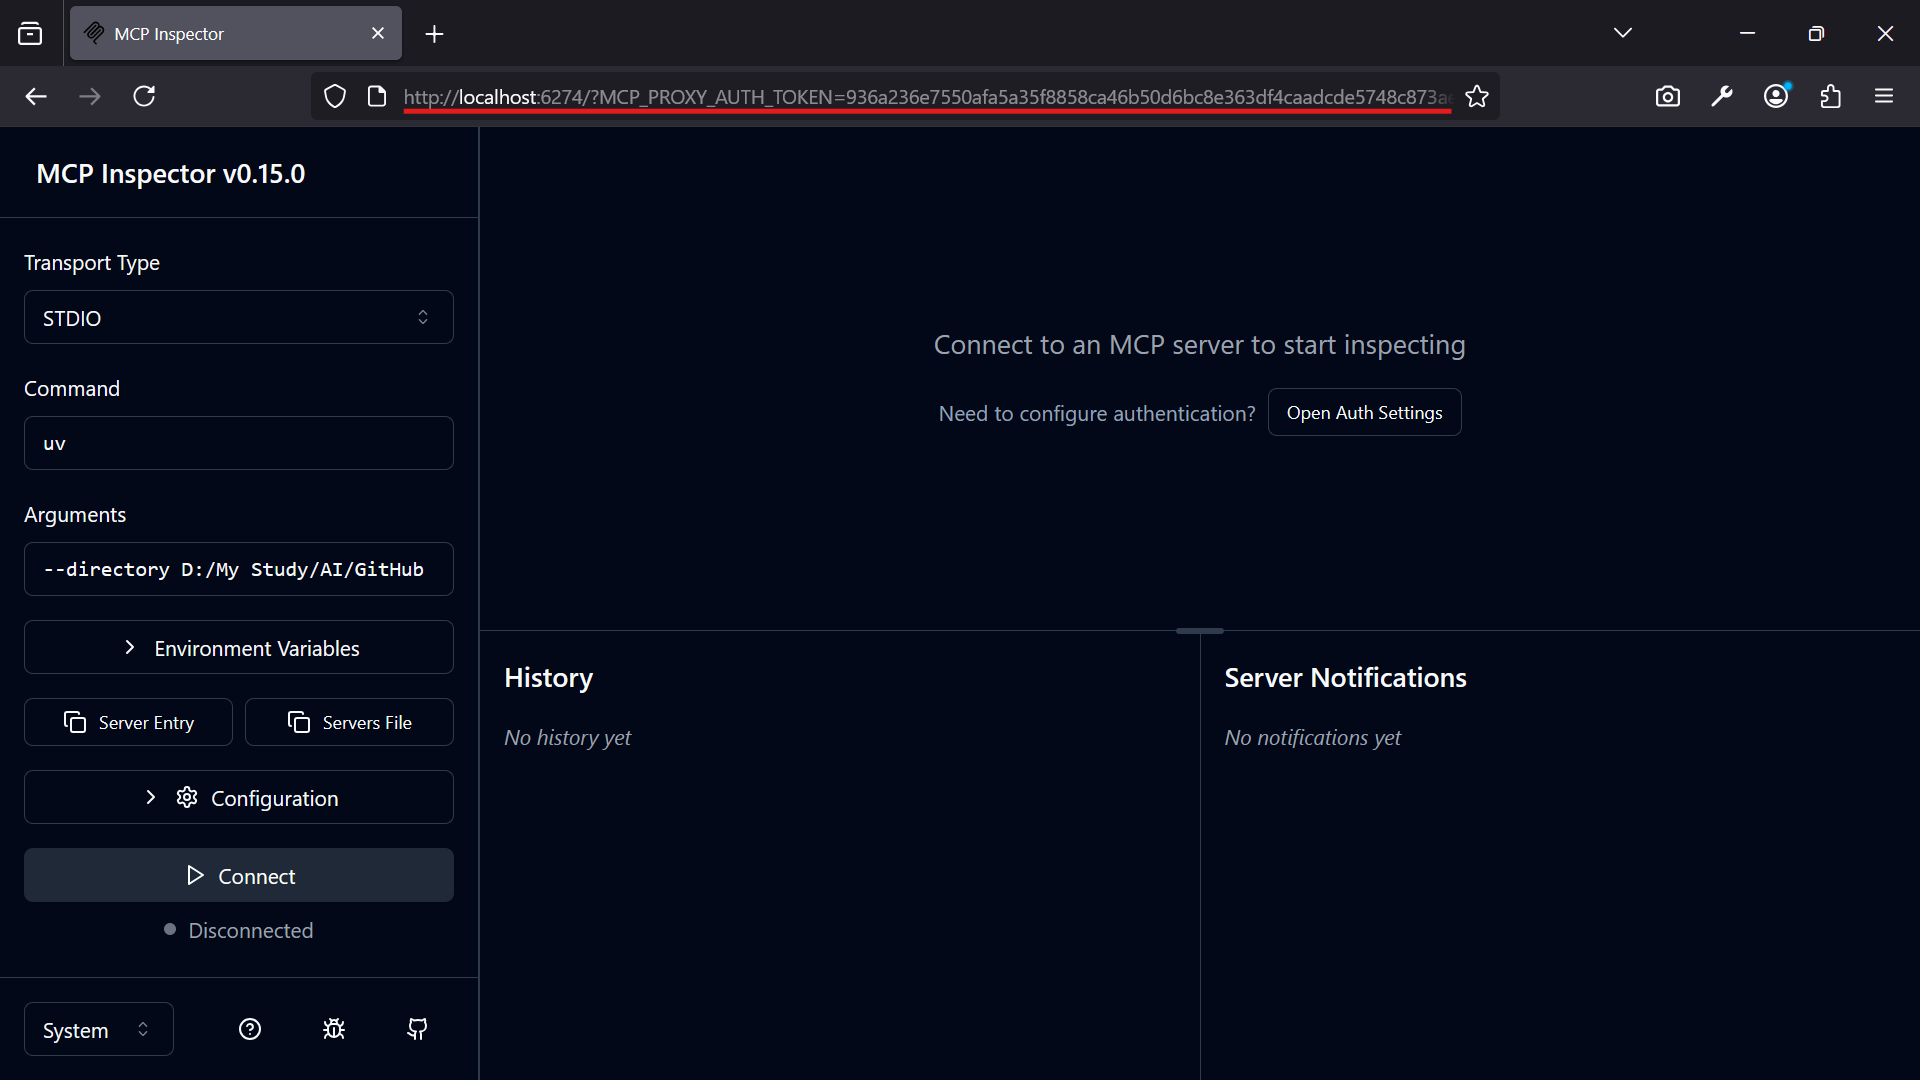
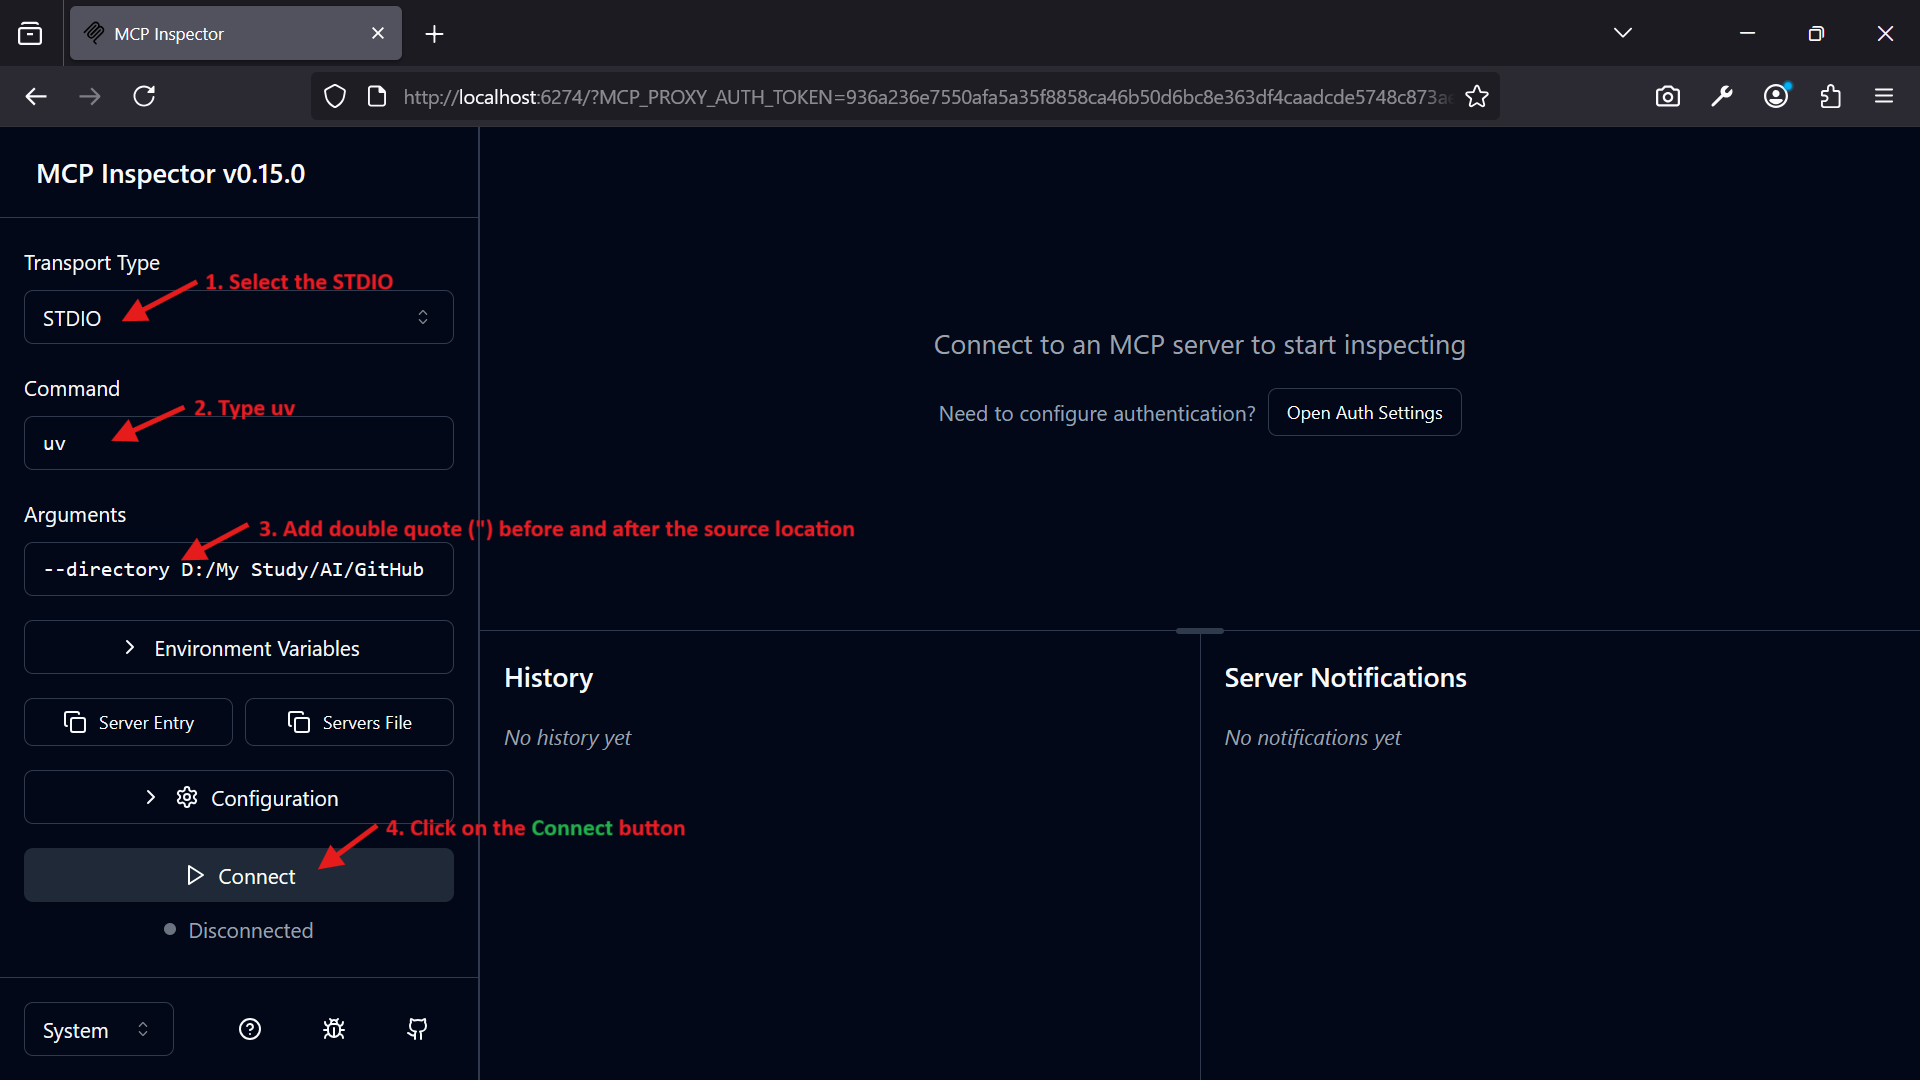
🧪 Using the MCP Inspector
After running the above command, the Inspector will start and automatically connect to the
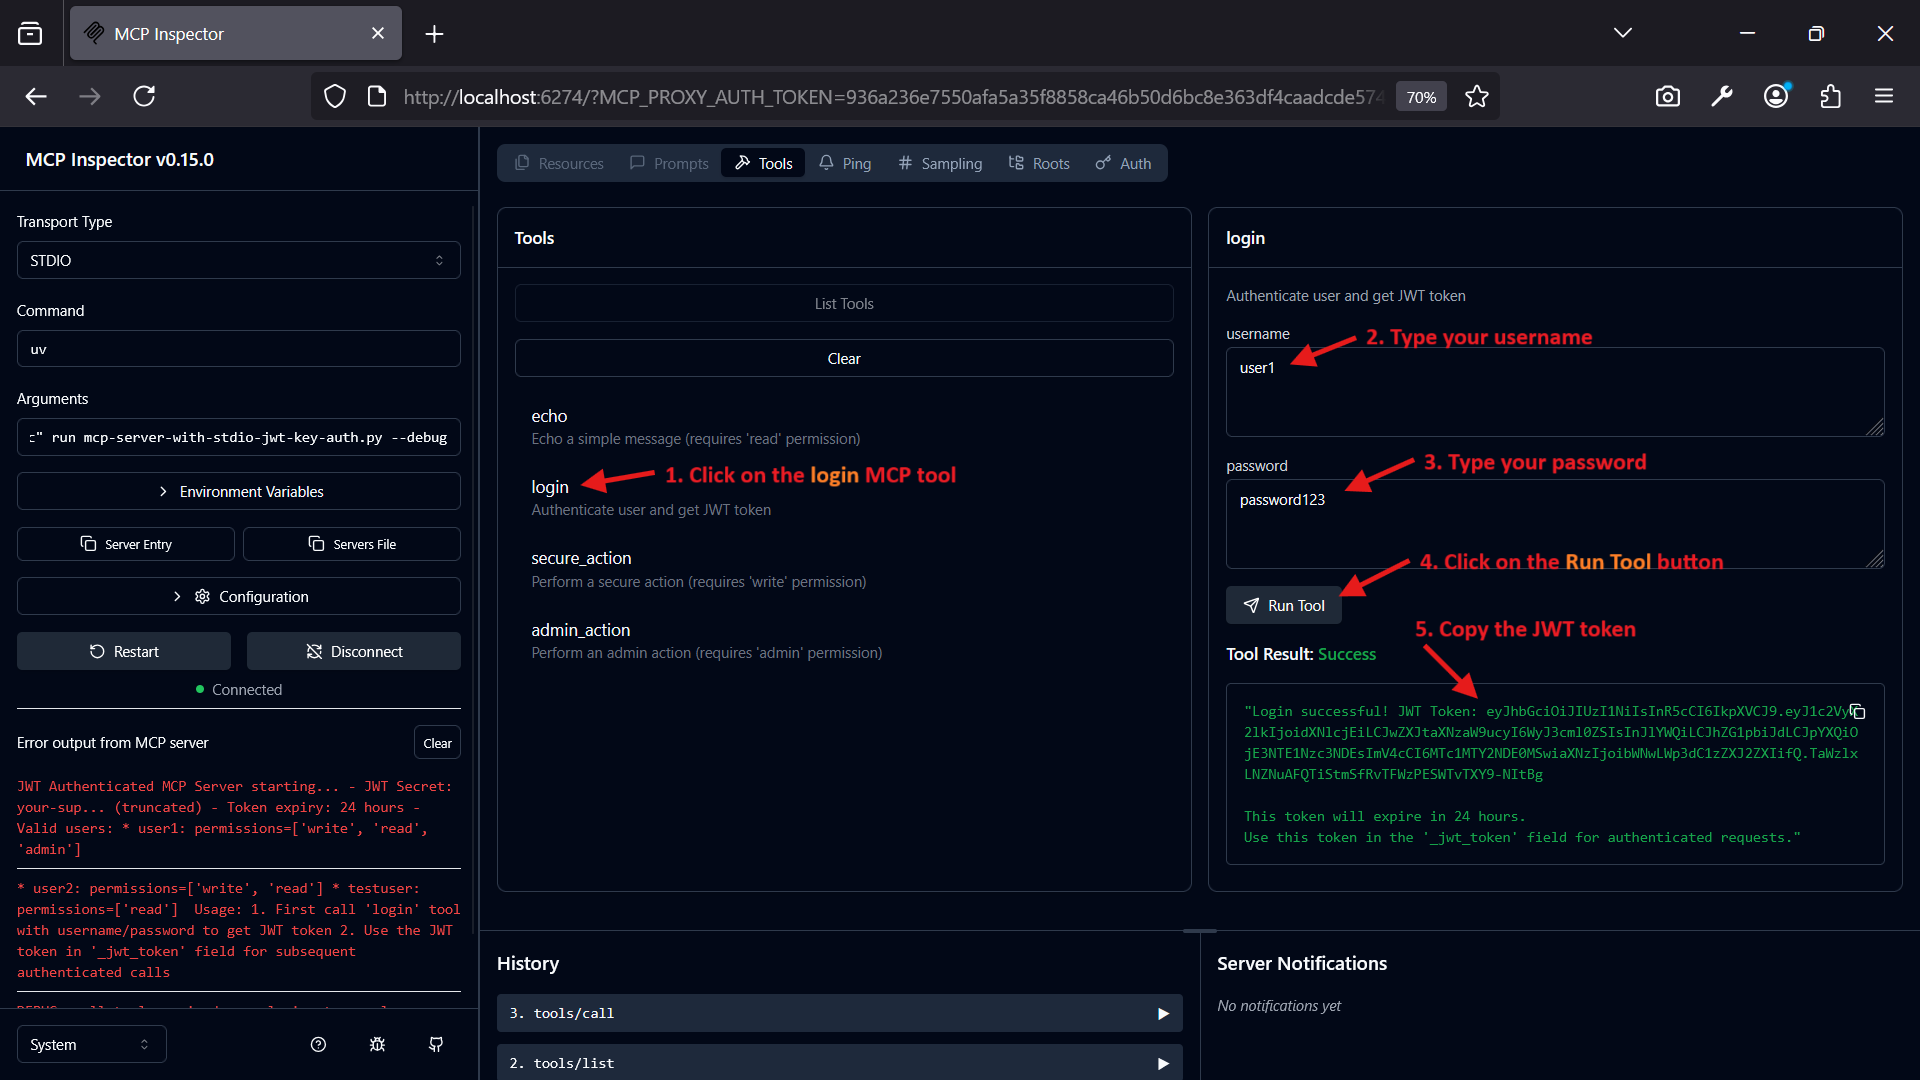
stdio-based server.Usage Flow:
Step 1: Login to Get JWT Token:
{ "method": "call_tool", "params": { "name": "login", "arguments": { "username": "user1", "password": "password123" } } }Response:
{
  "result": [
    {
      "type": "text",
      "text": "Login successful! JWT Token: eyJhbGciOiJIUzI1NiIsInR5cCI6IkpXVCJ9..."
    }
  ]
}
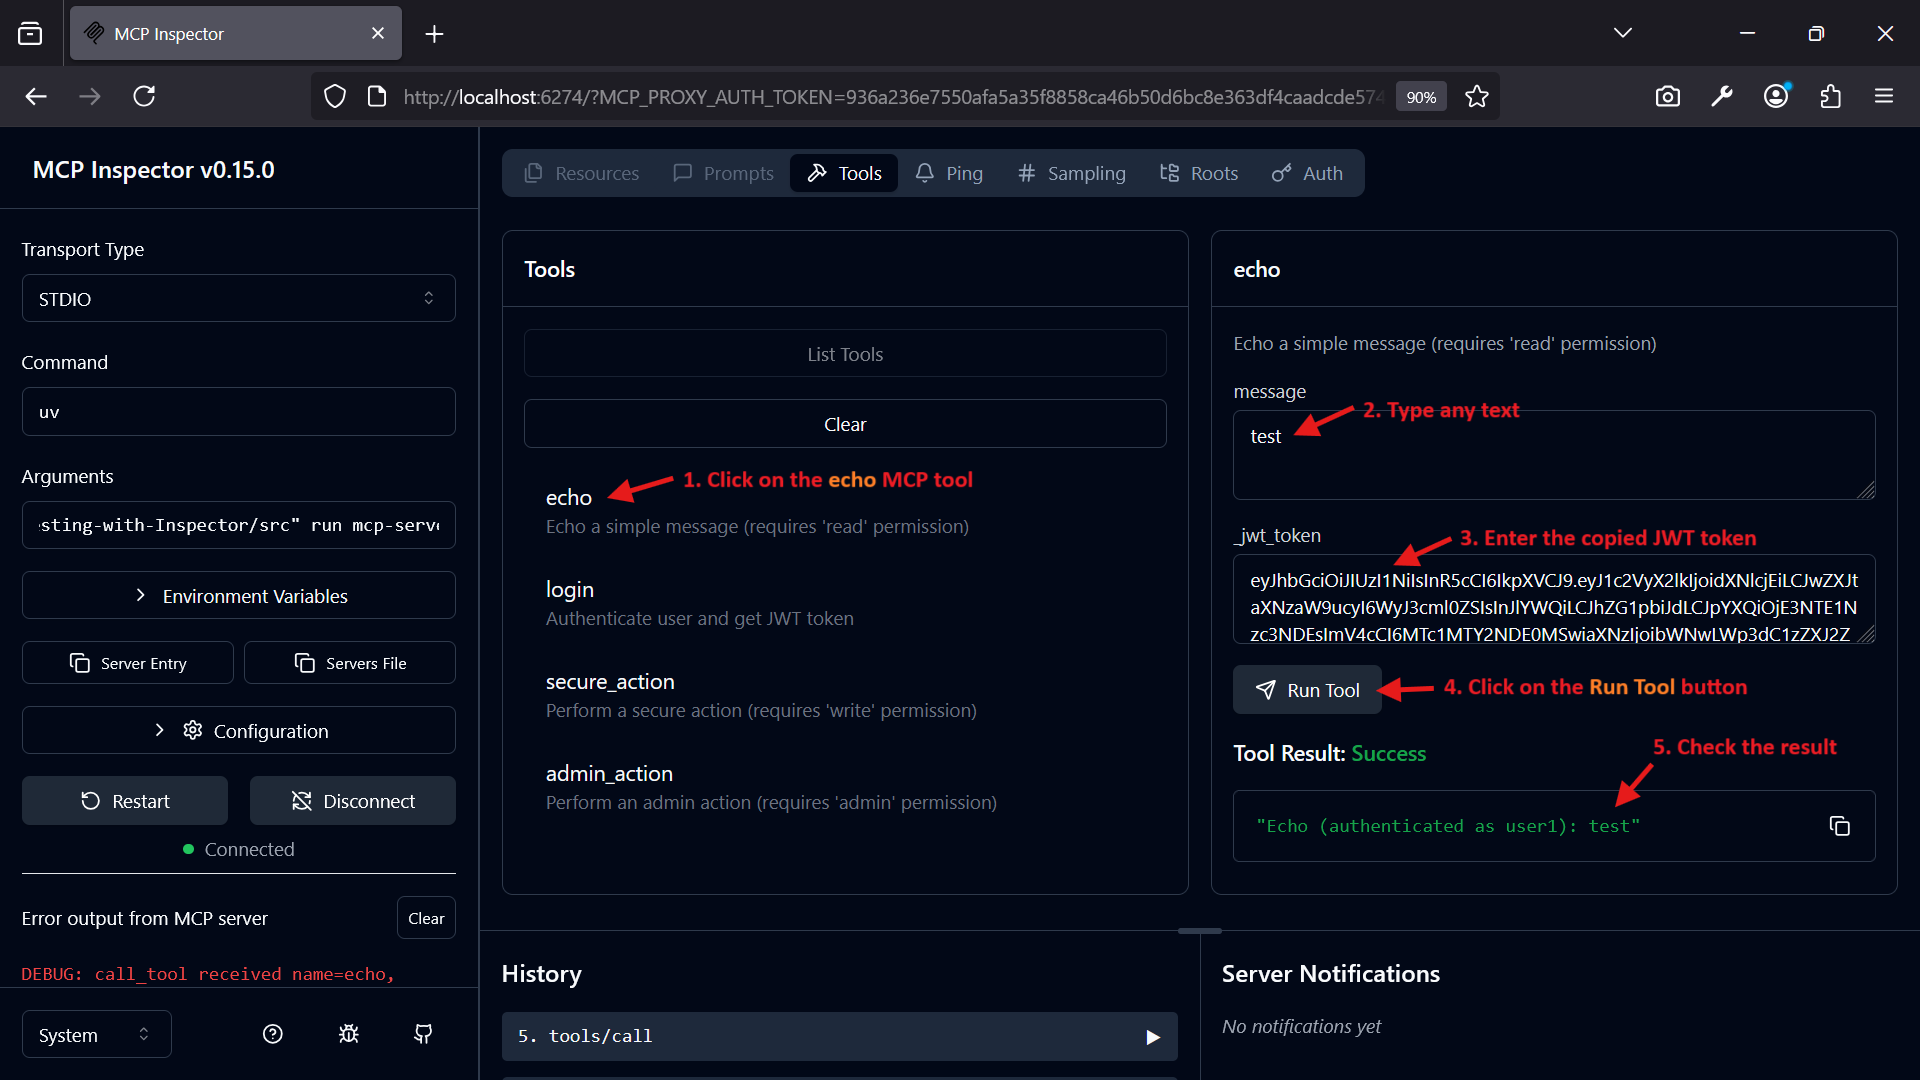
Step 2: Use JWT Token for Authenticated Requests:
{ "method": "call_tool", "params": { "name": "echo", "arguments": { "message": "test", "_jwt_token": "eyJhbGciOiJIUzI1NiIsInR5cCI6IkpXVCJ9..." } } }Response:
{
  "result": [
    {
      "type": "text",
      "text": "Echo (authenticated as user1): test"
    }
  ]
}
3️⃣ MCP Server with Stdio and Auth2 (mcp-server-with-stdio-auth2-auth.py)
🚧 To Do
🔄 Workflow
🔑 API Key Authentication:
- The server checks for a valid API key in the request arguments, metadata, or environment variables.
- If valid, the request is processed; otherwise, an error is returned.
- The
echotool demonstrates basic functionality.
🛡️ JWT Authentication:
- Users first call the
logintool with valid credentials to obtain a JWT token. - The token is used in subsequent requests for tools like
echo,secure_action, oradmin_action. - Permissions (
read,write,admin) are checked for each tool. - Tokens expire after 24 hours (configurable).
- Users first call the
📝 Logging:
- Logs are written to both the console and a rotating log file in the
logsdirectory. - Old log files are cleaned up based on a specified retention period.
- Logs are written to both the console and a rotating log file in the
🔍 Testing with MCP Inspector:
- Use MCP Inspector to interact with the server via a web interface.
- Debug mode (
--debug) provides detailed output for troubleshooting.
🩵 Troubleshooting
🚫 Invalid API Key:
- Ensure the API key is one of:
sk-1234567890abcdef,sk-abcdef1234567890,sk-test123456789. - Check environment variable
MCP_API_KEYor request arguments.
- Ensure the API key is one of:
⚠️ Invalid JWT Token:
- Verify the token is not expired (valid for 24 hours).
- Ensure the correct
JWT_SECRETis set. - Check username/password for
logintool.
🔒 Permission Errors:
- Ensure the user has the required permissions (
read,write, oradmin) for the requested tool.
- Ensure the user has the required permissions (
📝 Log Files:
- Check the
logsdirectory for detailed error messages. - Logs are named in the format
YYYYMM.log.
- Check the
from github.com/ahmad-act/MCP-Server-with-Authentication-and-Testing-with-Inspector
Installing Server With Authentication
This server has no published package — it is built from source. Open the repository and follow its README.
▸ github.com/ahmad-act/MCP-Server-with-Authentication-and-Testing-with-InspectorFAQ
Is Server With Authentication MCP free?
Yes, Server With Authentication MCP is free — one-click install via Unyly at no cost.
Does Server With Authentication need an API key?
No, Server With Authentication runs without API keys or environment variables.
Is Server With Authentication hosted or self-hosted?
Self-hosted: the server runs locally on your machine via the install command above.
How do I install Server With Authentication in Claude Desktop, Claude Code or Cursor?
Open Server With Authentication on unyly.org, pick your client tab (Claude Desktop, Claude Code, Cursor) and press Install — the config is generated automatically, no JSON editing.
Related MCPs
GitHub
PRs, issues, code search, CI status
 by GitHub
Filesystem
Secure file operations with configurable access controls.
Memory
Knowledge graph-based persistent memory system.
Template MCP Server
A CLI tool to create a new Model Context Protocol server project with TypeScript support, dual transport options, and an extensible structure
 by mcpdotdirect
Compare Server With Authentication with
Not sure what to pick?
Find your stack in 60 seconds
Author?
Embed badge for your README
Browse similar
All development MCPs