

About
Studio Rust — Model Context Protocol server
README
[!NOTE]
This is an actively developed fork
This repository is a fork of Roblox/studio-rust-mcp-server (no longer actively developed by Roblox). The fork adds a large set of new capabilities — full end-to-end play-testing (screenshots, UI inspection and search, real mouse/keyboard input, character control, camera control, ProximityPrompt discovery), multi-Studio-window routing, structured console/error reading, and OS-level Studio window management — and will continue to be developed.
Quick Setup
- Download and Run the server: Windows (macOS: build from source, see below)
- Restart AI Client (Claude, Cursor, etc) and Roblox Studio
- Done!
Roblox Studio MCP Server
This repository contains a reference implementation of the Model Context Protocol (MCP) that enables communication between Roblox Studio via a plugin and Claude Desktop or Cursor. It consists of the following Rust-based components, which communicate through internal shared objects.
- A web server built on
axumthat a Studio plugin long polls. - A
rmcpserver that talks to Claude viastdiotransport.
When LLM requests to run a tool, the plugin will get a request through the long polling and post a response. It will cause responses to be sent to the Claude app.
Please note that this MCP server will be accessed by third-party tools, allowing them to modify and read the contents of your opened place. Third-party data handling and privacy practices are subject to their respective terms and conditions.
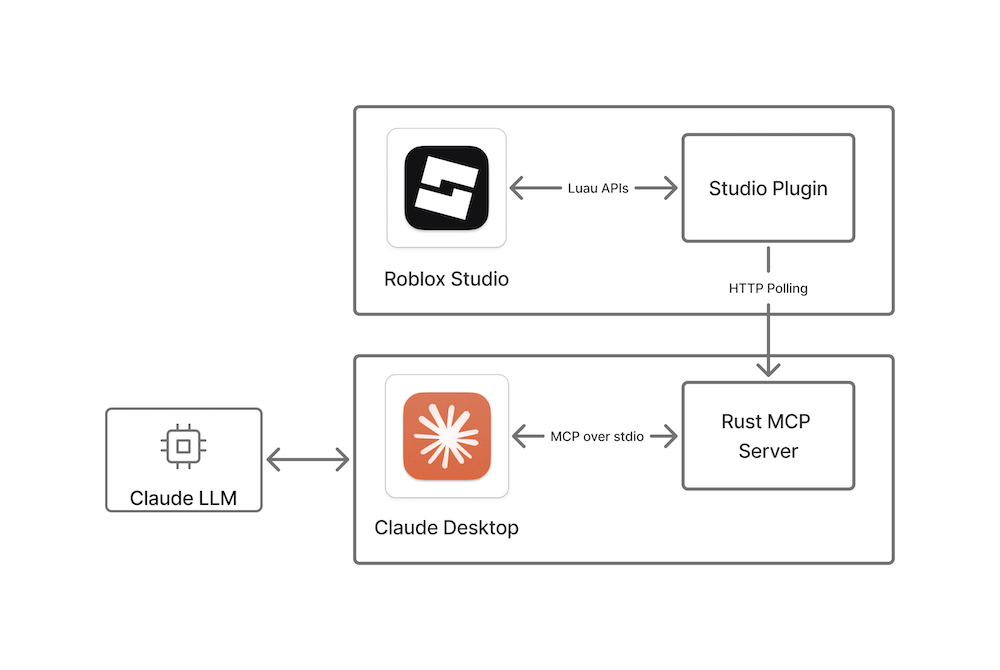
The setup process also contains a small plugin installation and Claude Desktop configuration script.
Included tools
- run_code - Runs a command in Roblox Studio and returns the printed output. Can be used to both make changes and retrieve information. Accepts
context=edit(default),server, orclientto run inside a live play session.mode=output(default) capturesprint/warn/errorand returned results;mode=executeruns the code directly without overriding its environment (nogetfenv/setfenv) and returns no captured output — for applying changes or running a script where you don't need the printed output (prints still go to the console, read them withget_console_output).max_linescaps the returned output inoutputmode (the last N lines are kept). - run_code_from_file - Reads a Luau script from a file on disk (the machine running the MCP server, same as Studio) and runs it in Studio, returning the printed output. Like
run_codebut the code comes from apathinstead of an inline string — useful for large scripts or running a saved.luaufile without pasting its contents. Accepts the samecontext,mode, andmax_linesasrun_code. - insert_model - Inserts a model from the Roblox Creator Store into the workspace. Returns the inserted model name.
- get_console_output - Gets the console output from Roblox Studio as structured entries (
seq,ts,level,message). Acceptscontext=edit,server, orclient,since_seqfor incremental reads,levelto filter (e.g. only errors), andlimit. - get_errors - Returns script errors captured via
ScriptContext.Error, with the full stack trace and the erroring script's path — the fast way to check "did anything break?" after exercising a feature. Supportssince_seqlike get_console_output. - start_stop_play - Starts or stops play mode or runs the server.
- run_script_in_play_mode - Runs a script in play mode and automatically stops play after the script finishes or times out. Returns structured output including logs, errors, and duration.
- get_studio_mode - Gets the current Studio mode (
start_play,run_server, orstop).
Play-testing tools
These let an AI agent test a game end to end like a real player: see the screen, find UI, click, type, and move the character. Input and screenshots require the Studio window to be visible (not minimized).
- take_screenshot - Captures what the game is rendering and returns it as an image. In play mode this is exactly what the player sees (3D world plus UI).
ui_pathcrops the capture to a single ScreenGui/GuiObject;isolate=truehides all other UI during the capture;park_mouse=truemoves the pointer to a corner first so hover tooltips stay out of the image;save_to_file=truesaves the encoded screenshot to a temp file and returns its path instead of inline image content. Falls back to an OS-level capture of the Studio window when the in-engine capture is unavailable. - get_ui_tree - Returns the UI hierarchy (live PlayerGui during play) as a compact JSON tree with names, classes, on-screen rects, text, and clickable/editable flags.
- find_ui - Searches the UI by text, name, or class — the fast way to locate a button or TextBox in a real game's deep UI instead of dumping trees. Returns paths ready for click_ui/send_text, rects, and a
covered_byflag when another element would swallow the click. - click_ui - Clicks through the engine's real input pipeline, so GuiButton handlers and InputBegan fire exactly as for a real player. Targets an element by path or an explicit viewport position. When a popup or overlay covers the target, the click fails naming the covering element (pass
force=trueto click anyway) instead of silently hitting the wrong thing. - click_object - Clicks a 3D object (Part or Model) by workspace path: its position is projected to the screen and clicked like a real mouse click, so ClickDetectors and raycast-based games respond. Reports when the object is off screen, hidden behind world geometry, or covered by 2D UI at that pixel instead of clicking blindly.
- list_prompts - Lists nearby ProximityPrompts ("press E to interact"): action text, key, hold duration, distance, and whether the character is in range. Trigger one like a player: walk into range and send_key its key (hold for
hold_durationwhen needed). - mouse_move - Moves the pointer without clicking, for hover effects (MouseEnter, tooltips) and positioning.
- mouse_drag - Drags like a real player: button down, a smooth stream of move events, button up — for aiming, sliders, and drag-and-drop. While the game locks the cursor (right-button camera drags), movement is automatically delivered as deltas, so camera rotation works too.
- input_sequence - Runs several input steps (click/click_object/drag/move/key/text/wait) in one call with precise timing, for combos that per-call latency would break.
- set_camera - Positions the camera (
set,look_at,frame,get,restore) —frameauto-fits a target object's bounding box in view without needing coordinates; use before take_screenshot, or to bring an off-screen object into view before click_object. - send_key - Presses keyboard keys through the real input pipeline; the default controls respond (
Wwalks,Spacejumps). Supports tap, hold for a duration, press, and release. - send_text - Types into a TextBox (optionally focusing it first and pressing Enter after) and returns the resulting text.
- control_character - High-level character control:
move_toa world position,walkin a direction,jump,stop, orget_state(position, health, velocity, camera). - wait_for - Polls a Luau condition until it becomes truthy or times out; the reliable way to wait for game state (character spawned, UI appeared) in end-to-end tests.
- studio_window - Inspects or restores the Roblox Studio window at the OS level (Windows). Studio pauses rendering while minimized or fully covered, which silently breaks input and screenshots — the input/screenshot tools restore the window and retry once automatically; this tool does it explicitly (
status/restore). - list_studio_instances - Lists every open Studio window connected to the server (place name, placeId, live DataModels).
- select_studio_instance - Chooses which Studio window subsequent tools operate on, by place name or placeId. With a single window open no selection is needed; with several open, tools ask for a selection instead of guessing. Selection is per MCP client, so two AI clients can drive two different Studio windows at once. (Limitation: two windows with the same unsaved place name are indistinguishable.)
How it works
Every Studio DataModel (edit, play server, play client) runs its own plugin instance. The edit and server instances long-poll the MCP server over HTTP with a role tag, so commands can be routed to a specific context. The play client cannot use HttpService, so the server instance polls on the client's behalf and relays commands and responses through a chunked RemoteEvent bridge between the two plugin VMs.
Screenshots use CaptureService:CaptureScreenshot() on the rendering DataModel; the resulting temporary contentId is read back as pixels on the edit DataModel (AssetService:CreateEditableImageAsync + ReadPixelsBuffer), so multi-MB pixel data never crosses the relay. Input uses UserInputService:CreateVirtualInput(), which drives the engine's real input pipeline: SendKey/SendMouseButton/SendTextInput plus SendMousePosition for absolute pointer movement and SendMouseDelta for relative movement while the cursor is locked. The cursor is always moved before a click, because ClickDetectors and hover logic follow the engine's tracked cursor position rather than the position embedded in a button event.
Clicks are hit-tested before they are sent: BasePlayerGui:GetGuiObjectsAtPosition plus a DisplayOrder/ZIndex render-order comparison finds the element that would actually receive the click, so a surprise popup fails the call with the covering element's name instead of silently swallowing the input. Studio pauses rendering while its window is minimized or fully covered, and the engine then drops virtual input and captures; the server detects the plugin's "not rendering" error, restores the Studio window at the OS level (un-minimize plus foreground), and retries the command once.
Screenshot images are DPI-scaled, so image pixels are not viewport coordinates — click by element path or the rects from get_ui_tree/find_ui, or scale image positions by the viewport/image ratio from the screenshot metadata.
Setup
Install with release binaries
This MCP Server supports pretty much any MCP Client but will automatically set up only Claude Desktop and Cursor if found.
To set up automatically:
- Ensure you have Roblox Studio, and Claude Desktop/Cursor installed and started at least once.
- Exit MCP Clients and Roblox Studio if they are running.
- Download and run the installer:
- Go to the releases page and download the latest release for your platform.
- Unzip the downloaded file if necessary and run the installer.
- Restart Claude/Cursor and Roblox Studio if they are running.
Setting up manually
To set up manually add following to your MCP Client config:
{
  "mcpServers": {
    "Roblox_Studio": {
      "args": [
        "--stdio"
      ],
      "command": "Path-to-downloaded\\rbx-studio-mcp.exe"
    }
  }
}
On macOS the path would be something like "/Applications/RobloxStudioMCP.app/Contents/MacOS/rbx-studio-mcp" if you move the app to the Applications directory.
For Claude Desktop, go to Settings > Developer > Edit Config. This opens location of the claude_desktop_config.json.
Some clients require user to setup the mcp server manually for each project. For example, Claude Code command would look like this:
claude mcp add --transport stdio Roblox_Studio -- '/Applications/RobloxStudioMCP.app/Contents/MacOS/rbx-studio-mcp' --stdio
Build from source
To build and install the MCP reference implementation from this repository's source code:
- Ensure you have Roblox Studio and Claude Desktop installed and started at least once.
- Exit Claude and Roblox Studio if they are running.
- Install Rust.
- Download or clone this repository.
- Run the following command from the root of this repository.
This command carries out the following actions:cargo run- Builds the Rust MCP server app.
- Sets up Claude to communicate with the MCP server.
- Builds and installs the Studio plugin to communicate with the MCP server.
After the command completes, the Studio MCP Server is installed and ready for your prompts from Claude Desktop.
Verify setup
To make sure everything is set up correctly, follow these steps:
- In Roblox Studio, click on the Plugins tab and verify that the MCP plugin appears. Clicking on the icon toggles the MCP communication with Claude Desktop on and off, which you can verify in the Roblox Studio console output.
- In the console, verify that
The MCP Studio plugin is ready for prompts.appears in the output. Clicking on the plugin's icon toggles MCP communication with Claude Desktop on and off, which you can also verify in the console output. - Verify that Claude Desktop is correctly configured by clicking on the hammer icon for MCP tools
beneath the text field where you enter prompts. This should open a window with the list of
available Roblox Studio tools (
insert_modelandrun_code).
Note: You can fix common issues with setup by restarting Studio and Claude Desktop. Claude sometimes is hidden in the system tray, so ensure you've exited it completely.
Send requests
- Open a place in Studio.
- Type a prompt in Claude Desktop and accept any permissions to communicate with Studio.
- Verify that the intended action is performed in Studio by checking the console, inspecting the data model in Explorer, or visually confirming the desired changes occurred in your place.
Installing Studio Rust
This server has no published package — it is built from source. Open the repository and follow its README.
▸ github.com/Kiet1308/studio-rust-mcp-serverFAQ
Is Studio Rust MCP free?
Yes, Studio Rust MCP is free — one-click install via Unyly at no cost.
Does Studio Rust need an API key?
No, Studio Rust runs without API keys or environment variables.
Is Studio Rust hosted or self-hosted?
Self-hosted: the server runs locally on your machine via the install command above.
How do I install Studio Rust in Claude Desktop, Claude Code or Cursor?
Open Studio Rust on unyly.org, pick your client tab (Claude Desktop, Claude Code, Cursor) and press Install — the config is generated automatically, no JSON editing.
Related MCPs
GitHub
PRs, issues, code search, CI status
 by GitHub
Filesystem
Secure file operations with configurable access controls.
Memory
Knowledge graph-based persistent memory system.
Template MCP Server
A CLI tool to create a new Model Context Protocol server project with TypeScript support, dual transport options, and an extensible structure
 by mcpdotdirect
Compare Studio Rust with
Not sure what to pick?
Find your stack in 60 seconds
Author?
Embed badge for your README
Browse similar
All development MCPs