
Cloudflare Dns Cloudflared
БесплатноНе проверенSelf-hosted MCP server for administering Cloudflare DNS and cloudflared tunnels, enabling exposure of SSH hosts and web services with Google OAuth access contro

Описание
Self-hosted MCP server for administering Cloudflare DNS and cloudflared tunnels, enabling exposure of SSH hosts and web services with Google OAuth access control.
README
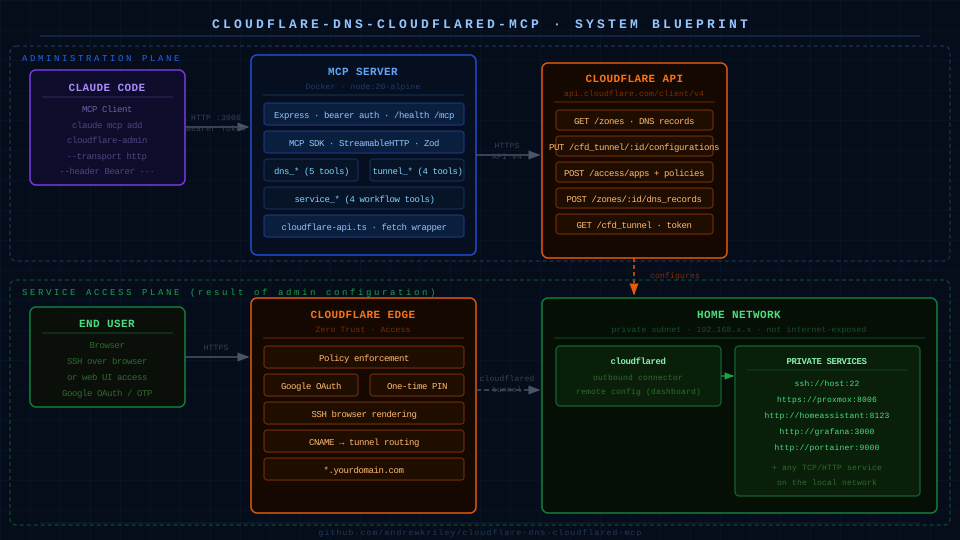
Self-hosted MCP server for administering Cloudflare DNS and cloudflared tunnel services — expose SSH hosts, web UIs, and other services on your home network through Cloudflare Tunnels with Google OAuth access control.
Runs as a Docker container on your own infrastructure. Connects to Claude Code or any MCP-compatible client via bearer-token-authenticated HTTP.
Tools
DNS
| Tool | Description |
|---|---|
dns_list_zones |
List all zones in the account |
dns_list_records |
List DNS records for a zone |
dns_create_record |
Create a DNS record (A, AAAA, CNAME, MX, TXT, …) |
dns_update_record |
Update an existing DNS record |
dns_delete_record |
Delete a DNS record |
Tunnels
| Tool | Description |
|---|---|
tunnel_list |
List all Cloudflare Tunnels |
tunnel_get |
Get tunnel details |
tunnel_get_token |
Get connector token for cloudflared |
tunnel_list_connections |
List active tunnel connections |
Tunnel Services (workflow)
| Tool | Description |
|---|---|
service_list |
List all services exposed across all tunnels |
service_expose_ssh |
Expose an SSH host through a tunnel with browser-based access |
service_expose_web |
Expose a web UI through a tunnel with access control |
service_remove |
Remove a service — tears down ingress, DNS, and Access app |
What service_expose_ssh and service_expose_web do
Each workflow tool wires up the full stack in one call:
- Tunnel ingress rule — maps the public hostname to the private backend service
- DNS CNAME — points
subdomain.yourdomain.com→[tunnel-id].cfargotunnel.com - Cloudflare Access application — gates who can reach the service
- Access policy — allows specific Google accounts, with optional one-time PIN (OTP) for non-Google emails
Prerequisites
Cloudflare Tunnel
You need a running cloudflared tunnel connected to your home network. Install cloudflared on your home server and connect it via the Cloudflare Zero Trust dashboard. The tunnel must show as Online before exposing services through it.
Google OAuth identity provider
For Google-authenticated access, configure Google as an identity provider once in the Zero Trust dashboard under Settings → Authentication. This is a one-time manual setup — the MCP server manages per-service access policies, not the identity provider itself.
Quick start
1. Clone
git clone [email protected]:andrewkriley/cloudflare-dns-cloudflared-mcp.git
cd cloudflare-dns-cloudflared-mcp
2. Configure
cp .env.example .env
Edit .env and fill in:
| Variable | Description |
|---|---|
CF_API_TOKEN |
Cloudflare API token (see permissions below) |
CF_ACCOUNT_ID |
Your Cloudflare account ID |
MCP_BEARER_TOKEN |
Shared secret for MCP client auth — generate with openssl rand -hex 32 |
3. Run
docker compose up -d
Check it's healthy:
curl http://localhost:3000/health
# {"status":"ok"}
4. Connect Claude Code
Run once to register the server:
claude mcp add cloudflare-admin --transport http \
  --header "Authorization: Bearer YOUR_MCP_BEARER_TOKEN" \
  http://localhost:3000/mcp
Replace YOUR_MCP_BEARER_TOKEN with the value from your .env.
5. Example usage
Ask Claude:
"Expose my Proxmox server at 192.168.1.100:8006 as proxmox.yourdomain.com through my home tunnel. Allow access for [email protected]."
Claude will call dns_list_zones, tunnel_list, then service_expose_web to wire everything up.
Secrets & Security
Environment variables
| Variable | Sensitivity | Purpose |
|---|---|---|
CF_API_TOKEN |
Secret | Cloudflare API token — DNS + Tunnel + Zero Trust permissions |
CF_ACCOUNT_ID |
Low | Cloudflare account identifier |
MCP_BEARER_TOKEN |
Secret | Shared secret for MCP endpoint auth |
MCP_PORT |
Low | HTTP port (default: 3000) |
All are loaded from .env via docker compose. The .env file is gitignored and must never be committed.
Creating the Cloudflare API token
Go to dash.cloudflare.com/profile/api-tokens and create a custom token with:
| Scope | Permission |
|---|---|
| Zone > DNS | Edit |
| Account > Cloudflare Tunnel | Edit |
| Account > Zero Trust | Edit |
| Zone > Zone | Read |
Set a 90-day expiry at creation time.
Token rotation (every 90 days)
- Create a new token at dash.cloudflare.com/profile/api-tokens
- Update
CF_API_TOKENin.env - Restart the container:
docker compose restart - Delete the old token in the Cloudflare dashboard
Generating a bearer token
openssl rand -hex 32
Security controls
| Control | What it does |
|---|---|
| Bearer token auth | All /mcp requests require Authorization: Bearer <token> |
| Non-root container | Process runs as unprivileged mcp user |
| Read-only filesystem | Container root filesystem is read-only (tmpfs for /tmp) |
| No new privileges | no-new-privileges:true prevents privilege escalation |
/health is auth-free |
Returns {"status":"ok"} only — no sensitive data exposed |
Development
Run locally without Docker
npm install
cp .env.example .env
# fill in .env
npm run dev
Build and test
npm run build          # compile TypeScript
npm run typecheck      # type-check without emitting
npm run lint           # ESLint
npm test               # unit tests (mocked, no credentials needed)
npm run test:integration  # integration tests (requires env vars — runs in CI)
Docker commands
docker compose up -d             # start in background
docker compose logs -f           # tail logs
docker compose restart           # restart after .env change
docker compose down              # stop and remove container
docker compose build --no-cache  # force rebuild image
CI
Every push and pull request runs:
| Check | Tool | Purpose |
|---|---|---|
| Secret scanning | Gitleaks | Detects accidentally committed tokens |
| TypeScript check | tsc --noEmit |
Strict compile-time correctness |
| ESLint | eslint |
Code quality and style |
| Unit tests | Vitest | Mocked tests — workflow tool logic |
| Dependency audit | npm audit --audit-level=high |
Flags high/critical vulnerabilities |
| Docker build | docker/build-push-action |
Verifies image builds successfully |
| Tunnel integration tests | Vitest + real cloudflared | Full lifecycle against a real ephemeral tunnel |
| VERSION ↔ package.json | npm run verify-version |
Keeps root VERSION and package.json in sync |
| Version bump (PRs) | Compare VERSION to base |
Every PR must bump VERSION when present on base (see VERSIONING.md) |
All checks above are required for a PR to merge to main once enabled in branch protection. Pushing a tag v*.*.* runs the Release workflow (GitHub Release + GHCR image + latest git tag).
Known limitations
Browser-rendered SSH and short-lived certificates
service_expose_ssh sets up the correct server-side configuration for Cloudflare short-lived SSH certificates (TrustedUserCAKeys, AuthorizedPrincipalsFile, SSH CA). However, Cloudflare's browser-rendered SSH terminal uses libssh2 1.9.0, which does not support OpenSSH certificate authentication. Certificate support was added in libssh2 1.11.0 (2023).
Effect: When accessing an SSH service via the browser terminal, the browser prompts for a private key instead of logging in automatically with a short-lived cert.
Short-lived certs work correctly for native SSH client access via the cloudflared ProxyCommand:
Host ssh.yourdomain.com
  ProxyCommand cloudflared access ssh --hostname %h
Workarounds for browser-only access (e.g. when outbound SSH is blocked on the client network):
Option A — Enable password auth on the backend sshd. The SSH port is not publicly exposed (only reachable via the tunnel, gated by Cloudflare Access). Password auth behind Google OAuth is an acceptable trade-off:
# On the SSH backend host
sudo sed -i 's/^PasswordAuthentication no/PasswordAuthentication yes/' /etc/ssh/sshd_config
sudo systemctl reload ssh
Option B — Deploy a web terminal (wetty). Run wetty on the backend host and expose it as a web service. The browser connects to wetty over HTTPS; wetty connects to sshd on localhost. No libssh2 limitation applies.
docker run -d --restart unless-stopped \
  --name wetty \
  -p 3000:3000 \
  wettyoss/wetty --ssh-host localhost --ssh-port 22 --base /
Then expose via service_expose_web with backend_port: 3000, backend_protocol: http. Cloudflare Access gates access as normal.
Versioning
The canonical version is the root VERSION file (same pattern as splunk-lab). Run npm run sync-version to copy it into package.json. Pushing a tag v*.*.* triggers a GitHub Release and publishes the Docker image to GHCR.
See VERSIONING.md for the full workflow, CI rules, and tag format.
Contributing
main is protected — all changes via PR from dev. CI must pass before merge. Direct pushes to main are blocked.
Установка Cloudflare Dns Cloudflared
У этого сервера нет опубликованного пакета — он собирается из исходников. Открой репозиторий и следуй инструкции в README.
▸ github.com/andrewkriley/cloudflare-dns-cloudflared-mcpFAQ
Cloudflare Dns Cloudflared MCP бесплатный?
Да, Cloudflare Dns Cloudflared MCP бесплатный — установка в пару кликов через Unyly без оплаты.
Нужен ли API-ключ для Cloudflare Dns Cloudflared?
Нет, Cloudflare Dns Cloudflared работает без API-ключей и переменных окружения.
Cloudflare Dns Cloudflared — hosted или self-hosted?
Доступен hosted-вариант: Unyly запускает сервер в облаке, локальная установка не обязательна.
Как установить Cloudflare Dns Cloudflared в Claude Desktop, Claude Code или Cursor?
Открой Cloudflare Dns Cloudflared на unyly.org, выбери вкладку своего клиента (Claude Desktop, Claude Code, Cursor) и нажми Install — конфиг сгенерируется автоматически, без правки JSON.
Похожие MCP
GitHub
PRs, issues, code search, CI status
 автор: GitHub
Filesystem
Secure file operations with configurable access controls.
Memory
Knowledge graph-based persistent memory system.
Template MCP Server
A CLI tool to create a new Model Context Protocol server project with TypeScript support, dual transport options, and an extensible structure
 автор: mcpdotdirect
Amap Maps Mcp Server
MCP server for using the AMap Maps API
 автор: duxiaohui
Supabase
Database, auth and storage
 автор: Supabase
Everything
Reference / test server with prompts, resources, and tools.
Git
Tools to read, search, and manipulate Git repositories.
Sequential Thinking
Dynamic and reflective problem-solving through thought sequences.
Time
Time and timezone conversion capabilities.
Compare Cloudflare Dns Cloudflared with
Не уверен что выбрать?
Найди свой стек за 60 секунд
Автор?
Embed-бейдж для README
Похожее
Все в категории development