

Описание
mcp bridge to game engines functionalities
README




Aker (Egyptian: ꜣkr) was an ancient Egyptian earth god, depicted as two lions seated back-to-back facing opposite horizons, Sef and Duau (Yesterday and Today), guarding the sun's safe passage through the underworld. In this architecture, Aker is the bridge: one face speaking JSON-RPC to the LLM, the other manipulating the engine's main thread via IPC.
AkerMCP is an MCP server that lets an AI client (Claude Code, Cursor, Copilot, Antigravity, any stdio MCP client) work inside a running C# game editor: read the scene, change it with undo, run C# on the editor's main thread, take a screenshot, enter play mode and check what happened. One server and one tool set for three engines, Unity, Godot and Stride Game Studio, each behind a small adapter over the same core.
What it does
Most engine integrations ship one hand-written tool per operation and break with every engine update. AkerMCP ships forty generic tools built on reflection and Roslyn. inspect shows what an object is made of, set_property changes any property by a dot path with undo, query finds objects, execute compiles and runs any C# against the live editor (with using lines and type declarations hoisted, so a helper class or a MonoBehaviour can be written and attached in one call), take_screenshot shows the result. The runtime loop, enter_play, send_input, sample_state, assert_state and the one-call playtest, runs the game and checks a mechanic against real values instead of pixels. Placeholder art and audio work the same way: the model writes a spec, the server returns a PNG or a WAV. Whatever the editor can do, the model can do, and it can see whether it worked.
AI: "Set the player's position to (10, 0, 5)"

-> set_property {"object_path": "/Player", "property_path": "position", "value": {"x":10,"y":0,"z":5}}
<- Property 'position' set successfully on /Player
Supported engines
| Capability | Unity | Godot | Stride |
|---|---|---|---|
| Inspect · query · get/set property (incl. nested) | ✅ | ✅ | ✅ |
call_method · create · delete (native Undo) |
✅ | ✅ | ✅ |
execute: arbitrary C# via Roslyn |
✅ | ✅ | ✅ |
| Selection · console logs · recompile/compile-errors | ✅ | ✅ | ✅ |
| Scene-view screenshot with editor gizmos | ✅ | ✅ | ✅ |
| Platform/build tools (list · switch · build_player) | ✅ | ✅ | ✅ |
OS window capture (list_windows · capture_window · focus_window) |
✅ | ✅ | ✅ |
2D sprites from a JSON shape-spec (create_sprite, rasterized server-side) |
✅ | ✅ | ✅ |
Placeholder audio (create_sound, synthesized server-side) |
✅ | ✅ | ❌ |
Gameplay primitive scripts (add_primitive) |
✅ | ❌ | ❌ |
Scene management (new_scene · open_scene · save_scene) |
✅ | ✅ | ✅ |
Runtime loop (enter_play/exit_play · capture_sequence · send_input) |
✅ | ◑ | ◑ |
Every ✅ is implemented and was verified live in that engine's editor. A ❌ answers NOT_SUPPORTED and names what is missing rather than failing quietly: Stride has no sound importer yet, and the primitive catalog carries Unity variants only. The window tools are the exception to the whole table, since they talk to the operating system, Windows or macOS, and work with no engine connected at all: they are how you see and dismiss a modal dialog that has frozen the editor's main thread.
What it does that the others do not
The other MCP servers for game engines are tied to one engine each: unity-mcp and Unity-MCP to Unity, godot-mcp to Godot. Here one tool set covers Unity, Godot and Stride from a shared core, so what you learn driving Unity works unchanged in the other two, and Stride Game Studio is supported at all.
execute hoists using lines and type declarations, so a MonoBehaviour can be written, compiled and attached in one call instead of three. playtest drives input and evaluates C# assertions server-side at exact moments on the timeline, which is the only way to catch a transient as short as the top of a jump arc: separate tool calls arrive whenever the round trip lets them, and by then the frame is gone.
Then there is the asset gap. A model writes code, not pixels. create_sprite closes it: the model describes the shape in JSON, with ellipses, rectangles, polygons and SVG path data, plus linear gradients and per-shape opacity, and the server rasterises that to an RGBA PNG at 4x supersampling before the plugin imports it as a sprite. The vector never reaches the editor, so Godot and Stride need no SVG support of their own to get the same placeholder Unity gets. create_sound does the same for audio on Unity and Godot, synthesising a WAV from a jsfxr-style spec. The prototype stops waiting for someone to draw the bird.
Pair it with LynxMCP for code search over the project and its library docs: Aker is the hands, Lynx the memory.

The same request in Stride Game Studio. execute duplicated a sphere into a ring through Stride's asset layer, so they are real, selectable, saved entities (note AkerSphere_* in the hierarchy), then the editor captured itself:

Under the hood
- A shared .NET Standard 2.1 core holds the tool logic; each engine adds an adapter that implements the engine interfaces (scene graph, editor context, code executor, play mode, input, capture). A fourth engine is another adapter; the server and the tools do not change.
- The standalone server talks JSON-RPC over stdio to the client and MessagePack over a named pipe to the plugin inside the editor, which runs every request on the engine's main thread.
- A reflection-based type system converts JSON to engine structs (
Vector3,Color,Bounds, ...) case-insensitively, the same way for all three engines. - Screenshots come from the editor's own render buffer with gizmos; when an adapter cannot, an OS-level capture (Windows
PrintWindow, macOS Quartz) takes over without stealing focus. - The server answers the MCP handshake in well under a second, connected engine or not, and sends the model its usage instructions with the tool list. See How the model learns to use it.
Details: Architecture and Writing an Engine Adapter.
Table of Contents
- Quick Start (Recommended)
- Connecting an AI Client
- Advanced: Building from Source (For Developers)
- Verifying the Connection
- MCP Tools
- MCP Resources
- Type System
- Example Session
- Architecture
- Writing an Engine Adapter
- Two sessions, as they happened
- How the model learns to use it
- Troubleshooting
- License
Quick Start (Recommended)
Two steps: (1) install the adapter for your engine, Unity, Godot or Stride (they are peers; pick the one you use), then (2) run the standalone MCP server, which is identical for all of them and auto-discovers whichever engine is running.
1a. Unity Setup
You do not need to install the .NET SDK or compile any code for Unity.
Go to the latest GitHub Release and download
AkerMCP.unitypackage.Open your Unity project and double-click the package to import it. (This package already contains all necessary C# scripts, dependencies, and Roslyn compilers).
(Optional) Open the menu AkerMcp → Setup Test Scene to create a ready-to-test scene.
Open Window → AkerMcp and click Start AkerMcp Plugin. You should see a green Running status. (Tip: The plugin must be running before you start the server. The server discovers it automatically via a lock file).
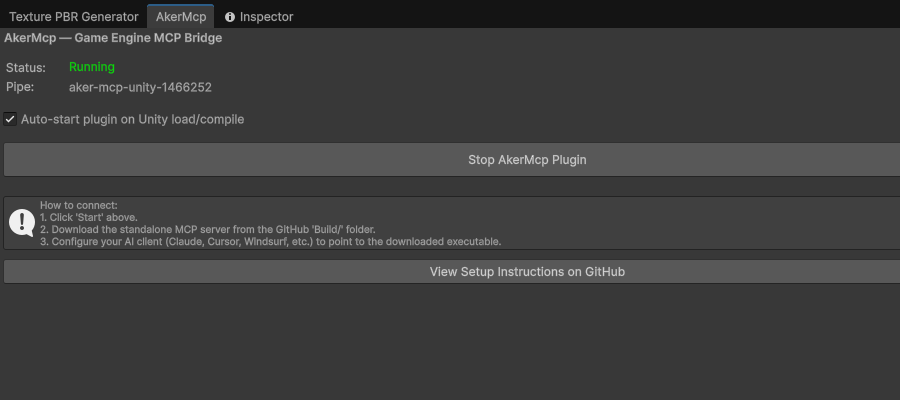
1b. Godot Setup
AkerMCP ships a Godot 4.x (.NET/C#) adapter with the same full toolset as Unity. Because a Godot project is a real .csproj, there are no DLLs to copy: references and the Roslyn engine come via NuGet/ProjectReference.
- Download
AkerMcp.Godot-addon.zipfrom the latest Release and extract it so you getaddons/aker_mcp/in your Godot project (or copy this repo'splugins/godotfolder into your project asaddons/aker_mcp). - Add the AkerMcp core to your game's
.csproj(or use the includedsamples/godotproject directly; runsetup-samplesfirst to link the addon):
Make sure your project has<ProjectReference Include="path/to/AkerMcp.Shared.csproj" /> <ProjectReference Include="path/to/AkerMcp.Client.csproj" /> <PackageReference Include="Microsoft.CodeAnalysis.CSharp.Scripting" Version="4.8.0" /><EnableDynamicLoading>true</EnableDynamicLoading>(required for editor plugins). - Build the C# solution once (Project → Tools → C#: Create/Build), then enable the plugin under Project → Project Settings → Plugins → AkerMcp.
The plugin auto-starts with the editor and pumps requests on the main thread every frame. Scene paths follow the edited scene root (e.g. /TestScene/Box), property paths are case-insensitive (position.x resolves to Position.X), and screenshots capture the editor's 3D viewport. The standalone MCP server discovers the Godot plugin automatically, with no server changes.
1c. Stride Setup
AkerMCP ships a Stride (Game Studio) adapter with the same full toolset, including undoable edits via Stride's Quantum graph, execute (Roslyn), real Scene-view screenshots (editor back-buffer, with gizmos), and the platform/build tools (dotnet build per executable project).
Stride support runs as a Game Studio editor plugin. Game Studio has no third-party plugin discovery, so AkerMcp registers itself with one tiny bootstrap. Pick the path that matches how you got Stride.
Option A (recommended): Stride installed from the Launcher, official binaries, no Stride rebuild
A per-launch wrapper injects the plugin only into the Game Studio process it starts, via the .NET runtime's DOTNET_STARTUP_HOOKS. The variable is never written to your user/machine environment, so it cannot affect any other .NET app; if the plugin DLL is ever missing, the wrapper just launches Game Studio without AkerMcp.
# one-time, from the repo root
.\install-stride-wrapper.ps1 -GameStudioPath "C:\path\to\Stride.GameStudio.exe"
# (omit -GameStudioPath to auto-detect a Launcher install)
This builds the adapter against your installed Game Studio, drops it into <GameStudio>/AkerMcpPlugins, and creates a "Stride Game Studio (AkerMCP)" shortcut (Desktop + Start Menu). Launch Stride from that shortcut and open a project + scene; the pipe server starts automatically. Your official Stride shortcut keeps launching Game Studio untouched. Remove everything with .\install-stride-wrapper.ps1 -Uninstall.
Option B: you build Stride Game Studio from source
The adapter loads in-process via a drop-in loader patched into Game Studio itself (no wrapper needed).
- Build Stride Game Studio from source (the adapter references its editor assemblies). See the Stride build docs.
- Add a drop-in plugin loader to
Stride.GameStudio/Program.cs(right after the built-in plugins are registered) so Game Studio loads any adapter placed in anAkerMcpPluginsfolder next toStride.GameStudio.exe:var akerPluginsDir = System.IO.Path.Combine(System.AppContext.BaseDirectory, "AkerMcpPlugins"); if (System.IO.Directory.Exists(akerPluginsDir)) foreach (var dll in System.IO.Directory.GetFiles(akerPluginsDir, "*.dll")) try { foreach (var t in System.Reflection.Assembly.LoadFrom(dll).GetTypes()) if (!t.IsAbstract && typeof(AssetsPlugin).IsAssignableFrom(t) && t.GetConstructor(System.Type.EmptyTypes) != null) AssetsPlugin.RegisterPlugin(t); } catch { /* skip incompatible DLLs */ } - Build + deploy the adapter into Game Studio with
setup-stride.ps1(set-StrideBinto your Game Studio build output), then launch Game Studio and open a project + scene; the plugin starts the pipe server when a project opens.
Either way, the standalone MCP server then discovers the Stride engine automatically, the same as Unity and Godot.
2. MCP Server Setup
- Go to the latest GitHub Release.
- Download the standalone server for your OS (
AkerMcp.Server-win-x64.zip,-osx-x64.zip, or-linux-x64.zip). - Extract the archive anywhere on your computer.
Connecting an AI Client
Point your AI client to the standalone executable you extracted in Step 2.
Important: Make sure the Unity plugin is running (green status in the AkerMcp window) before using any tools from the AI client.
Claude Code (CLI)
claude mcp add game-engine -- /absolute/path/to/extracted/AkerMcp.Server
Claude Desktop / Cursor / Windsurf
Open the MCP settings (or claude_desktop_config.json) and add the server:
{
  "mcpServers": {
    "game-engine": {
      "command": "/absolute/path/to/extracted/AkerMcp.Server",
      "args": []
    }
  }
}
Windows users: Replace the command path with the full Windows path to the
.exe, for example"C:\\Tools\\AkerMcp.Server\\AkerMcp.Server.exe". Remember to use double backslashes in JSON!
Google Antigravity
Antigravity reads mcp_config.json from its user-data directory (~/.gemini/antigravity/ or %USERPROFILE%\.gemini\antigravity\). Add:
{
  "mcpServers": {
    "game-engine": {
      "command": "C:/Tools/AkerMcp.Server/AkerMcp.Server.exe",
      "args": [],
      "type": "stdio"
    }
  }
}
VS Code + Copilot
Add to your .vscode/settings.json or use the MCP: Add Server command:
{
  "mcp": {
    "servers": {
      "game-engine": {
        "command": "C:\\Tools\\AkerMcp.Server\\AkerMcp.Server.exe",
        "args": []
      }
    }
  }
}
Alternative: Running from Source (For Developers)
If you cloned the repository or prefer running via the .NET SDK instead of using the standalone binaries, use dotnet run. This is often necessary if you are actively modifying the MCP server code.
CLI command:
claude mcp add game-engine -- dotnet run --project /absolute/path/to/AkerMCP/Server -c Release --verbosity quiet --nologo
JSON Configuration (for Claude Code config, Cursor, Antigravity, etc):
{
  "mcpServers": {
    "game-engine": {
      "type": "stdio",
      "command": "dotnet",
      "args": [
        "run",
        "--project",
        "C:/absolute/path/to/AkerMCP/Server",
        "-c",
        "Release",
        "--verbosity",
        "quiet",
        "--nologo"
      ]
    }
  }
}
Advanced: Building from Source (For Developers)
If you want to modify AkerMCP or test the included Unity project, you'll need the .NET 8.0+ SDK.
Step 1: clone and build
git clone https://github.com/lorenzo-cambiaghi/AkerMCP.git
cd AkerMCP
dotnet build -c Release
dotnet publish Shared/AkerMcp.Shared.csproj -c Release -o .publish
Step 2: Unity plugin setup
If you are modifying the source code and want to push changes to your own Unity project:
- Copy this repo's
plugins/unityfolder into your own Unity project asAssets/AkerMcp. - Create
Assets/AkerMcp/Plugins/and copy all.dllfiles from.publish/andClient/bin/Release/netstandard2.1/. - Copy the Unity Roslyn Compilers (
Microsoft.CodeAnalysis.dll, etc.) from your Unity Editor installation (.../Editor/Data/MonoBleedingEdge/lib/mono/4.5/) into thePlugins/folder.
If you just want to run the included sample, run ./setup-samples.sh (or setup-samples.bat on Windows) once to link the plugin into samples/unity, then ./copy-dlls.sh (or copy-dlls.bat) to build and copy all dependencies. Open samples/unity in Unity.
Packaging a Release
On Windows, .\publish-release.ps1 -Version v1.2.3 does the whole release in one command: builds the packages (Unity must be closed), tags the commit, creates the GitHub Release and uploads the five artifacts via the GitHub API (auth via GITHUB_TOKEN or the stored git credential). Use -DryRun to preview, -SkipBuild to reuse existing Build/ output.
The six release artifacts are: AkerMCP.unitypackage (Unity plugin), AkerMcp.Godot-addon.zip (Godot addon; extract into your project's addons/), AkerMcp.Stride-source.zip (Stride adapter source + install-stride-wrapper.ps1; build it against your Game Studio per 1c. Stride Setup; it is not a prebuilt binary because it links your specific Stride editor assemblies), and the three standalone server builds (AkerMcp.Server-{win,osx,linux}-x64.zip).
Alternatively, run build-package.bat (Windows) or ./build-package.sh (Mac/Linux) to only produce the artifacts in the local Build/ folder (gitignored), then upload them as release assets manually. Binaries are distributed via Releases, not committed to the repository.
Verifying the Connection
Once both the Unity plugin and an AI client are running, you can verify the connection:
- In Unity: the AkerMcp window should show Running (green)
- In the AI client: ask the AI to use the
inspecttool:
"Inspect the scene hierarchy"
You should get back a tree of objects with their components:
Player  [Transform, Rigidbody]
  PlayerCamera  [Transform, Camera]
Enemy_1  [Transform, MeshFilter, MeshRenderer, BoxCollider, Rigidbody]
Enemy_2  [Transform, MeshFilter, MeshRenderer, BoxCollider, Rigidbody]
Ground  [Transform, MeshFilter, MeshRenderer, MeshCollider]
If you see this, everything is working.
MCP Tools
Every tool definition rides in your client's context on every turn, so the set is layered. core (14 tools, about 2,300 tokens of definitions) is inspect, edit, execute, screenshot, logs and compile. standard (27 tools, about 4,100 tokens, the default) adds scripts, scenes, play control, the engine pin and the OS window tools that unblock a modal dialog. full (40 tools, about 6,800 tokens) adds sprite and sound authoring, the verification tools, playtest and the build pipeline. Pick one with --profile core in the server's arguments or AKER_MCP_PROFILE=core in its environment; AKER_MCP_TOOLS_INCLUDE=playtest,build_player adds single tools to a profile and AKER_MCP_TOOLS_EXCLUDE removes them. A call to a hidden tool answers with the profile that hid it and how to load it, and the handshake instructions list the hidden ones, so the model asks instead of guessing.
Every tool carries the four MCP hints (read-only, destructive, idempotent, open-world), so a client can auto-approve the reads and ask before delete, execute, call_method, send_input, write_script, new_scene, open_scene, switch_build_target and build_player.
Scene
| Tool | Profile | What it does |
|---|---|---|
inspect |
core | Components, properties, methods and children of a scene object or of a type; depth, include_methods, filter |
get_property |
core | Read one property by dot path (position, Rigidbody.mass, MeshRenderer.material.color.r) |
set_property |
core | Set one property by dot path, with undo; structs as JSON objects |
call_method |
core | Invoke a method on a scene object or a static member of a type; string arguments, converted |
query |
core | Find objects by type, name glob or regex, tag or property values |
create |
core | Add an object with a type, name, optional parent and initial properties, with undo |
delete |
core | Remove an object, with undo; recursive: false keeps its children |
select |
core | Select an object in the editor; it becomes selectedObject in execute |
get_selection |
core | What the user has selected: path, components, property summary |
Development workflow
| Tool | Profile | What it does |
|---|---|---|
refresh_scripts |
core | Compile pending script changes and return errors and warnings; blocks through Unity's domain reload |
get_compile_errors |
core | The last compilation's result without recompiling |
get_console_logs |
core | Recent console entries, filtered by level or text |
execute |
core | Run any C# on the engine's main thread through Roslyn and return its value; globals selectedObject, Find, FindAll<T>, Create, Log |
take_screenshot |
core | JPEG of the Game view (default) or the Scene view with gizmos |
write_script |
standard | Write a source file into the project by a path relative to its root, wherever the server runs |
engine_status |
standard | Which engine answers, which others run, and a pin that survives reconnects |
Scene and 2D authoring
| Tool | Profile | What it does |
|---|---|---|
new_scene |
standard | A fresh scene, 2D by default, optionally saved to an asset path |
open_scene |
standard | Open a scene by its engine asset path |
save_scene |
standard | Save the edited scene in place or to a path |
create_sprite |
full | Author a flat, geometric shape-spec; the server rasterises it to a PNG and imports it as a sprite on any engine |
create_sound |
full | Synthesise a short jsfxr-style sound and import it as an audio clip |
add_primitive |
full | Write a vetted gameplay script (2D platformer controller, auto-runner, camera follow, kill zone, score overlay) |
Engine support:
create_spriteimports + places a sprite on Unity and Godot; on Stride it persists a real.sdtextexture asset in the package (via the editor'sSessionViewModel) and also adds a runtime preview entity for immediate visibility.create_soundworks on Unity and Godot; Stride has no sound importer yet and says so.add_primitivecarries Unity variants only for now, and when it cannot serve your engine it names the ones a given primitive exists for.new_scene/open_scene/save_scenework on Unity and Godot (file-on-disk scenes) and on Stride (package-managedSceneAssetvia the editor).write_scriptworks on all three. (Stride'screate_sprite+ scene creation are verified live in Game Studio.)
add_primitive next to write_script: write_script writes the source you hand it, so the file is whatever the model composed. add_primitive writes a file the model did not compose. The server keeps five gameplay scripts that already work, picks the variant for the connected engine and sends it down the same write path. Call it with no id and it lists the catalog; call it with one and it reports the file it wrote, the public fields you can set, and what to do next.
id |
What it is | Public fields |
|---|---|---|
platformer_controller_2d |
Move and jump with ground check | moveSpeed, jumpForce, gravityScale, groundTag, jumpKey |
auto_runner_2d |
Constant forward run, jump on input | forwardSpeed, jumpForce, gravityScale, groundTag, jumpKey |
camera_follow_2d |
Smoothed follow with offset | target, offset, smooth, followY |
killzone_2d |
Kill on contact with a tag | deadlyTag, reloadOnDeath |
score_overlay |
On-screen score counter | score, label |
So: add_primitive for the piece every 2D prototype needs and nobody wants rewritten from scratch, write_script for the part that is yours. The Unity variants read input through the legacy Input Manager. Either way the file lands on disk, so refresh_scripts comes next, then attaching the component and setting the fields.
create_sprite shape-spec: drawn in order (painter's): ellipse, rect (with rx for rounded corners), polygon, line/polyline, and path (an SVG path-data subset). Each shape takes a fill (hex or linear gradient), optional stroke/strokeWidth, and opacity. Example (a flat bird placeholder):
{
  "name": "bird", "pixels_per_unit": 64, "pivot": {"x":0.5,"y":0.5},
  "scene_path": "/World", "position": {"x":-3,"y":0,"z":0},
  "spec": { "width":64, "height":64, "shapes": [
    {"type":"ellipse","cx":31,"cy":34,"rx":23,"ry":21,"fill":"#FFC107","stroke":"#C98A00","strokeWidth":2},
    {"type":"polygon","points":[[52,29],[64,33],[52,38]],"fill":"#FF8C00"} ] }
}
Keep placeholders flat and geometric: recognizable silhouette over detail. For arbitrary SVG (boolean paths, filters, tracing) a dedicated vector tool would be the right home;
create_spritedeliberately targets the clean-prototype niche.
Runtime loop
| Tool | Profile | What it does |
|---|---|---|
enter_play / exit_play |
standard | Run the project and stop it; Unity's domain reload and reconnect are handled |
get_play_state |
standard | Playing, paused, time, frame counter; read twice to tell a frozen game from a live one |
set_play_pause |
standard | Pause or resume |
send_input |
standard | Inject key, mouse button and mouse move events into the running game (window_title for a game in its own window) |
play_step |
full | Advance frames while paused |
capture_sequence |
full | Several screenshots at an interval, returned as a strip, to see motion |
Engine support: the runtime loop is backed by the optional
IPlayModeController(play control) and the optionalIInputSimulator(in-process input, with an OS-level fallback). Support is honest per engine:
- Unity, full: Play Mode runs in the Game View, so
take_screenshot/capture_sequencecapture the live game; pause/step supported. Reuses the domain-reload reconnect fromrefresh_scripts.- Godot, partial: the game runs in a separate window (screenshot it with
capture_window, drive it withsend_input's OS-level path +window_title); no editor-side pause/step.- Stride: Game Studio has no plugin-controllable Play Mode;
enter_playreports this and points you tobuild_player+ running the produced executable.- SkelForge, full: "play" plays the animation timeline in-editor; pause + frame-step supported; the viewport shows the pose.
send_inputprefers an engine's in-processIInputSimulator, otherwise focuses the game/engine window and injects via OS-levelSendInput(Windows; macOS/Linux report unsupported). On Unity the in-process path drives the new Input System (com.unity.inputsystem) directly, resolved via reflection, so there is no hard package dependency; projects on the legacy Input Manager (or without the package) fall back to OS-level automatically. On Godot/Stride the game is a separate window, so passwindow_title(the game window's title) or the OS-level path targets the editor. Theactionevent type is reserved but not yet injectable; drive the key/mouse controls the action is bound to.
Verify and iterate
| Tool | Profile | What it does |
|---|---|---|
sample_state |
full | Evaluate C# expressions in the running game and return their values |
assert_state |
full | Compare runtime expressions to expected values with ==, <, approx, truthy and friends, polled until they hold |
playtest |
full | One call: enter play, run a timed list of input, wait, capture, assert and sample steps, check the final criteria, exit play; returns one verdict with frames and evidence |
Platform and build
| Tool | Profile | What it does |
|---|---|---|
list_platforms |
full | The build platforms the engine knows, flagged active and buildable |
get_platform_settings / set_platform_settings |
full | Read and change a platform's build and player settings as a key-value map |
switch_build_target |
full | Make a platform the active target |
build_player |
full | Build the project for a platform and return a report |
Engine differences are handled gracefully: e.g. Godot and Stride have no global active target, so
switch_build_targetreports that and you pass the platform directly tobuild_player.
Windows on the server's machine
| Tool | Profile | What it does |
|---|---|---|
list_windows |
standard | Visible top-level windows: title, process, pid; works with no engine connected |
capture_window |
standard | Screenshot any window by a title substring, occluded or not, without stealing focus |
focus_window |
standard | Bring a window to the foreground, restoring it if minimised |
These three are how the model recovers from a modal dialog that blocks the editor's main thread, and how it screenshots a Godot game that runs in its own window.
How take_screenshot works
The tool follows a hybrid capture strategy that prefers quality but always succeeds:
- Engine-internal path (implemented by all three adapters): captures the Scene view directly from the editor's render buffer including gizmos (Unity
GrabPixels, Godot viewport, Stride editor back-buffer viaTexture.Save). Works even when the editor window is occluded or partially off-screen. Highest quality. - OS-level fallback (automatic, cross-platform on Windows + macOS): captures the engine's main window without stealing foreground focus. Works for any C# engine without requiring adapter code. Per-OS implementation is selected at runtime:
- Windows: Win32
PrintWindow(PW_RENDERFULLCONTENT)viauser32.dll - macOS: Quartz
CGWindowListCreateImageviaCoreGraphics.framework+ImageIO.framework. Window discovery: enumerates on-screen windows owned by the engine PID; among those, prefers any whose title contains the engine name (anywhere; it matches both "Unity 6000…" and "… Godot Engine") and within that subset picks the largest by area. If no title contains the engine name, falls back to the largest PID-owned window - Linux: not implemented; the engine adapter must implement
IScreenCapture
- Windows: Win32
Output is automatically (cross-platform via ImageSharp):
- Resized to a maximum of 1920px on the longest side
- Re-encoded as JPEG (quality 85)
Typical output size: ~150-400 KB, comfortably under Claude API image limits (~5 MB).
Parameters:
{ "view": "game" }   // default: captures the Game View
{ "view": "scene" }  // captures the active Scene View with gizmos (Unity / Godot / Stride)
Example:
→ set_property {"object_path": "/Player", "property_path": "Light.color", "value": {"r":1,"g":0,"b":0,"a":1}}
← Property 'Light.color' set successfully on /Player

→ take_screenshot {"view": "scene"}
← [JPEG image, 1920×1080, 287 KB]   // AI now sees the red light
macOS: Screen Recording permission
On macOS 10.15+, capturing windows from another process requires Screen Recording permission for the binary running the AkerMcp server. This affects only the OS-level path (capture_window and the take_screenshot fallback); the engine-internal IScreenCapture path (implemented by all three engine adapters) works without any permission grant.
First-time setup:
- The first time the OS-level fallback is invoked, macOS shows a permission prompt for the binary running the server (typically
dotnet). - If you miss the prompt or denied it, open: System Settings → Privacy & Security → Screen Recording
- Add (or enable the toggle for) the binary running AkerMcp:
- If you launch via
dotnet run --project Server→ the entry isdotnet(ordotnet [version]) - If you ship a self-contained build → the entry is your published executable
- If you launch via
- Restart the server. macOS caches the denial decision until the process restarts; granting alone is not enough.
Verification:
# Trigger a screenshot from your AI client. If permission is missing, the tool returns:
#   "macOS denied the screen capture (CGWindowListCreateImage returned NULL)..."
# Follow the steps above and try again after restarting the server.
Why no permission is needed for Unity (and most engines): The Unity adapter implements IScreenCapture using its own Camera/SceneView render buffer. That happens entirely inside the Unity process, so macOS doesn't treat it as cross-process screen capture and no permission is required. Only when no adapter capture exists does AkerMcp fall back to the OS-level path that triggers the permission flow.
Dynamic Code Execution (execute)
The execute tool runs arbitrary C# code inside the live editor, Unity, Godot or Stride, using Roslyn. This is the most powerful tool: it can do anything that engine's editor API allows, with no fixed tool surface.
What it enables:
- Procedural scene generation (spawn 100 objects in a grid, create terrain, etc.)
- Bulk property modifications across many objects
- Asset manipulation (create materials, import textures, modify prefabs)
- Complex queries that go beyond what
querysupports - Editor automation (menu items, build pipeline, custom importers)
- Anything you can do in an editor script for that engine
Built-in globals available in your code (shown for the Unity adapter; the Godot and Stride adapters expose equivalent globals over their own Node / Entity types):
| Global | Type | Description |
|---|---|---|
selectedObject |
GameObject? |
Currently selected GameObject in the editor |
Find(name) |
GameObject? |
Shortcut for GameObject.Find(name) |
FindAll<T>() |
T[] |
Find all objects of type T |
Create(name) |
GameObject |
Create a new empty GameObject |
Log(message) |
void |
Log to the Unity console |
Imported namespaces (no using needed): System, System.Collections.Generic, System.Linq, plus the engine's namespaces: UnityEngine/UnityEditor (Unity), Godot (Godot), Stride.Engine/Stride.Core.Mathematics (Stride).
Need another namespace? Add using ...; directives at the top of the snippet; they are hoisted to file scope automatically (e.g. using System.IO;).
Declaring types works too. A snippet is wrapped as a method body, but class, struct, interface, enum, record and delegate declarations are lifted to file scope before compiling, so helper classes, fake implementations of an interface, callback receivers and MonoBehaviours you then AddComponent all work directly, with no reflection workarounds. Access modifiers are adjusted for you (private class Foo is accepted), and local functions inside the body keep working as usual.
Examples (Unity-flavored; the same patterns apply with each engine's API):
// Create a grid of cubes
for (int x = 0; x < 5; x++)
    for (int z = 0; z < 5; z++) {
        var cube = GameObject.CreatePrimitive(PrimitiveType.Cube);
        cube.name = $"Cube_{x}_{z}";
        cube.transform.position = new Vector3(x * 2, 0, z * 2);
    }
// Set all enemies to red
var enemies = FindAll<Renderer>()
    .Where(r => r.gameObject.name.StartsWith("Enemy"))
    .ToArray();
foreach (var r in enemies)
    r.material.color = Color.red;
return $"Colored {enemies.Length} enemies";
// Return scene stats
var objects = FindAll<GameObject>();
var types = objects
    .SelectMany(go => go.GetComponents<Component>())
    .Where(c => c != null)
    .GroupBy(c => c.GetType().Name)
    .Select(g => $"{g.Key}: {g.Count()}")
    .ToArray();
return string.Join("\n", types);
Note: Each
executecall is compiled and run independently: variables do not persist between calls, so every script must be self-contained. The evaluator runs on Unity's main thread with full Editor API access;Debug.Logoutput produced during the run is captured and returned in theoutputfield.
How property paths work
Properties are accessed via dot-notation paths resolved at runtime through reflection:
transform.position.x          → float
Rigidbody.mass                → float (targets a specific component)
MeshRenderer.material.color   → Color
When a property name is ambiguous (e.g. enabled exists on multiple components), prefix it with the component type: Rigidbody.enabled, MeshRenderer.enabled.
MCP Resources
| URI | Description |
|---|---|
aker://guide |
The usage playbook as markdown: workflow, property paths, execute rules, screenshots, recovery. Served by the server, no engine needed |
scene://hierarchy |
Full scene tree with components listed per object |
project://info |
Engine name/version, project path, active scene |
editor://logs |
Recent console entries |
editor://compile_status |
Compilation status, error/warning counts |
engine://types |
Registered engine type names |
Type System
The serializer converts between JSON and .NET types via reflection. It handles:
- Primitives:
int,float,double,bool,string,enum - Structs: any value type, constructed from JSON via field/property matching
- Arrays:
T[]from JSON arrays - Lists:
List<T>from JSON arrays - Dictionaries:
Dictionary<string, T>from JSON objects - Nested types: recursive resolution (e.g.
BoundscontainingVector3fields) - Nullable: automatic unwrap
The Unity adapter registers optimized converters for:
Vector2  Vector3  Vector4  Vector2Int  Vector3Int
Quaternion  Color  Color32  Rect  RectInt
Bounds  BoundsInt  LayerMask
JSON examples:
{ "x": 1.0, "y": 2.0, "z": 3.0 }                                              // Vector3
{ "r": 0.5, "g": 0.0, "b": 1.0, "a": 1.0 }                                    // Color
{ "center": { "x": 0, "y": 0, "z": 0 }, "size": { "x": 10, "y": 10, "z": 10 }} // Bounds
[{ "x": 0, "y": 0, "z": 0 }, { "x": 1, "y": 1, "z": 1 }]                      // Vector3[]
Example Session
→ inspect {"target": "/Player"}
← {
    "typeName": "Rigidbody",
    "path": "/Player",
    "components": [
      {"name": "Transform", "enabled": true},
      {"name": "Rigidbody", "enabled": true}
    ],
    "properties": [
      {"name": "position", "type": "Vector3", "value": {"x":0,"y":1,"z":0}},
      {"name": "Rigidbody.mass", "type": "float", "value": 1.0},
      ...
    ],
    "childNames": ["PlayerCamera"]
  }

→ select {"object_path": "/Player/PlayerCamera"}
← {"selected": true, "path": "/Player/PlayerCamera", "name": "PlayerCamera",
    "components": [{"name":"Transform"}, {"name":"Camera"}]}

→ set_property {
    "object_path": "/Player",
    "property_path": "position",
    "value": {"x": 10, "y": 0, "z": 5}
  }
← Property 'position' set successfully on /Player

→ query {"type_filter": "Camera"}
← [{"path": "/Player/PlayerCamera", "type": "Camera", "name": "PlayerCamera"}]

→ refresh_scripts {}
← Recompilation requested. Status: idle
  Last compile: 14:32:05
  Result: SUCCESS
  No errors or warnings.

→ get_console_logs {"level_filter": "error", "count": 10}
← (No matching log entries)
Architecture
                  ┌──────────────────────┐
                  │  LLM (Claude, etc.)  │
                  └──────────┬───────────┘
                             │ JSON-RPC 2.0 / stdio
                  ┌──────────▼───────────┐
                  │    AkerMCP Server    │   .NET 8 console process
                  │   20+ MCP tools      │
                  │    5 MCP resources   │
                  └──────────┬───────────┘
                             │ Named Pipe + MessagePack
                  ┌──────────▼───────────┐
                  │   Engine Plugin      │   runs inside Unity / Godot / Stride / Flax
                  │   ISceneGraph impl   │
                  └──────────────────────┘
| Project | Target | Description |
|---|---|---|
AkerMcp.Shared |
netstandard2.1 | Protocol models, engine abstractions, reflection engine, serialization, IPC |
AkerMcp.Server |
net8.0 | MCP server: JSON-RPC over stdio, routes tool calls to the engine plugin |
AkerMcp.Client |
netstandard2.1 | Plugin base class: runs inside the engine, handles IPC and main-thread dispatch |
How it works
- The engine plugin starts a named-pipe server and writes a lock file to the system temp directory.
- The MCP server scans for lock files, connects to the pipe, and begins forwarding tool calls.
- The LLM sends JSON-RPC requests over stdio. The server forwards them to the engine plugin via MessagePack IPC and returns results as JSON.
- The engine plugin dispatches requests to the main thread, executes reflection-based operations through
ISceneGraph/ISceneNode, and returns results.
Property paths like transform.position.x are resolved at runtime by PropertyPathResolver, which walks the object graph via cached reflection metadata. Struct value-type propagation is handled automatically.
Project structure
AkerMCP/
├── AkerMcp.sln
├── Shared/                              AkerMcp.Shared (netstandard2.1)
│   ├── Protocol/                        JSON-RPC and MCP message models
│   ├── Abstraction/                     Engine-agnostic interfaces
│   ├── Reflection/                      PropertyPathResolver, inspector, cache
│   ├── Serialization/                   GenericSerializer, TypeRegistry
│   └── Ipc/                             Named pipe channel, binary framing
├── Server/                              AkerMcp.Server (net8.0 console app)
│   ├── McpServer.cs                     JSON-RPC dispatcher, MCP lifecycle
│   ├── ToolRegistry.cs                  40 tool registrations, handlers, profile pruning
│   ├── ToolDocs.cs                      every tool description, in one place
│   ├── ToolProfiles.cs                  core / standard / full
│   ├── ToolAnnotationTable.cs           the four MCP hints per tool
│   ├── ServerInstructions.cs            handshake instructions + the aker://guide resource
│   ├── ResourceRegistry.cs              6 resources, incl. the aker://guide playbook
│   ├── EngineConnection.cs              IPC client to engine plugin
│   ├── StdioTransport.cs                stdin/stdout transport
│   ├── ImageProcessor.cs                Resize + JPEG normalization (cross-platform via ImageSharp)
│   ├── SpriteRasterizer.cs              shape-spec → RGBA PNG (pure-managed ImageSharp.Drawing) for create_sprite
│   └── Platform/                        OS-level window capture
│       ├── IPlatformScreenCapture.cs    Common interface
│       ├── PlatformScreenCapture.cs     Runtime OS-based factory
│       ├── Windows/
│       │   └── WindowsScreenCapture.cs  Win32 PrintWindow + GDI+
│       └── Mac/
│           └── MacScreenCapture.cs      Quartz CGWindowListCreateImage + ImageIO P/Invoke
├── Client/                              AkerMcp.Client (netstandard2.1)
│   ├── EnginePluginBase.cs             Abstract base for adapters
│   ├── IpcRequestHandler.cs            Request routing and execution
│   ├── PluginDiscovery.cs              Lock-file based auto-discovery
│   ├── MainThreadDispatcherBase.cs     Thread-safe queue with TCS pattern
│   └── ClientConfiguration.cs          Client-side settings
├── plugins/                            Canonical engine adapters (the shippable plugins)
│   ├── unity/                          Unity adapter (→ Assets/AkerMcp in-project)
│   │   ├── UnitySceneGraph.cs           Scene traversal and node creation
│   │   ├── UnitySceneNode.cs            Reflection wrapper for GameObjects
│   │   ├── UnityTypeRegistration.cs     MessagePack types and aliases
│   │   └── Editor/                      Editor-only tooling
│   │       ├── DynamicEvaluatorV2.cs    Roslyn-powered C# execution engine
│   │       ├── McpEditorWindow.cs       Unity Editor UI for MCP server
│   │       ├── UnityCompilationSupport.cs Script compilation tools
│   │       ├── UnityEditorContext.cs    Active selection and console logs
│   │       ├── UnityMainThreadDispatcher.cs Unity main thread marshalling
│   │       ├── UnityScreenCapture.cs    Game/Scene view render-buffer capture
│   │       └── UnityMcpPlugin.cs        Plugin entry point
│   ├── godot/                          Godot 4.x (.NET) adapter (→ addons/aker_mcp in-project)
│       ├── AkerMcpEditorPlugin.cs       [Tool] EditorPlugin entry + main-thread pump
│       ├── GodotMcpPlugin.cs            EnginePluginBase subclass
│       ├── GodotSceneGraph.cs           Edited-scene traversal and node creation
│       ├── GodotSceneNode.cs            Reflection wrapper for Nodes (no components)
│       ├── GodotCapabilities.cs         Type resolution and engine metadata
│       ├── GodotTypeRegistration.cs     Vector/Color/Rect2/Aabb converters
│       ├── GodotMainThreadDispatcher.cs Queue drained by EditorPlugin._Process
│       ├── GodotEditorContext.cs        Selection, scene I/O, log buffer
│       ├── GodotCompilationSupport.cs   `dotnet build` + MSBuild diagnostics
│       ├── GodotScreenCapture.cs        Editor viewport capture
│       └── GodotCodeExecutor.cs         Roslyn-powered C# execution engine
│   └── stride/                         Stride (Game Studio) adapter (.csproj + sources)
│       ├── StrideMcpPlugin.cs           AssetsPlugin entry (Game Studio hook)
│       ├── StrideBootstrap.cs           Idempotent Register(), shared by both loaders
│       ├── StrideEnginePlugin.cs        EnginePluginBase (composed; hosts the IPC server)
│       ├── StrideSceneGraph.cs          Live edited-scene traversal
│       ├── StrideSceneNode.cs           Reflection wrapper for Entities + components
│       ├── StrideSceneBridge.cs         Quantum writes (undo) + editor-game access
│       ├── StrideCapabilities.cs        Type resolution and engine metadata
│       ├── StrideMainThreadDispatcher.cs WPF Dispatcher marshalling
│       ├── StrideEditorContext.cs       Selection + GlobalLogger console capture
│       ├── StrideCompilationSupport.cs  `dotnet build` + MSBuild diagnostics
│       ├── StrideScreenCapture.cs       Scene-view back-buffer capture (Texture.Save)
│       ├── StrideBuildManager.cs        Platform/build (executable projects)
│       └── StrideCodeExecutor.cs        Roslyn-powered C# execution engine
│   ├── stride-startuphook/             DOTNET_STARTUP_HOOKS bootstrap (binary-install path)
│   │   └── StartupHook.cs               Registers the adapter once Game Studio loads
│   └── stride-launcher/                Per-launch wrapper (sets the hook for the GS child only)
│       └── Program.cs                   Starts ../Stride.GameStudio.exe with the hook injected
├── samples/                            Minimal harness projects (open in the editor)
│   ├── unity/                          Unity project; Assets/AkerMcp → junction to plugins/unity
│   └── godot/                          Godot project; addons/aker_mcp → junction to plugins/godot
└── setup-samples.bat / .sh             Recreates the sample junctions after a clone
The plugins under
plugins/are the canonical, shippable source. Thesamples/projects are thin shells that link the plugin in via a directory junction (created bysetup-samples), so there is a single copy of each adapter; the editor edits it in place. The junctions are gitignored; runsetup-samplesonce after cloning.
Writing an Engine Adapter
To support a new engine (e.g. Godot, Stride, Flax), subclass EnginePluginBase and implement the required interfaces:
public class MyEnginePlugin : EnginePluginBase
{
    // Required
    protected override ISceneGraph CreateSceneGraph() => new MySceneGraph();
    protected override IEngineCapabilities CreateCapabilities() => new MyCapabilities();
    protected override IMainThreadDispatcher CreateDispatcher() => new MyDispatcher();

    // Optional
    protected override IEditorContext? CreateEditorContext() => new MyEditorContext();
    protected override IAssetManager? CreateAssetManager() => null;
    protected override ICompilationSupport? CreateCompilationSupport() => new MyCompilationSupport();
    protected override IScreenCapture? CreateScreenCapture() => new MyScreenCapture();
    protected override ISpriteImporter? CreateSpriteImporter() => new MySpriteImporter();
    protected override ISceneManager? CreateSceneManager() => new MySceneManager();
    protected override IPlayModeController? CreatePlayModeController() => new MyPlayModeController();
    protected override IInputSimulator? CreateInputSimulator() => new MyInputSimulator();

    protected override void Log(string message) { /* ... */ }
    protected override void LogError(string message) { /* ... */ }
}
| Interface | Purpose | Required |
|---|---|---|
ISceneGraph |
Scene tree traversal, create/delete, query | Yes |
ISceneNode |
Property get/set, method invocation, component listing | Yes |
IEngineCapabilities |
Type resolution, engine metadata | Yes |
IMainThreadDispatcher |
Marshal actions to the engine's main thread | Yes |
IEditorContext |
Selection, scene management, console logs | No |
IAssetManager |
Asset search, load, save, delete | No |
ICompilationSupport |
Script recompilation, error retrieval | No |
IScreenCapture |
Engine-internal render-buffer capture (Game/Scene view) | No; falls back to OS-level capture on Windows (PrintWindow) and macOS (Quartz). On Linux, this interface is required |
ISpriteImporter |
Import a server-rasterized PNG as a 2D sprite, optionally placing it in the scene (powers create_sprite) |
No; create_sprite reports it as unavailable if absent |
ISoundImporter |
Import a server-synthesized WAV as an audio clip, optionally placing a source in the scene (powers create_sound) |
No; create_sound reports NOT_SUPPORTED if absent, as on Stride |
ISceneManager |
Create / open / save scenes (powers new_scene/open_scene/save_scene) |
No; the scene tools report it as unavailable if absent |
IPlayModeController |
Start/stop play, pause/step, read play state (powers enter_play/exit_play/set_play_pause/play_step/get_play_state) |
No; the play tools report NOT_SUPPORTED if absent |
IInputSimulator |
Inject synthetic input in-process (powers send_input) |
No; send_input falls back to OS-level window injection if absent |
Tip for the macOS OS-level fallback:
IEngineCapabilities.EngineNameis used as a window-title preference signal: the macOS capture path prefers PID-owned windows whose title contains this string (anywhere in the title) to disambiguate the editor's main window from inspector/floating panels. The match is case-insensitive and works for both prefix-style titles (Unity:"Unity 6000.x …") and suffix-style titles (Godot:"Scene - Project - Godot Engine"). If no window matches, the largest PID-owned window is used as a fallback, so even a non-matchingEngineNamewon't break the capture.
Register custom type converters for engine-specific structs:
TypeRegistry.Instance.RegisterCustomSerializer<Vector3>(
    v => new Dictionary<string, object?> { ["x"] = v.x, ["y"] = v.y, ["z"] = v.z },
    d => new Vector3(F(d, "x"), F(d, "y"), F(d, "z"))
);
Two sessions, as they happened
Two sessions on a real project, told as they happened. They show what the loop looks like when the model can inspect, execute and look.
Case Study 1: The "Invisible" GPU Bug
A developer's Custom Voxel Ambient Occlusion (AO) was rendering completely flat, making underground caves far too bright.
- Without AkerMCP, an AI assistant is blind. It can only read your shader code, guess what might be wrong, and give you a list of 5 things to check manually. You are left recompiling, entering Play Mode, attaching debuggers, and iterating blindly for hours because the state lives entirely in GPU memory.
- With AkerMCP, the AI sits at your desk:
- Visual Verification: By calling
take_screenshoton the Scene View, the AI visually confirmed the user's report: "The overall look is flat and washed out. The caves aren't dark at all." - Dynamic Editor Control: The AI wrote an on-the-fly C# Roslyn script via the
executetool to force theVoxelWorldGIpipeline into a pure "Debug 10 (Grayscale AO)" mode. A second screenshot confirmed the AO channel was completely white (AO ≈ 1.0). - CPU Memory Inspection: To check if the voxelization was failing, the AI wrote another script to read the
_cellsarray in CPU memory, counting 29,408 occupied solid voxels. Voxelization was working perfectly. - 3D Texture Readback: Realizing the bug was in the Cone-Tracing pass, the AI wrote a complex script to perform a GPU readback of the
Texture3Dradiance buffer. Unity only returned the 0-depth slice by default, so the AI rewrote its script to iterate and aggregate all 104 volume layers. - The Smoking Gun: By analyzing the aggregated buffer, the AI discovered the alpha channel was mirroring the raw occupancy data instead of the calculated AO. It immediately pinpointed the exact failure: an empty mip-map chain generation step meant the cones couldn't trace any occlusion.
- Visual Verification: By calling
In just minutes, the AI diagnosed a complex, data-dependent GPU bug. It didn't just write code; it acted as a Technical Artist, triggering Editor pipelines, reading multidimensional arrays from VRAM, taking visual snapshots, and confirming hypotheses through interactive feedback.
Case Study 2: The "Context-Aware" Shader Architect
In another session, the user wanted standard (non-voxel) meshes to react to the lighting data generated by the custom Voxel Engine.
- Without AkerMCP: The AI might provide generic HLSL code. The user would have to manually create the
.hlslinclude files, figure out how to wire them up to Unity's Shader Graph as Custom Function Nodes, and hope the variable names matched the engine's internals. - With AkerMCP (and LynxMCP):
- The AI searched the project's custom C# and Shader code to understand exactly how the Voxel Engine stored its lighting buffers (e.g.
_VoxelGridMipped). - It wrote an HLSL include file specifically tailored to the project's architectural quirks.
- Using the
executetool, the AI tapped into Unity'sAssetDatabaseto automatically create and save the.hlslfiles in the correctAssets/directory. - It didn't stop at the code. Recognizing that Unity Shader Graphs are JSON files under the hood, the AI used the
executetool to programmatically construct and save a complete.shadergraphasset directly into the project. This graph automatically wired up the new HLSL Custom Function Node to the PBR Master node. - Visual A/B Testing (Zero User Input): Finally, the AI didn't just assume it worked. It used
executeto create a new Material using the generated shader, spawned two identical test objects in the scene, one with a standard shader and one with the new Voxel GI shader, and applied the materials itself. It then took atake_screenshotto visually compare them side-by-side, proving the custom Global Illumination was contributing correctly, completely autonomously.
- The AI searched the project's custom C# and Shader code to understand exactly how the Voxel Engine stored its lighting buffers (e.g.
AkerMCP turns the AI from a simple "code generator" into an autonomous Technical Artist that not only writes the shaders, but natively integrates them into the engine's asset pipeline.
How the model learns to use it
Nothing to install on the client side. The server sends its usage instructions in the MCP handshake, with the tool list: the inspect, modify, verify order; the property path syntax; the execute rules (nothing persists between calls, always return a value, using lines at the top, the timeout only stops the wait); what to do after writing a script; how to dismiss a modal dialog. They name only the tools of the active profile and list the hidden ones with the way to load them. The full playbook is the aker://guide resource, markdown a client can read on demand, and it needs no engine.
If your client honours a project rules file (CLAUDE.md, AGENTS.md, .cursor/rules/), the same text can live there: ask the model to read aker://guide and save it, or copy it from Server/ServerInstructions.cs. Earlier versions of this README carried a 250-line template here for that purpose; the handshake replaced it.
Troubleshooting
The AI says a tool "is not loaded in tool profile 'standard'"
The default profile hides the authoring, verification and build tools. Start the server with --profile full (or AKER_MCP_PROFILE=full), or add just that tool with AKER_MCP_TOOLS_INCLUDE=playtest. See MCP Tools.
The server says "No engine plugin discovered"
The Unity plugin must be started before the MCP server. Open Window → AkerMcp in Unity and click Start first.
Unity shows DLL loading errors
Make sure you copied all DLLs from the .publish/ folder, including System.Text.Json.dll. Unity does not ship this library by default.
Property not found on component
Prefix the property with the component type name: Rigidbody.mass instead of just mass. This disambiguates when multiple components share property names.
The first server start is slow
dotnet run compiles the server on first launch. Subsequent starts are fast. You can also use dotnet build -c Release ahead of time, then run the compiled binary directly:
./Server/bin/Release/net8.0/AkerMcp.Server
Connection drops after Unity recompiles scripts
Domain reload in Unity tears down the plugin to safely release file locks. Re-click Start in the AkerMcp window after a recompile. The MCP server features an infinite background retry loop and will automatically detect the new instance and reconnect; you do not need to restart the server.
macOS: take_screenshot returns "macOS denied the screen capture"
Only happens when the OS-level fallback is used (engine adapter doesn't implement IScreenCapture). Open System Settings → Privacy & Security → Screen Recording, enable the entry for the binary running the server (typically dotnet), then restart the server; macOS caches the denial decision until the process restarts. See macOS: Screen Recording permission for the full procedure.
macOS: take_screenshot returns "No on-screen window found for PID"
Only happens with the OS-level fallback. The engine's main window cannot be located via title prefix. Verify that IEngineCapabilities.EngineName in your adapter matches the actual editor window title prefix (e.g. "Unity" for Unity Editor). The match is case-insensitive but must be a prefix.
Unity says "Opening file failed: Access is denied"
If you downloaded the repository as a ZIP or cloned it on Windows, Unity might complain about .asset or .meta files being read-only. To fix this:
- Right-click the
samples\unityfolder in Windows Explorer. - Go to Properties.
- Uncheck the Read-only box and click Apply (apply to all folders, subfolders, and files).
Alternatively, open Command Prompt and run:
attrib -R "samples\unity\*.*" /S /D
License
Установка AkerMCP
У этого сервера нет опубликованного пакета — он собирается из исходников. Открой репозиторий и следуй инструкции в README.
▸ github.com/lorenzo-cambiaghi/AkerMCPFAQ
AkerMCP MCP бесплатный?
Да, AkerMCP MCP бесплатный — установка в пару кликов через Unyly без оплаты.
Нужен ли API-ключ для AkerMCP?
Нет, AkerMCP работает без API-ключей и переменных окружения.
AkerMCP — hosted или self-hosted?
Self-hosted: сервер запускается локально на твоей машине командой из раздела установки.
Как установить AkerMCP в Claude Desktop, Claude Code или Cursor?
Открой AkerMCP на unyly.org, выбери вкладку своего клиента (Claude Desktop, Claude Code, Cursor) и нажми Install — конфиг сгенерируется автоматически, без правки JSON.
Похожие MCP
Fetch
Web content fetching and conversion for efficient LLM usage.
Roblox Studio
Enables AI coding tools to control Roblox Studio for workspace exploration, instance manipulation, and script management. It provides tools for playtesting, sce
 автор: paralov
Opencode Omniroute Plugin
OpenCode plugin for the OmniRoute AI Gateway. Drives dynamic model discovery, /connect auth flow, and multi-instance OmniRoute providers via the official @openc
 автор: GitHub Actions
AWS KB Retrieval
Retrieval from AWS Knowledge Base using Bedrock Agent Runtime.
 автор: modelcontextprotocol
Spring AI MCP Server
Provides auto-configuration for setting up an MCP server in Spring Boot applications.
llm-analysis-assistant
A very streamlined mcp client that supports calling and monitoring stdio/sse/streamableHttp, and can also view request responses through the /logs page. It also
 автор: xuzexin-hz
MCP-Agent
A simple, composable framework to build agents using Model Context Protocol by [LastMile AI](https://www.lastmileai.dev)
 автор: lastmile-ai
Spring AI MCP Client
Provides auto-configuration for MCP client functionality in Spring Boot applications.
mcp.natoma.ai
A Hosted MCP Platform to discover, install, manage and deploy MCP servers by [Natoma Labs](https://www.natoma.ai)
MCPHub
Website to list high quality MCP servers and reviews by real users. Also provide online chatbot for popular LLM models with MCP server support.
Compare AkerMCP with
Не уверен что выбрать?
Найди свой стек за 60 секунд
Автор?
Embed-бейдж для README
Похожее
Все в категории ai