
AutoMCP
FreeNot checkedAutomatically converts CLI tools, APIs, and programs into MCP servers for LLM and agentic use, enabling rapid integration without manual server implementation.

About
Automatically converts CLI tools, APIs, and programs into MCP servers for LLM and agentic use, enabling rapid integration without manual server implementation.
README
What is AutoMCP?
Integrating traditional CLI tools and APIs with modern Large Language Models (LLMs) and agentic platforms is often a complex and time-consuming process. Developers typically need to write custom servers, wrappers, or interfaces to make their tools accessible to LLMs, slowing down innovation and interoperability.
AutoMCP solves this problem by providing an automated framework that bridges the gap between existing CLI tools, APIs, and the latest interoperability standards for LLMs, such as the Model Context Protocol (MCP). With AutoMCP, developers can rapidly extend their tools for LLM and agentic use—without having to manually implement new servers or utilities—enabling faster integration, experimentation, and adoption in AI-driven workflows.
🌟 Key Features
- CLI
- MCP Server
- Supported Protocols:
- Model Context Protocol (MCP)
- Universal Tool Calling Protocol (UTCP) [Future Scope]
- Agent2Agent (A2A) [Future Scope]
- MCP Gateway [Future Scope]
- API Support (OpenAPI and Swagger) [Future Scope]
- Sourcing man pages [Future Scope]
🚦 Getting Started
Pre-requisites
- OpenAI-compliant LLM Service (Mistral Small, Llama 3.3, Granite 3, 8b+ model)
- Python 3
Environment Setup
# Setup virtual environment
pip install uv
uv venv --python 3.9
source .venv/bin/activate

# Install Dependencies
uv sync

# Install automcp
uv pip install -e .
LLM Setup
Create .env file: cp .default_env .env
Update the following properties in the .env file:
- MODEL_BASE_URL: OpenAI base url for LLM (/v1 endpoint)
- MODEL_KEY: API token for LLM.
- MODEL_NAME: Name of the LLM model.
Usage
AutoMCP can be run in two modes: as a standalone CLI tool, or as an MCP server that you can connect to using your preferred MCP clients or hosts.
💻 Mode 1: Standalone
In the standalone mode, the automcp can take CLI programs as input and output the MCP server.
source .env

# Run automcp
$ uv run automcp create --help
Usage: automcp create [OPTIONS]

  Create an MCP server for a given program

Options:
  -p, --program TEXT        Path to script, CLI, or executable. Can be
                            specified multiple times.  [required]
  -hc, --help_command TEXT  Name of the help command
  -o, --output TEXT         Save path for the MCP server
  --help                    Show this message and exit.


# Generate mcp server for a single command
$ uv run automcp create -p "podman images" -o ./server.py

# Generate mcp server for multiple commands
$ uv run automcp create -p "podman container list" -p "podman logs" -p "podman images" -o ./podman.py

# Generate mcp server for complex command (with sub-commands)
$ uv run automcp create -p "helm repo" -o ./helm.py
🖥️ Mode 2: MCP Server
AutoMCP also provides MCP server that lets you create MCP servers from a MCP client.
You can start the MCP server with automcp cli by running the command:
uv run automcp run
If you want to register the AutoMCP MCP server in cursor or claude, then you can add the following json configuration to your mcp.json:
"automcp-server":{
    "command": "uv",
    "args": [
        "run",
        "automcp",
        "run"
    ],
    "env": {
        "MODEL_BASE_URL": "...",
        "MODEL_KEY": "...",
        "MODEL_NAME": "..."
    }
}
Currently users need to manually register the ouput server with their tools.
⚙️ How it works?
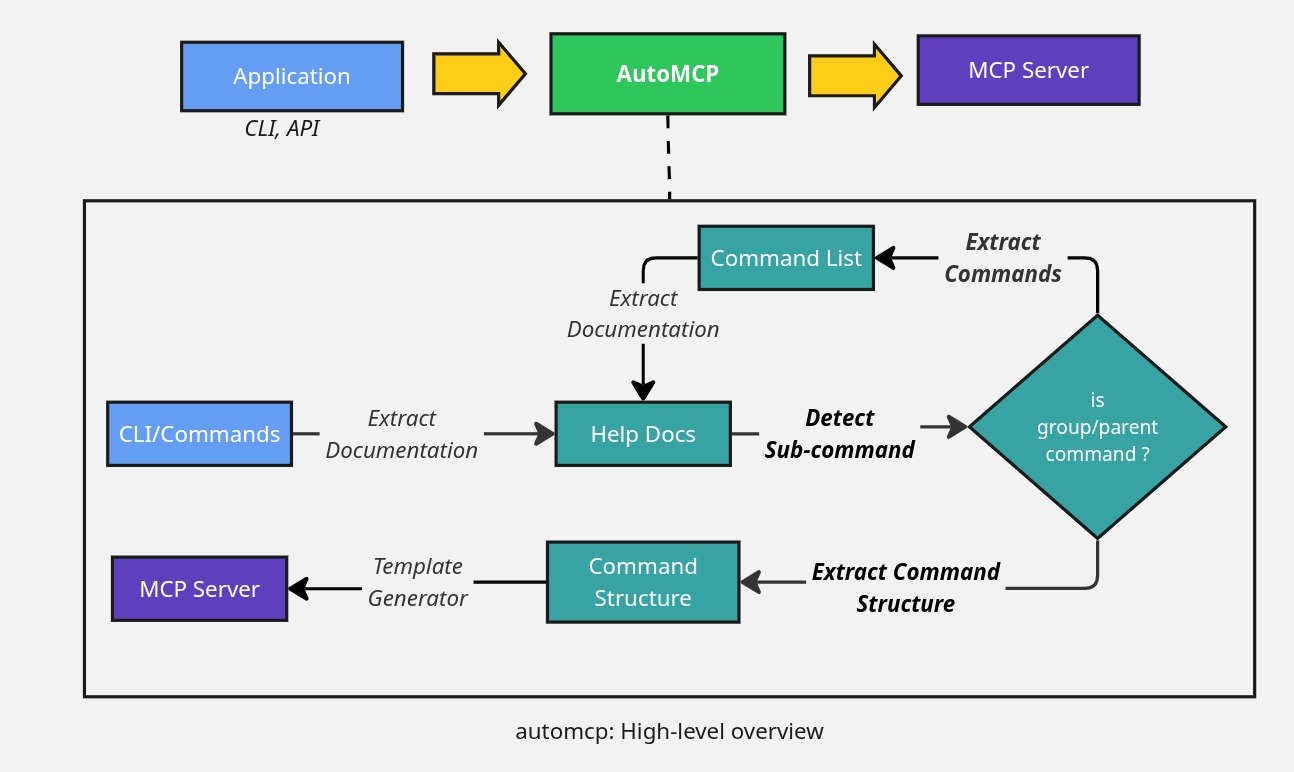
automcp uses an LLM workflow to process CLI help documentation and generate MCP server.
At the core of project, is the llm modules that defines multiple LLM agents each used in different parts of the CLI help text processing.
Detect Sub-Command: This agent is responsible for evaluating whether the given help text contains sub-commands or not.
Extract Command List: Agent to extract list of sub-commands.
Extract Command: Agent to extract command details (description, arguments, flags, etc).
The interaction with the actual LLM server is done through the standard OpenAI client. LLM outputs are structured by using OpenAI client support for PyDantic Data Modeling library.
The generation of MCP server is done through Jinja2 templating library and you can find the details about the generator and template under templates directory.
⚠️ Limitations
- The MCP server registration with tools like Cursor or Claude must currently be done manually.
- Only supports CLI tools with standard help output; highly custom or interactive CLIs may not be parsed correctly.
- LLM-based extraction may occasionally misinterpret complex or ambiguous help texts.
- Generated MCP servers may require manual review or adjustment for edge cases.
- Performance and accuracy depend on the quality of the underlying LLM and help documentation.
Install AutoMCP in Claude Desktop, Claude Code & Cursor
unyly install automcpInstalls into Claude Desktop, Claude Code, Cursor & VS Code — handles npx, uvx and build-from-source repos for you.
First time? Get the CLI: curl -fsSL https://unyly.org/install | sh
Or configure manually
Run in your terminal:
claude mcp add automcp -- uvx automcpFAQ
Is AutoMCP MCP free?
Yes, AutoMCP MCP is free — one-click install via Unyly at no cost.
Does AutoMCP need an API key?
No, AutoMCP runs without API keys or environment variables.
Is AutoMCP hosted or self-hosted?
Self-hosted: the server runs locally on your machine via the install command above.
How do I install AutoMCP in Claude Desktop, Claude Code or Cursor?
Open AutoMCP on unyly.org, pick your client tab (Claude Desktop, Claude Code, Cursor) and press Install — the config is generated automatically, no JSON editing.
Related MCPs
Fetch
Web content fetching and conversion for efficient LLM usage.
AWS KB Retrieval
Retrieval from AWS Knowledge Base using Bedrock Agent Runtime.
 by modelcontextprotocol
Spring AI MCP Server
Provides auto-configuration for setting up an MCP server in Spring Boot applications.
llm-analysis-assistant
A very streamlined mcp client that supports calling and monitoring stdio/sse/streamableHttp, and can also view request responses through the /logs page. It also
 by xuzexin-hz
Compare AutoMCP with
Not sure what to pick?
Find your stack in 60 seconds
Author?
Embed badge for your README
Browse similar
All ai MCPs